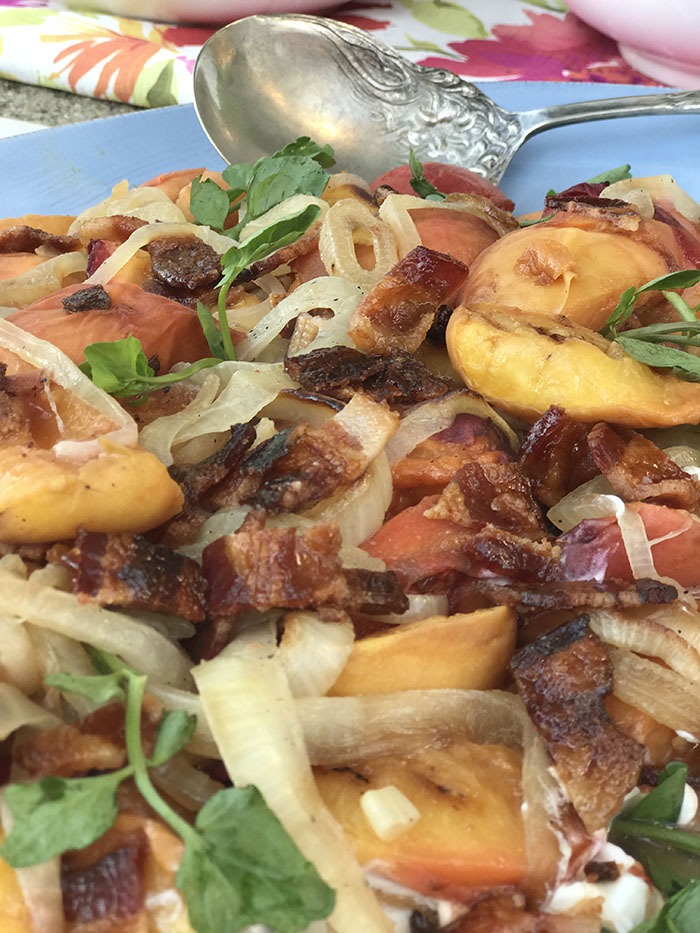
Oh my! Oh my! Oh my! The Salad Palooza is the mother of all Pot Luckys! What a feast! What a gathering! What fierce women bound together by emulsified vinaigrettes! Ok, there were other things to unite over and celebrate. And this GNO (Girls Night Out) took things to a whole next level. My pal and blog bestie Stacie pulled out all the stops gathering up the gals for a gorgeous summer night at her lakeside cottage. The only call to action was salads – home-made, of course – and to try and not bring duplicates. Sign Up Genius makes it easy to keep track of choices made and helps weed out repeats. Above is Amey’s yumster Charred Peaches & Onions, with watercress, candied bacon and chevre. So good!
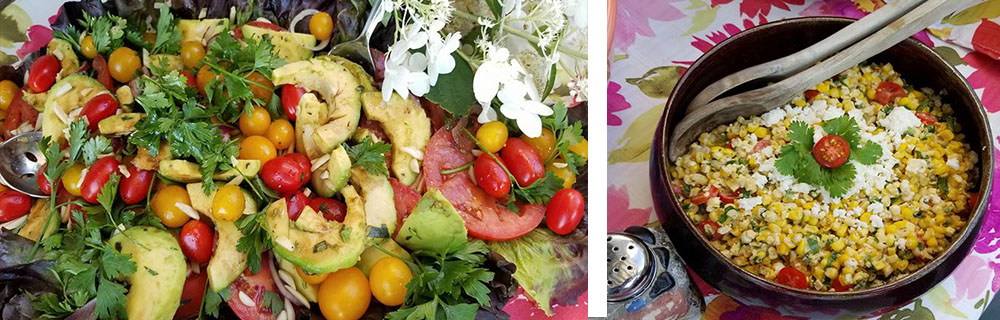
Avocado & Tomato Salad with Almonds and a Tarragon Balsamic; Gourmet Mexican Street Corn Salad.
Pot Luckys, for those readers that are new, are my answer to the dreaded pot luck. The emphasis is on the Lucky. Menus are curated around a theme and the goal is to avoid the Velveeta cube with frilly pick. Don’t think you are fooling anyone by topping that cube with a chunk of Slim Jim. That does NOT make it special. I’m on to you. I know, I know not everyone that you want (HAVE?) to invite cooks, so there are definitely jobs for them, too….How much wine CAN you carry? Do my dishes – yes, please. Set up? Break Down? Keep my drink cold? Yes, Yes, and Yes.
In addition to the main theme – salads this time – there is always room for an app or two, a signature drink and of course dessert. How much do you love these cheese wafers below? Someone does:) They remind me of Christmas parties, warm from the oven. I have a real soft spot for them.
We’ve done about a dozen Pot Luckys so far with a good list of more to come. Some of my favorites include fajitas, soup exchange, sliders, and a nautical theme. For details on how to host your own, link here. Depending on the party (8 kinds of meatloaf and 6 flavors of soup), you can plan on leftovers for your freezer. But for other themes, like salad palooza, you can expect the flowers to get licked right off the dish, with nothing but amazing memories to take away.
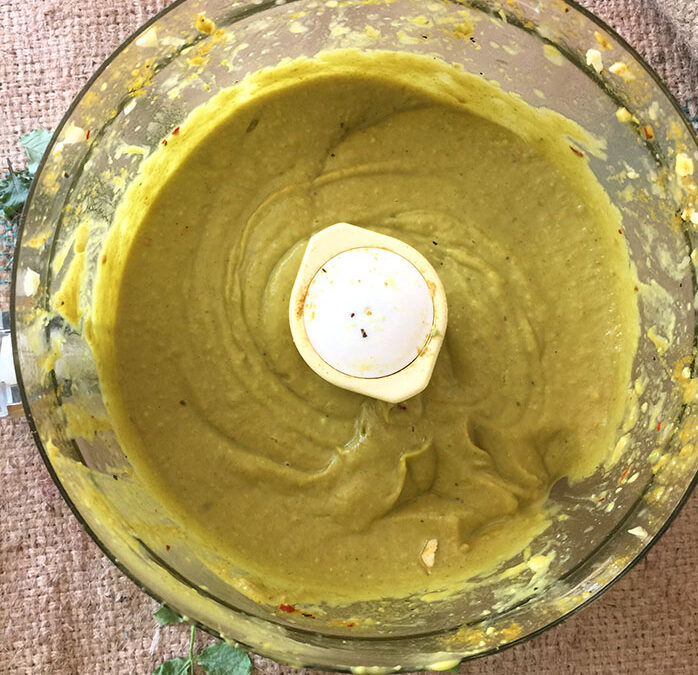
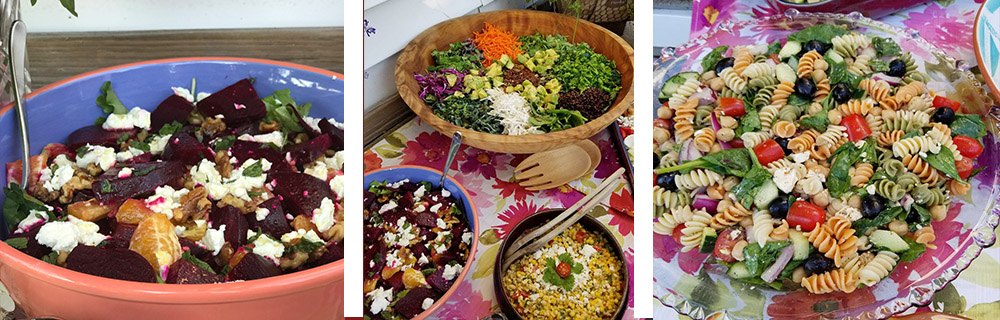
That middle salad in the large wooden bowl is mine. In case you missed the curried avocado dressing, I’m sharing it again below. This dressing can do just about anything – it’s a real workhorse. But keep scrolling – there are alot more great salad ideas below the recipe!
This is the kind of dressing you can slather on anything and everything. It is a game changer for a quiet romaine and it balances out the earthiness of a strong bitter green like kale. Slap it on a sammy, add it to a salad jar, or dunk your veggies in it.
Ingredients
Scale
1 Tablespoon ground cumin
1 teaspoon ground coriander
1 teaspoon ground turmeric
3 cloves garlic, peeled
1 1/2 ripe avocados, peeled, pitted, cut into chunks
3/4 cup white balsamic vinegar
1/2 teaspoon salt
1/4 teaspoon ground black pepper
1/4 teaspoon red pepper flakes
1/2 cup extra virgin olive oil
1/4 cup water, or as needed
Instructions
In a small sauté pan, toast the cumin, coriander and turmeric for about one minute, until fragrant.
With the motor running, drop the garlic into the bowl of a food processor. Turn off and add the avocados, pulsing a few times to a chunky puree. Add the vinegar, toasted spices, salt and peppers and pulse several times until combined.
With the motor running, drizzle in the olive oil until smooth, adding water as needed to desired consistency.
Notes
Makes 2 1/2 cups. Store in the refrigerator, in an airtight container.
This dressing is designed for a hearty green and grain salad, so is aggressively seasoned. If you want to use this creamy green goodness in a more delicate dish, cut back on the spices and garlic a bit.
If you don’t have white balsamic, use another mildly flavored and light colored vinegar, like rice vinegar.
Prep Time:5 minutes
Category:Dressing
Method:Food Processor
Cuisine:American
Keywords: salad, salad dressing
Meanwhile back at the party, the fun continues….
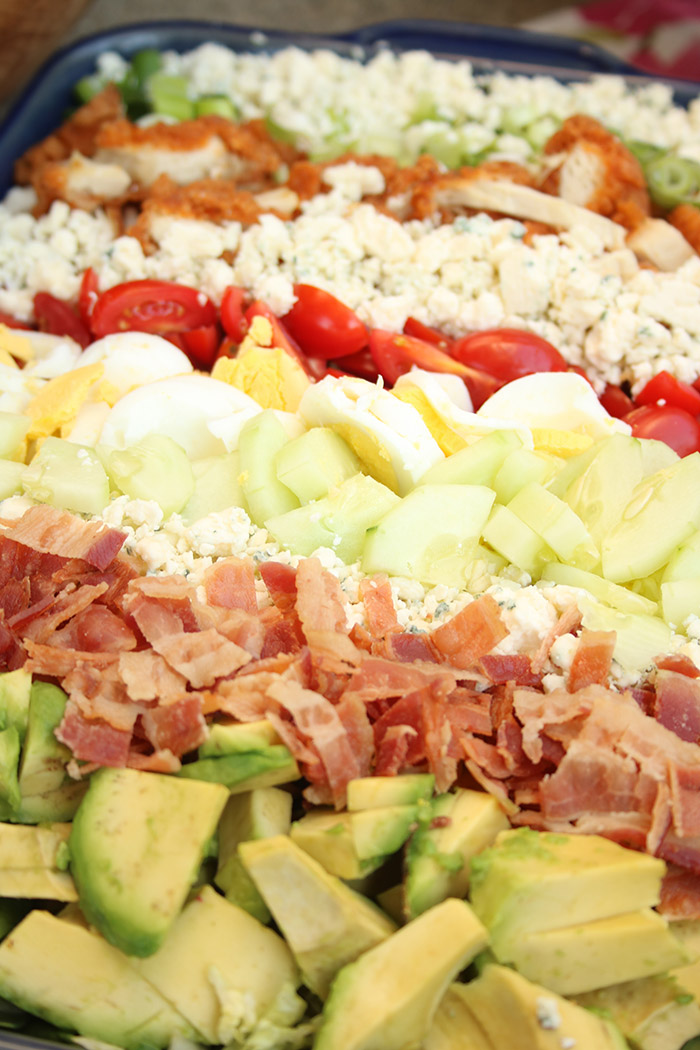
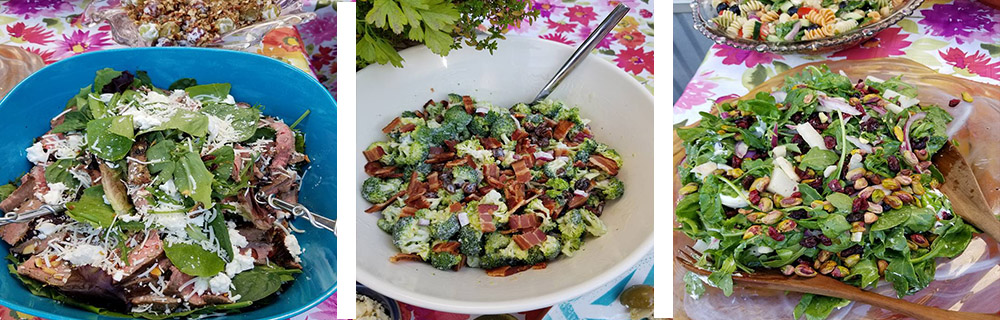
Word must have gotten out that Cobb is one of my favorites – avocado, bacon, blue cheese, cucumbers, eggs, tomatoes, chicken, spinach – what could be bad?
You will be amazed how creative guests can be when challenged to pull out all the stops. At least I was – once again! I have been to many a party where there were three or four versions of crunchy pea salad or watermelon & feta, but nothing close to overlap occurred here. In lieu of Sign Up Genius, Stacie set up a private facebook page and made a few suggestions, and then guests weighed in on what they had in mind. It really sparked the imagination. Farmers’ Market finds reigned supreme.
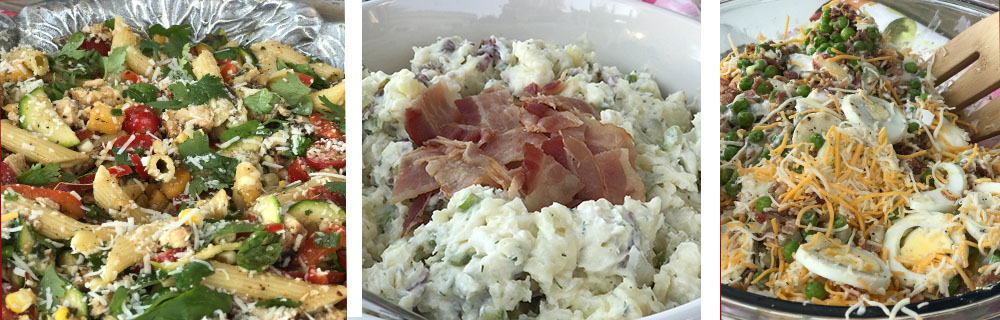
Penne with Chicken, Zucchini, Tomatoes and Corn; Red Skin Potato Salad with Prosciutto; 7 layer Salad.
And bacon – you can never go wrong with bacon. Lest you think these were some girly spa salads, look again. While my salad was vegan, it was hearty and robust and chock-full of plant-based protein, while still feeling indulgent. The variety of colors, textures, flavors and aromas across the buffet was extraordinary.
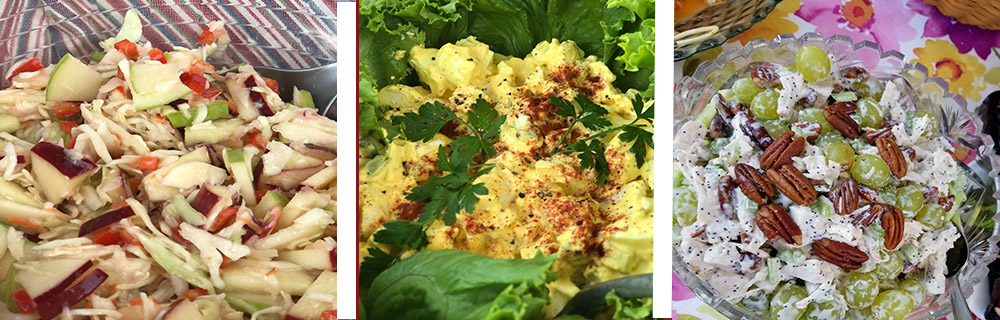
Go ahead and admit it: you are just a little jealous that the egss in the salad below were just laid. AmIRite?
Apple Cole Slaw; Farm Fresh (no really – straight from the hen house) Egg Salad; Grapes & Pecans.
Thanks to Stacie for hosting and recruiting so many wonderful women who know how to spin a salad.
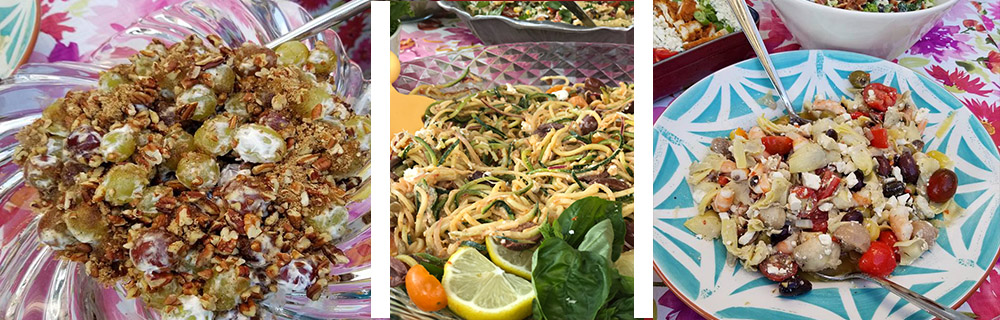
Chicken Salad with Grapes & Pecans; Greek Zoodle Salad; Mediterranean Shrimp Salad with Artichoke Hearts.
Did you see a salad here that you’d like to try? If so, leave a comment below and I’d be happy to bring more of these recipes to life. Did you know I used to create recipes for CNN and Burt Wolf interviewing chefs around the globe? I’d watch the 60-second edited video and create a tasty recipe that matched all the action. Shhh – top secret. I’ve already said too much.
With pretty much all 19 bowls licked clean, blueberry pie sent us out and on our merry way. I’ll be dreaming about this feast for summers to come. Many thanks to all that made this night so special.
That glow is just a reflection from this sunset. I swear it!
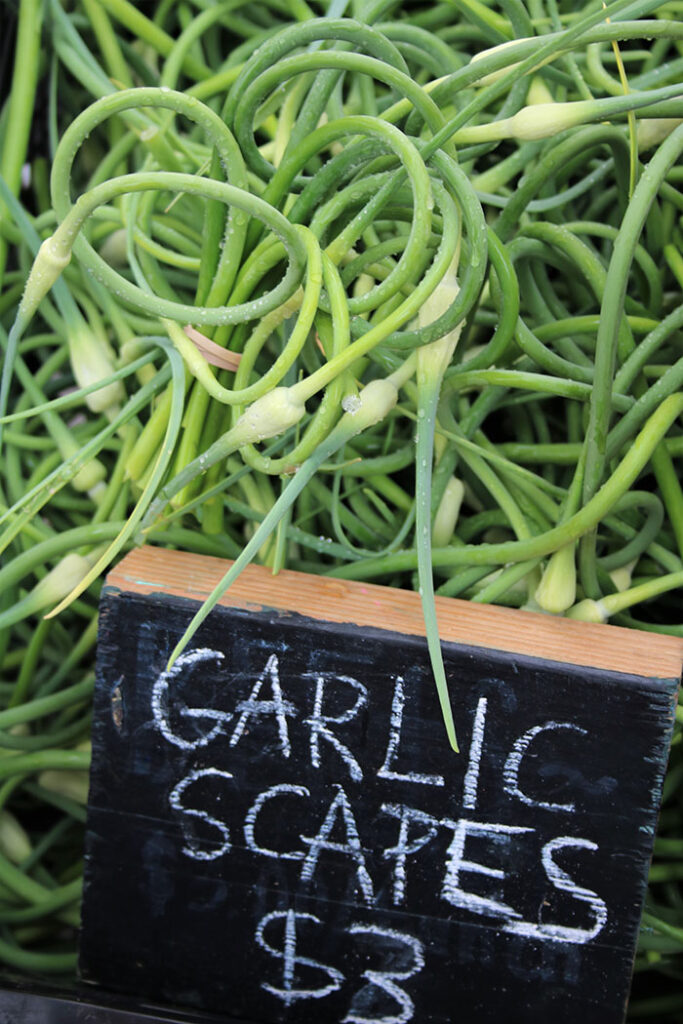
Finally! Ermahgerd!!!! Did you think that winter would ever end?? I for one did not. Today in NYC it was 90 and stickeeeeeeeeeeeeeeeeeeeee! But that means not only are the farmers’ markets in full spring swing, they are pushing out the bounty that Mother Earth shares this time of year. Garlic scapes! Remember them? I am scooping them up to dose plain ole pesto with these fresh shoots and flowering stems of the garlic bulb, while also jam-packing the processor with not only basil, but also arugula and parsley. Arugula and Garlic Scape Pesto! Oh yeah!!
Those growing garlic will be familiar with this curlicue that shoots up from the buried bulb. I’m sending out this scape pesto recipe now because my readers are scattered across the globe, and it is found from May through July, depending on where you are. It usually starts shooting up about a month after the bulb’s first leaves, and many will cut it back and compost to stop diverting energy so the bulb itself can fatten up. Resist! Just say no! Cut back, but don’t compost. There are many things you can do with these stems, from chopping and adding to a potato salad, to making sauces like this scape pesto, to making those cute bundles below. They can be eaten raw, blanched, roasted or grilled. For a deep dive on all things you can do with these divine shoots, check out (and follow) Suzie Durigon at Just Crumbs. She has a wonderful post on everything you always wanted to know about scapes.
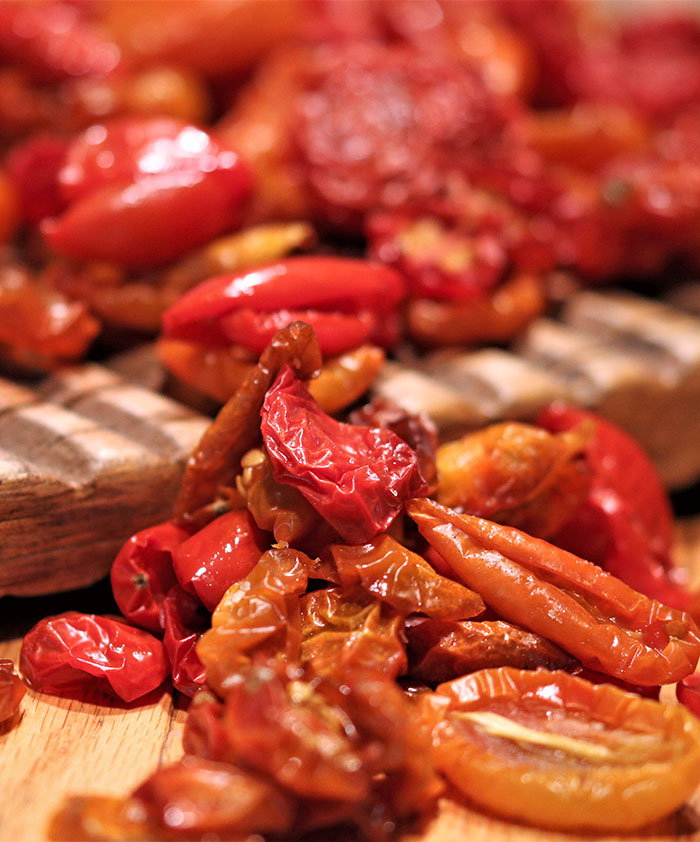
Try to find a farmer that will sell you a big bag. They last a month or so in a plastic bag in the fridge, and buying them by the piece can get pricey. I have seen them for a quarter each, but I shop at the end of the day and dazzle farmers with my true appreciation for this shoot. I can usually make off with a 2-gallon ziplock filled for just $10. As long as you are successful in your hunt, why don’t you whip up a batch of Roasted Garlic Scapes? You won’t be sorry. They have that I-want-more-ish quality like salted edamame, with a big dose of robust flavor. Plus they are easy-peasy and are a bit of a show stopper.
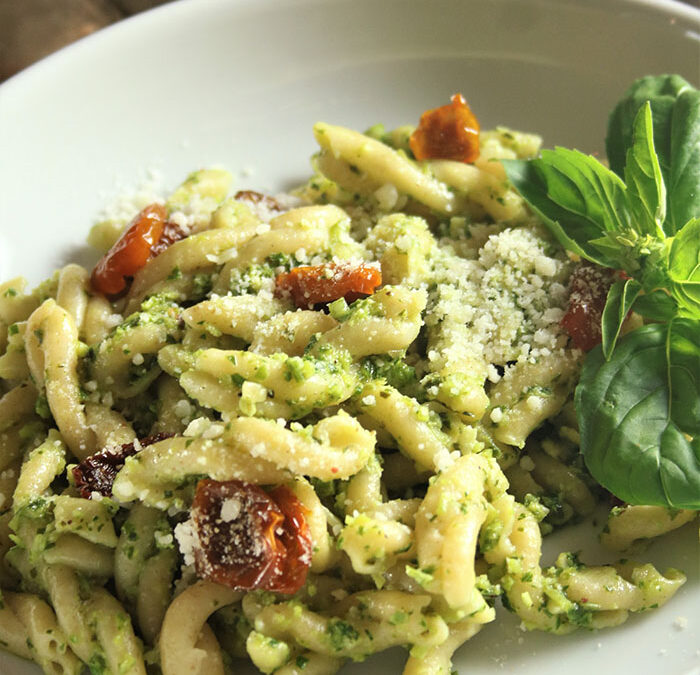
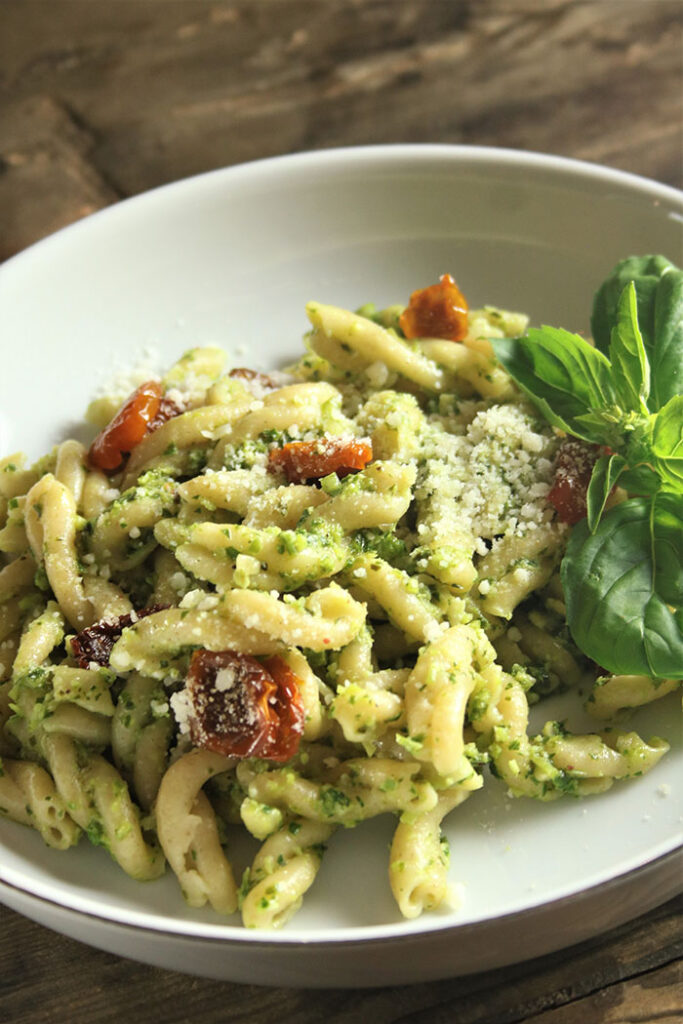
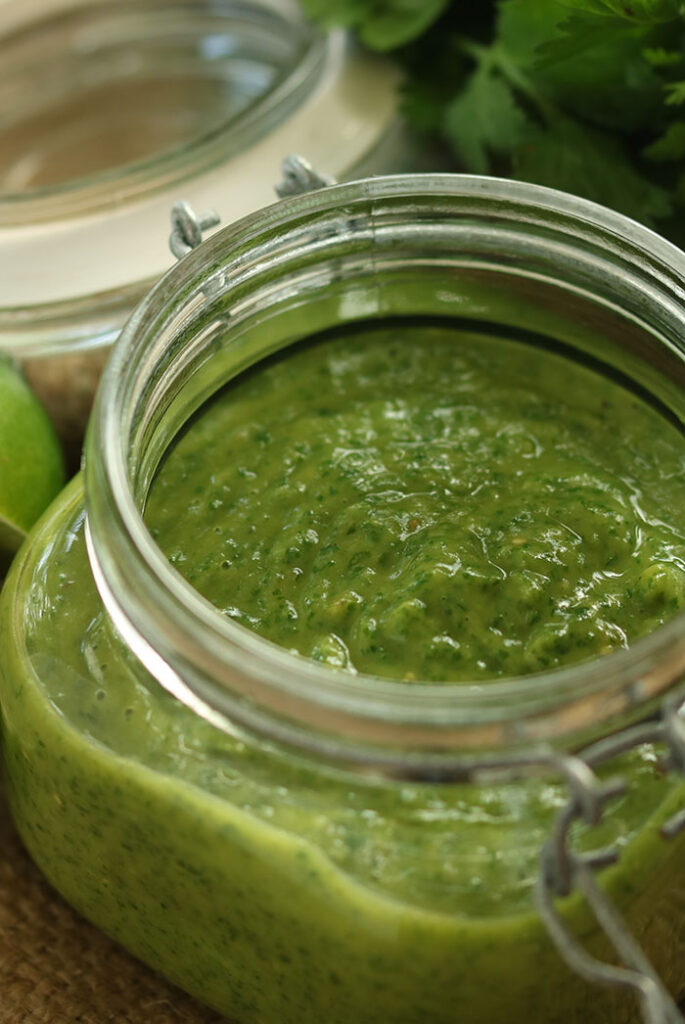
Arugula & Scape Pesto
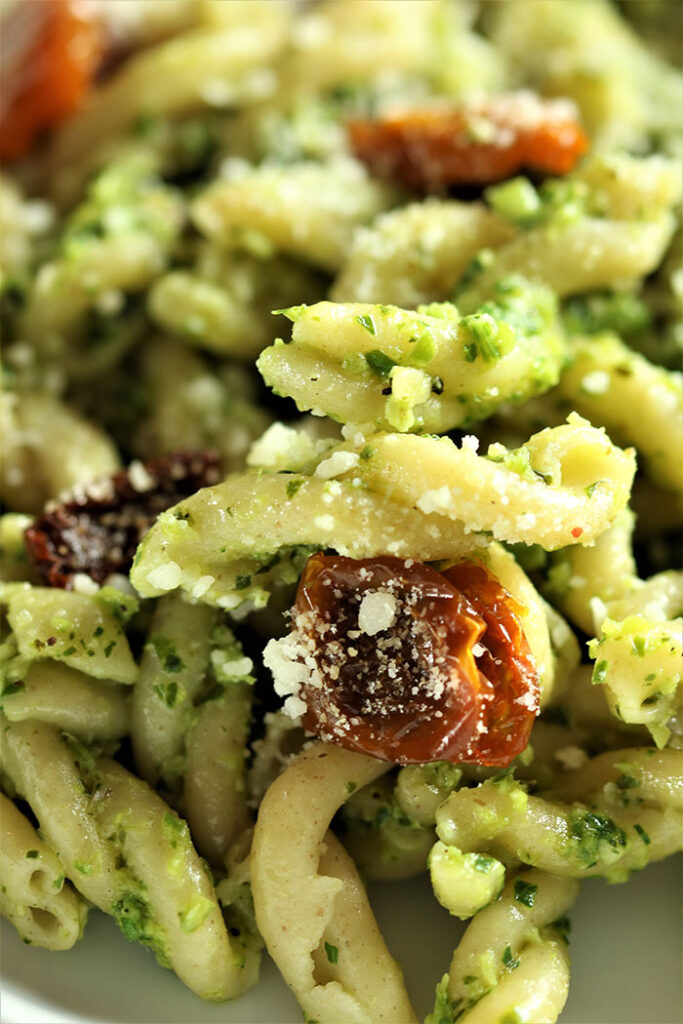
The ingredients, ratios and directions are detailed below, but rest easy that this is a 5 minute processor recipe. The scapes, arugula, parsley, and basil give it a jewel-like green color and the Parmesan and sunflower seeds (so much cheaper and flavorful than pine nuts) give it some body. I am serving it here atop a fresh gemelli (did you know that is Italian for twins, as the pasta is doubled over and twisted together?) and oven-dried tomatoes. The tomatoes are from the freezer and were dried at the end of last season when they were at their peak. I linked the recipe below so you can keep it in mind for later this year. You could also add some of the other spring veggies, like peas or asparagus tossed in at the end of the pasta’s cooking, or even some sauteed morels or other spring mushrooms. This flavorful pesto is not limited to pasta: drizzle it on a Caprese, marinate vegetables for the grill, or spoon it on a grilled steak or chicken breast. It’s so universal you can also slather it on a panini.
Swapping out more mature bulb garlic with just-in-season garlic shoots, while supplementing the basil with arugula and parsley, gives this scape pesto a bright and spring-like freshness that is great on anything from pasta to grilled fare to tomatoes and fresh mozzarella.
Ingredients
Scale
10 – 12 garlic scapes, trimmed and sliced crosswise
1 cup tightly packed basil
1/2 cup tightly packed Italian parsley
1/2 cup tightly packed arugula
1/2 cup grated Parmesan cheese
1/4 cup raw sunflower seeds
Juice of one lemon
1 teaspoon salt
1/2 teaspoon ground black pepper
3/4 cup extra virgin olive oil
Instructions
Place the scape, basil, parsley and arugula in the work bowl of a food processor and pulse 8 – 10 times until coarsely chopped.
Add the remaining ingredients, except the olive oil, and pulse again to combine. With the motor running, add the olive oil in a thin stream until combined and desired texture is reached, scraping down the side of the workbowl as necessary.
Store in the refrigerator in an airtight container.
Notes
The salt in this recipe is based on using it with pasta. If you plan to use it in a non-carby way like a fresh mozzarella drizzle, then you may want to cut back on the salt.
Serving suggestion:
Serve on pasta – hot or cold; top a tomato and fresh mozzarella Caprese; spoon onto grilled chicken, steaks, fish or vegetables; or slather on a sammy.
Prep Time:5 minutes
Category:Sauce
Method:Blender/Processor
Cuisine:Italian
Keywords: Scape Pesto
When you give this spring arugula and scape pesto a whirl, tag me on Instagram and as always, I LOVE to see your comments below.
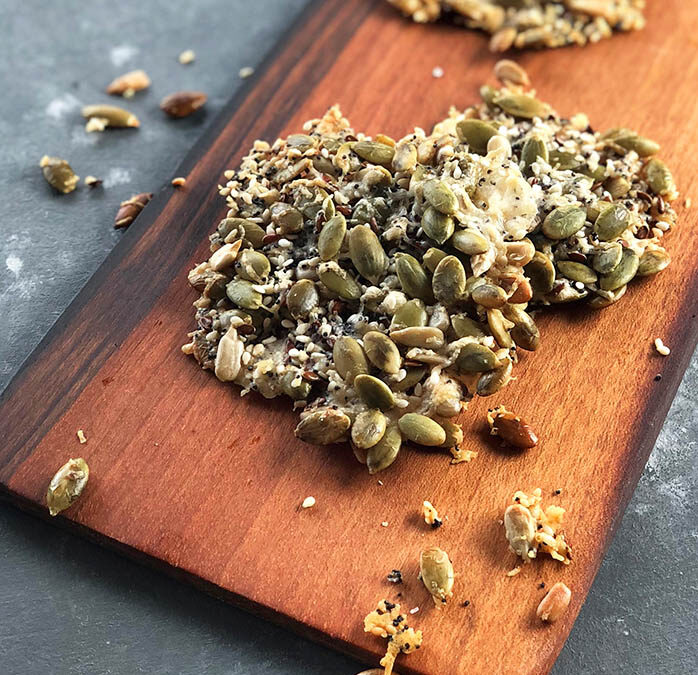
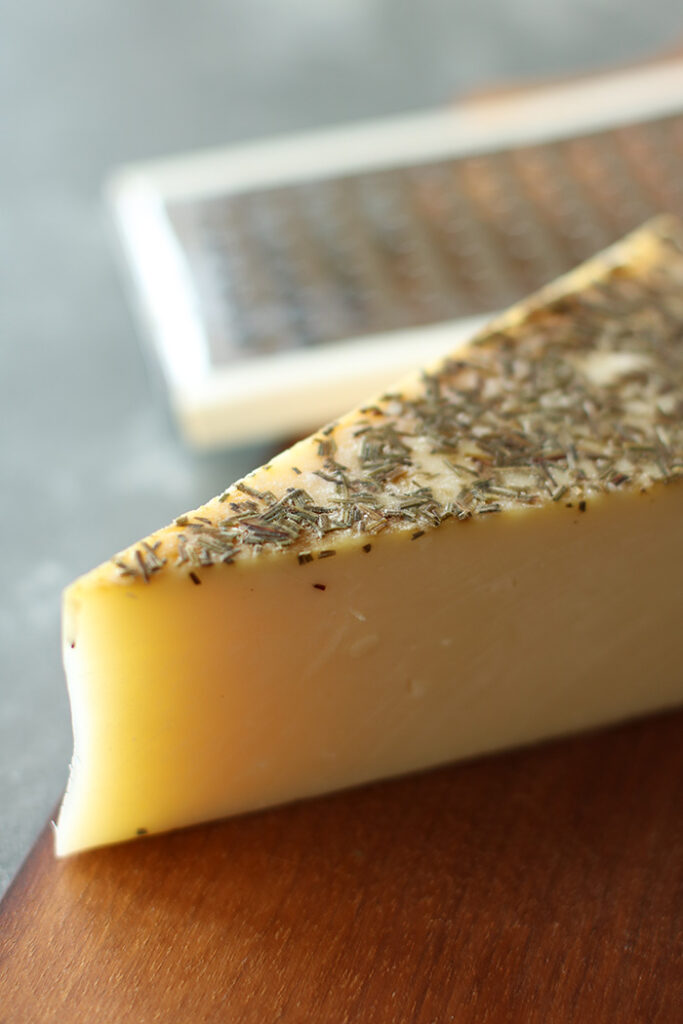
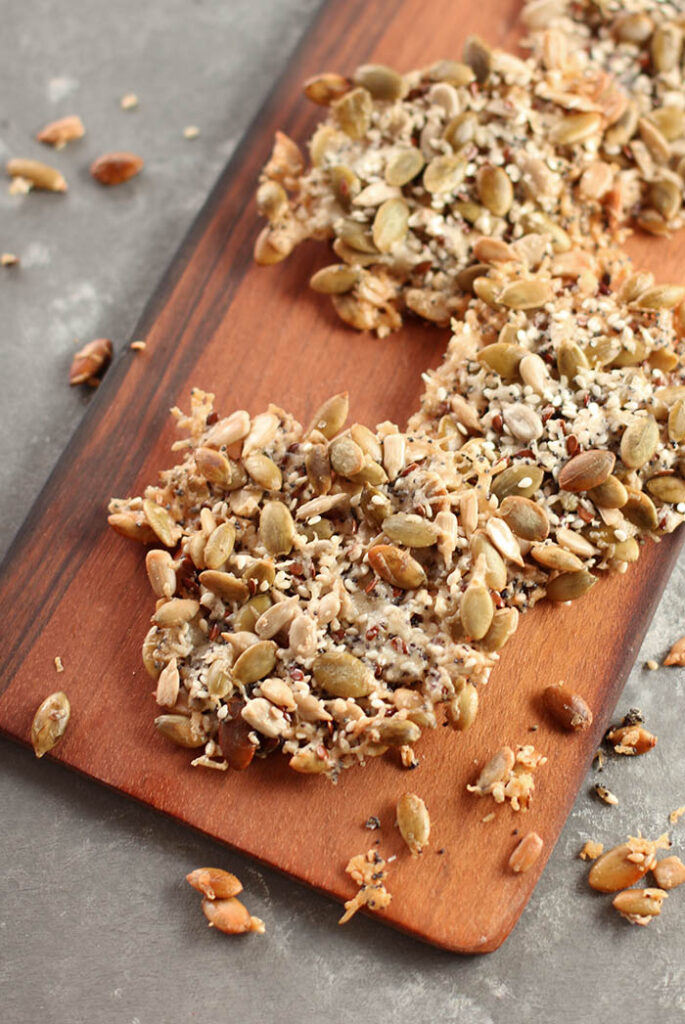
You’re driving me crackers, she said to this weather. Luckily this tasty little number is neither season- nor weather-dependent. I found my inspo for this recipe in a fancy store in California (Market Hall in Berkeley, if you must know), and I just might have eaten my weight in them. After “serving” them to guests two nights in a row, while secretly polishing them off on my own in the kitchen, I decided it was time to stop paying this fool’s ransom and knock them off for myself. Armed with only a visual on the seed varietals and my longstanding loyalty to a good cheese crisp, I took it upon myself to try to replicate and I must say I nailed it first try. You’re welcome!! The base recipe for these – when seed-free – reminds me of the signature dish at an early Lidia Bastianich restaurant – Frico. The frico, as a dish,is a melted cheese crisp, usually made with unpasteurized cow’s milk cheese from Friuli called Montasio. At the restaurant, these cheese crisps crowned salads and were often stuffed with potatoes or mushrooms and more, served as an appetizer. How I miss this!
But, oh my, these Cali ones were chock-full of seeds, which provides more crunch and an additional level of nuttiness. Yahoo. As I was testing them, I remembered a frequent guest that I cooked for during my days as the food stylist at The Rosie O’Donnell show. Marjorie Johnson, from Minna-so-TA, dont’cha know. At 4’8”, this feisty redhead, always decked out in a red dress, topped with a red apron, is pure sass. Here she is in 2016 at the Anoka County Fair, where she won 52 ribbons, including 22 blue and the sweepstakes prize for her tea ring. Yes, those are all hers…from that week!
I met Marjorie before the millennium, and her goal was to have 2000 blue ribbons by the year 2000. She has well over 2500 now and has not slowed down one bit. Her secret, she told me, to beefing up her ribbon count was to enter random categories with less competition……………like crackers. And we’re back. Temporarily. (I must add that is something I was long aware of – don’t take the easiest path using a sweet ingredient in a dessert. Work harder and come up with something that is unexpected.) I haven’t seen Marjorie in a while, but we keep in touch and I have her book. I’ll never forget the segments we did with Alec Baldwin or Paul and Nell Newman after Marjorie won a load of dough from Newman’s Own. It all went to her favorite charity – American Cancer Society in Minnesota – and they in turn crowned her the belle of the ball, tiara and all. I think Alec summed it up best – while on his knees to meet Marjorie eye to eye – “We need more Marjories!!”
Seeded Cheese Crisps
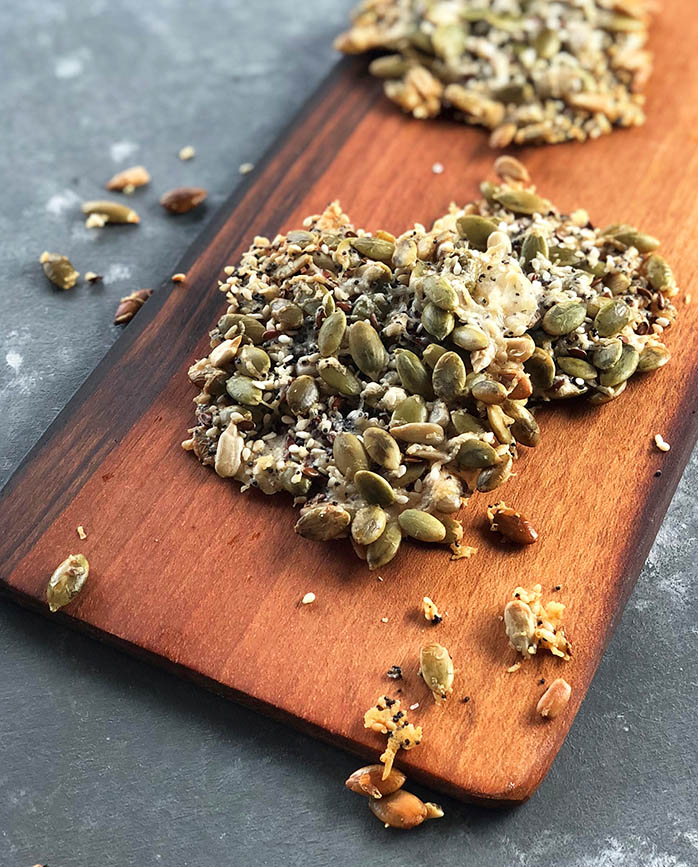
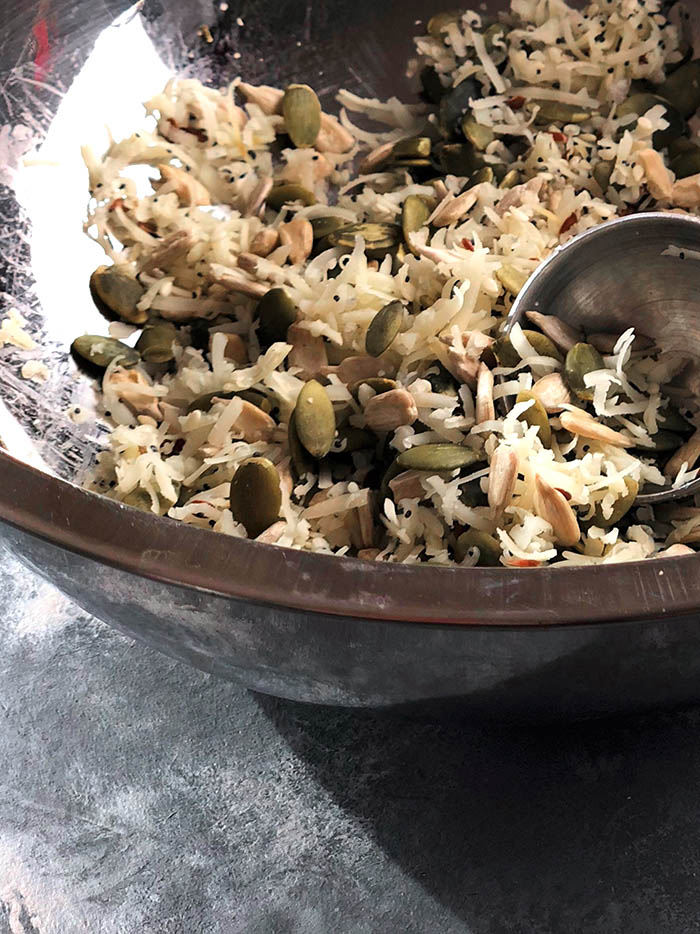
I debated calling this a Cheese Krackle instead of a Cheese Crisp, because the seeds make it so much more than a Crisp. Such decisions!?! Luckily the recipe is much more straightforward than that challenge. I really don’t need to tell you in great detail about this recipe, because once I locked in the ratio of ingredients, it pretty much baked itself. Instead of Montasio, I chose a rosemary Asiago, an Italian cow’s milk gold medal winner at the 2008 World Championship Cheese Contest, and Fontina Fontal, also Italian, and also cow’s milk…from our friends at The Cheese Lady, of course. The Asiago adds a bit of tang and the Fontina is a sublime melting cheese. Keep the cheeses cold until you grate them, as they tend to be a bit softer than many cheeses we often grate. I used the big holes on a box grater.
Add all the seeds to the grated cheese and mix well to combine. You may find that as you dole out the mixture onto a sheet pan that the smaller seeds will settle so be sure to keep mixing as you go.
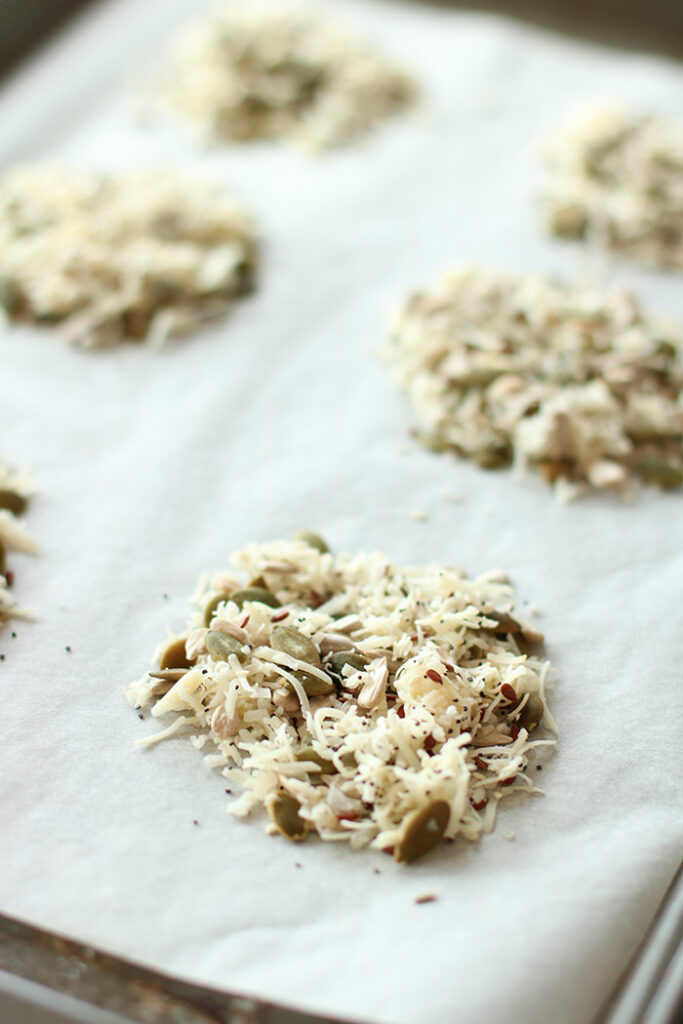
You will need two or three batches on a half-sheet pan to bake off all the mixture. If you need to re-use a pan for a later batch, let it cool to room temp first so it doesn’t throw off your oven timing. I used two Tablespoons mixture per cracker and flattened them a bit with my fingertips for even cooking. You will need to leave a little space between them, but more for an easy removal than to accommodate massive spreading.
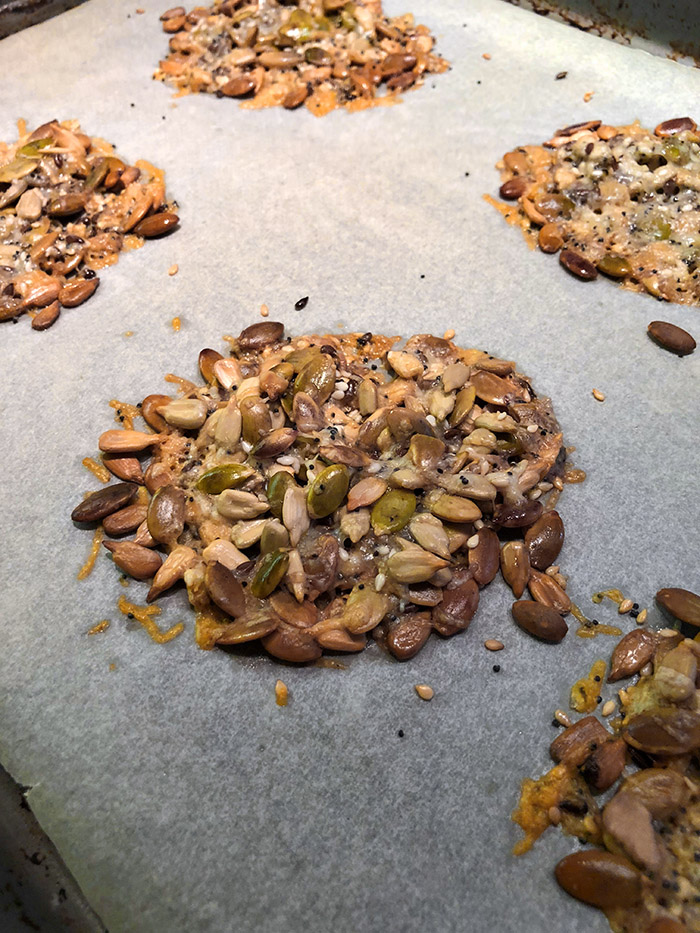
Bake at 375o for 7 – 8 minutes until the crisps are lightly golden. Remove the pans from the oven and let the cheese crisps cool slightly on the sheet pans until they firm up. Then you can transfer quickly to a wire rack using an offset spatula. I would tell you to store them in an airtight container once cooled, but let’s be real – are you going to have any leftovers? Kind of doubt it!!!
These are tasty as a garnish for soups and salads, or as an accoutrement to a cheese or meze spread. Call it a Krackle, call it a Crisp, but definitely call it delicious.
When you give this loaded cheese crisp a whirl, tag me on Instagram and as always, I LOVE to see your comments below.
This seed-filled cheese crisp is great on top of a soups and salads, or as an accoutrement to a cheese or meze spread. Call it a Krackle, call it a Crisp, but definitely call it delicious. And while you are at it, double up on the recipe. You’re gonna want more.
Ingredients
Scale
3 ounces grated Asiago, or 1 1/3 cups
1 ounce grated Fontina Fontal, or 1/3 cup
3 1/2 ounces raw shelled pumpkin seeds, or 2/3 cup
1 ounce raw shelled sunflower seeds, or 1/4 cup
3 Tablespoons sesame seeds, or 1 ounce
1 Tablespoon flax seeds, or 1/2 ounce
1 Tablespoon poppy seeds, or 1/3 ounce
3/4 teaspoon kosher salt
Instructions
Preheat oven to 375o F. Line two half-sheet pans with parchment paper.
Combine all ingredients in a small bowl. Mix well. The smaller seeds may settle so be sure to stir as you dole out the mixture.
Divide the mixture into crackers, allowing 2 Tablespoon per cracker. Flatten any mounds to a uniform thickness.
Bake for 7 – 8 minutes until lightly golden. Cool slightly on the sheet pans until they firm up, and then quickly transfer to a wire rack using an offset spatula. Store in an airtight container once cooled.
Notes
I used a rosemary Asiago but plain works well too.
Keep the cheeses cold until you grate them, using a box grater. They are a bit soft so they don’t grate as well at room temperature as a harder cheese, like Parmesan.
These are delicious on top of a soup or a salad, or as an accoutrement to a cheese or meze spread, but do note they are not sturdy like a Ritz, so don’t go planning to spread your Cheez Whiz atop. Who are you anyway??:)
Prep Time:10 minutes
Cook Time:10 minutes
Category:cracker
Method:oven
This post contains affiliate links. For more of my must-have faves, visit my shop.
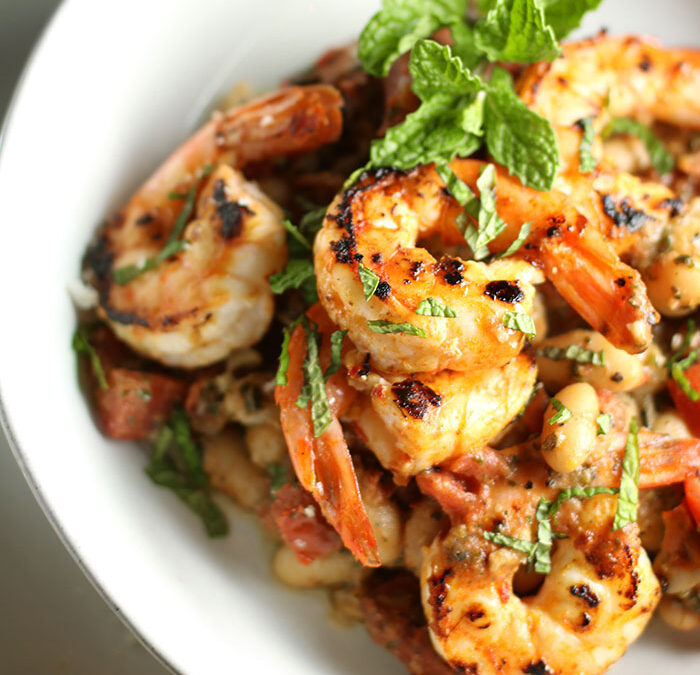
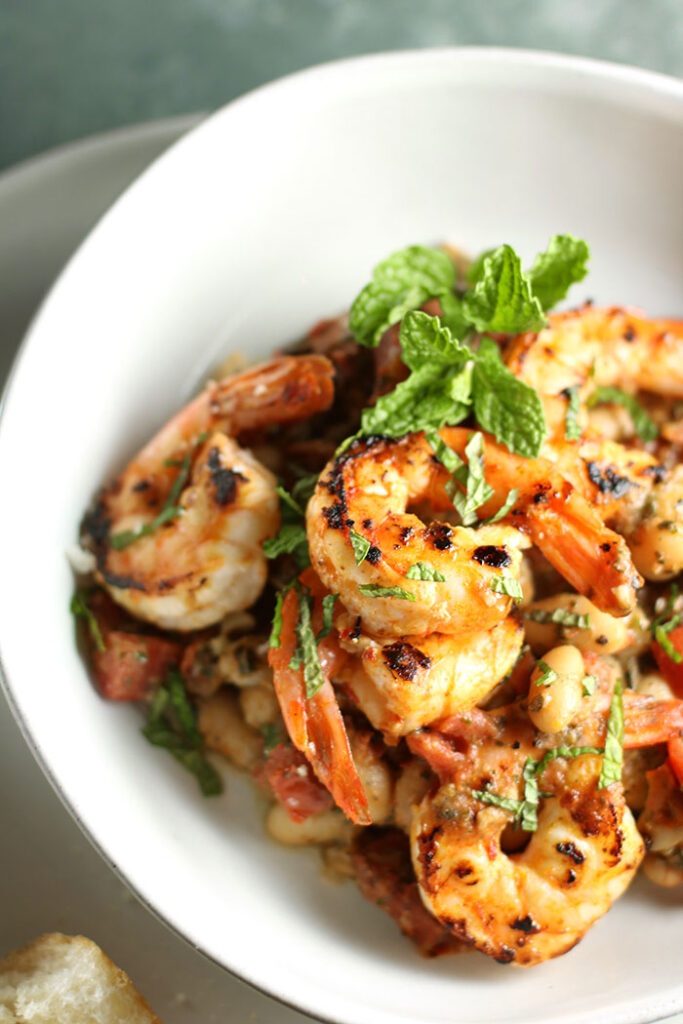
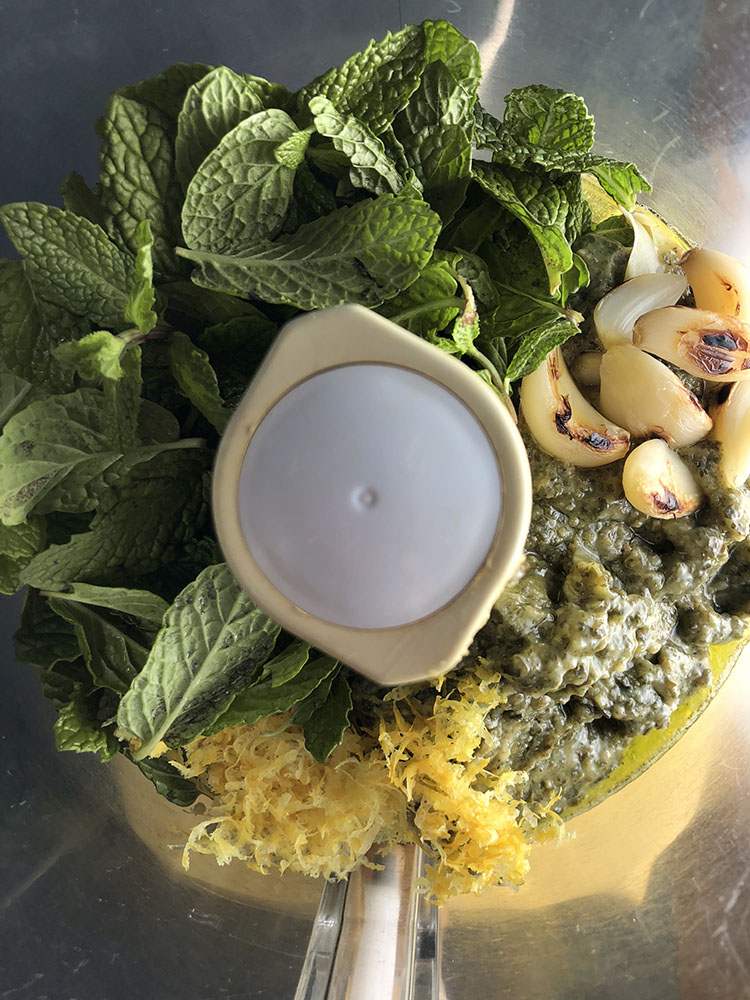
Winter Winds into Spring? Is that winds like a pathway or winds like gale-force nor’easter…AGAIN? It’s the first day of spring and NYC is getting hit with the fourth nor’easter in three weeks. This one is coming with perhaps 16″ of snow. My stomach says “winter be gone”. But the howling winds outside say “in due time.” So let’s agree to disagree. This shrimp & white bean dish with a flavor-packed pesto is a compromise. We CAN all get along. The beans and tomatoes cooked down to a hearty stew, but the pesto is tricked out with mint and parsley. I see you, spring.
Upgrade the Pesto
I know how you roll and I got you covered. Shortcut cooking. And before I digress on why I am not a fan of the term “hack”, let’s just acknowledge that shortcuts are what the pros do. Know when you can use a convenience product, like store-bought pesto, and when you need to put on the apron. I am right there with you on not re-inventing the wheel when it comes to already made products. But let’s face it, the pesto can be a little one-note samba-ish. No real depth of flavor. So with only about ten minutes of pan roasting garlic, while picking mint and parsley off the stem, and zesting a lemon, we can add real layered flavor and bring some zip to this dish.
Kick Up the Shrimp
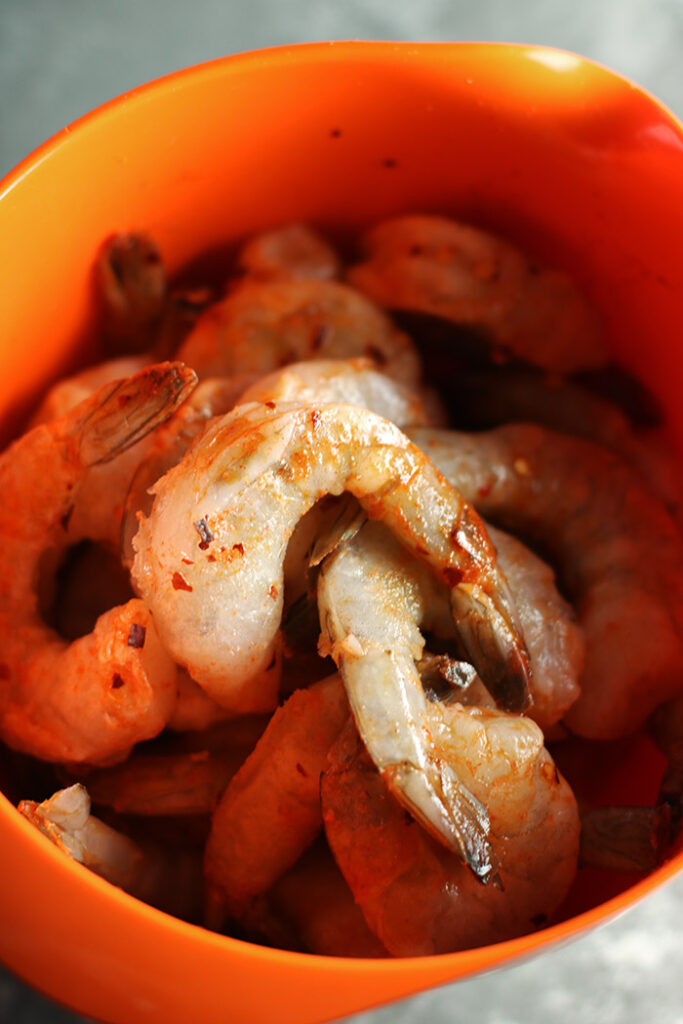
The spice in the shrimp is just enough to make you notice and pay attention. Hellllllo, shrimp. Welcome. You need to give it at least a little kick to soar above the tomatoes and beans which can be bland left to their own devices. It’s all about building the flavors. This only needs a 15 minute marinade while you move on with the rest, then a quick sauté of two minutes per side and you are done.
Prepare the Beans
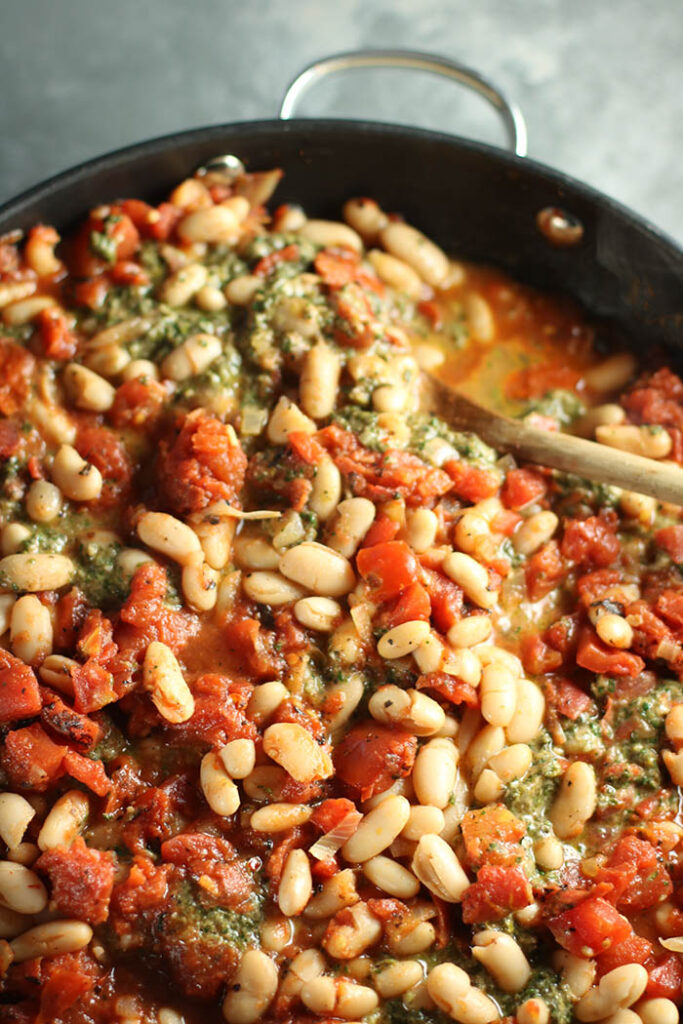
Nothing goes better together than shrimp & white beans. And nothing makes me happier than opening up cans and dumping into a pan. Okay, okay, it’s best to rinse the white beans, but come on!! I practically pioneered the dump & stir technique and I bring it to you on the reg. Throw the remaining ingredients in a large sauté pan and let ‘er rip. You’ll want to add the pesto last to maintain some green. Show of hands: how many knew that cannellini beans are white kidneys?
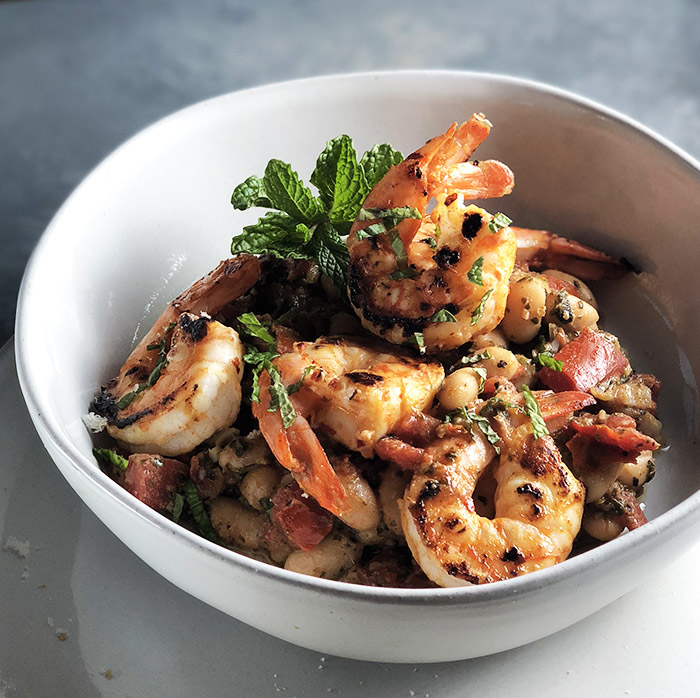
Garlic, shallots, lemon, mint plus shrimp & white beans and tomatoes. What’s not to like? Take that pan above and divvy it into bowls, then top with the sautéed shrimp, a sprinkle of fresh mint and a crisp white wine and you are all set. Oh, did I forget? A big crusty loaf of sourdough is mandatory. So many carbs, so little time.
You could really serve shrimp & white beans almost anytime of year, except perhaps the dead of summer (unless cold), but this dish is a polite nod to the arrival of spring. Comfy and cozy, the robust stew of beans and tomatoes, topped with spicy shrimp is lifted up by a pesto that has been doctored with mint and lemon. Yum!
Ingredients
Scale
8 cloves of garlic, not peeled
7 ounces prepared pesto
1 cup tightly packed mint leaves
1 cup tightly packed parsley leaves
Zest of one lemon
3 Tablespoons extra virgin olive oil, divided per below
2 or 3 15.5-ounce cans cannellini beans, rinsed and drained
Garnish with fresh mint, cut into chiffonade (thin strips)
Instructions
Prepare the pesto:
In a large sauté pan over medium-high heat, roast the garlic, stirring from time to time, until the skins have charred evenly, about 8 – 10 minutes. Cool and peel.
Transfer the pesto to a blender or food processor and add the garlic, mint, parsley, and lemon zest. Blend until well-combined.
Marinate the shrimp:
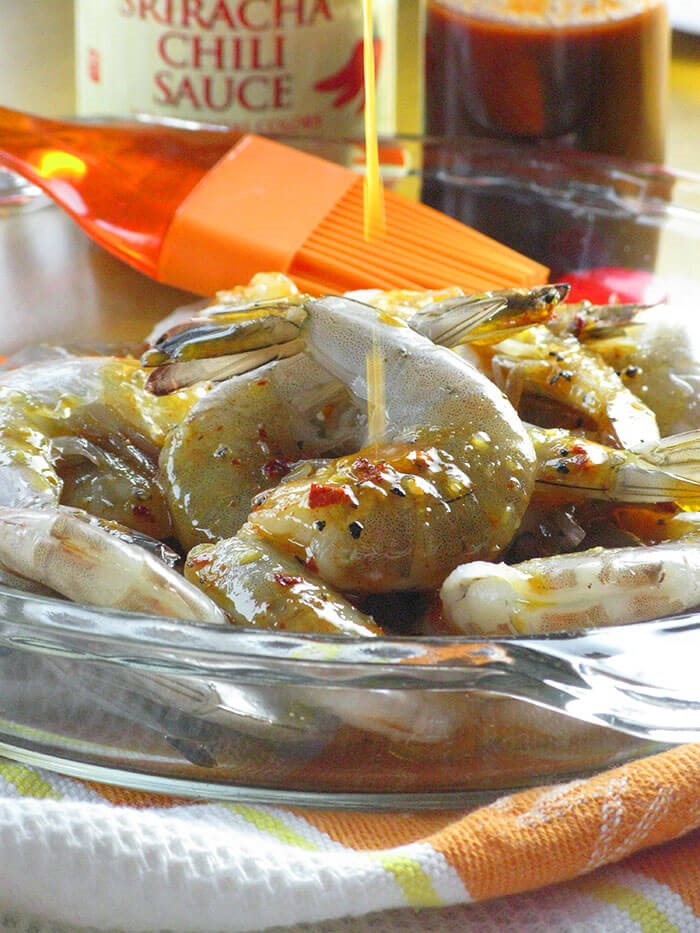
In a mixing bowl, combine two Tablespoons extra virgin olive oil, lemon juice, Sriracha, and 1/2 teaspoon red pepper flakes. Add the shrimp and set aside for 15 minutes.
Prepare the beans:
Add the remaining Tablespoon of olive oil to the large sauté pan. Heat over medium heat and add the shallots, sautéing until soft and lightly golden, about 4 minutes.
Add tomatoes and their juices, salt and remaining 1/2 teaspoon red pepper flakes. Bring to a simmer, cooking until liquid is reduced and slightly thickened, about 5 minutes. Add beans and pesto and warm through, about 5 minutes. Remove from heat and keep warm.
Cook the shrimp:
In another sauté pan, cook the shrimp over medium-high heat until cooked through, about 2 minutes per side, being careful not to overcrowd the pan. You may need to do this in batches.
Serve:
Divide the bean-tomato mixture among 6 bowls. Top with the shrimp and garnish with fresh mint.
Notes
Shrimp is sold in one-pound bags, by size. A one-pound bag marked 16 – 20 contains between 16 and 20 shrimp. The higher the number, the smaller the shrimp.
This can easily stretch to 8 servings with the addition of the third cans of beans and of tomatoes, especially if you are using the smaller size shrimp (and therefore have more per pound).
Makes great leftovers, but you may want to add a little liquid if the beans have soaked it all up. Broth, tomato juice, white wine, or even a little water. Whatever you have on hand will work.
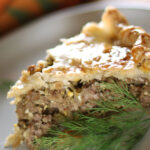
I have had a tattered copy of the grandmother of this meat pie recipe since I first moved to New York – and I always read the faded title as Kulebvaka. Shared with me by an older Jewish woman who was very adventurous in exploring international flavors even in the 70s, the copy was covered in her handwritten notes. I assumed, wrongly as it turns out, that the vaka had something to do with beef, the main ingredient in this recipe. All those years of having the name wrong prevented me from making the connection to coulibiac, one of my earliest catering days’ fancy puffs. The coulibiac I made was filled with salmon and – oh yes – crammed full of eastern European flavors, like dill and sometimes horseradish. Coulibiac. Kulebyaka. “Yaka”, not “Vaka”. The name had nothing to do with the beef that fills the pie. Color me surprised – years and years later.
It turns out the word Kulebyaka comes from the Old Slav verb kulebyachit which means to make with hands – nothing to do with what was inside. It can be stuffed with fish, meat, mushrooms, rice, hard-boiled eggs and so much more. The traditional meat pie recipe calls for a yeast-based dough (I am just using a store bought pre-rolled pie crust), but it was elevated to haute cuisine status (and the pastry became more delicate) during the 19th century when French chefs started appearing in Russia. The tradition continues as the Hennin twin brother chefs that I trained under in Paris spent time in Russia. One showed up here with a vat of caviar as his carry on. Yaaaaaaaaaaaaaas!
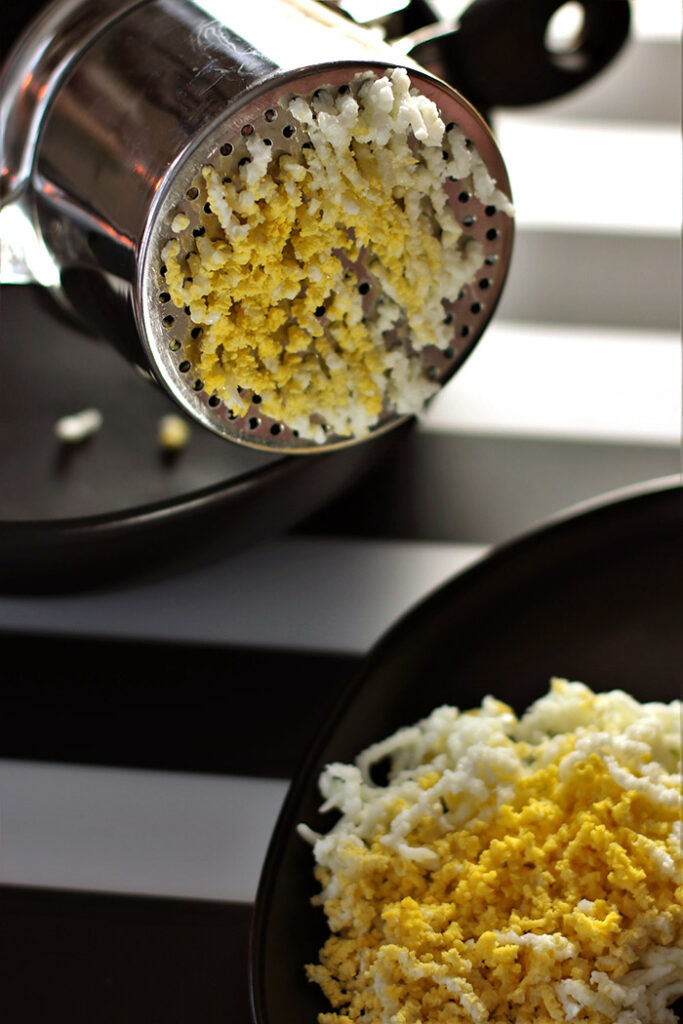
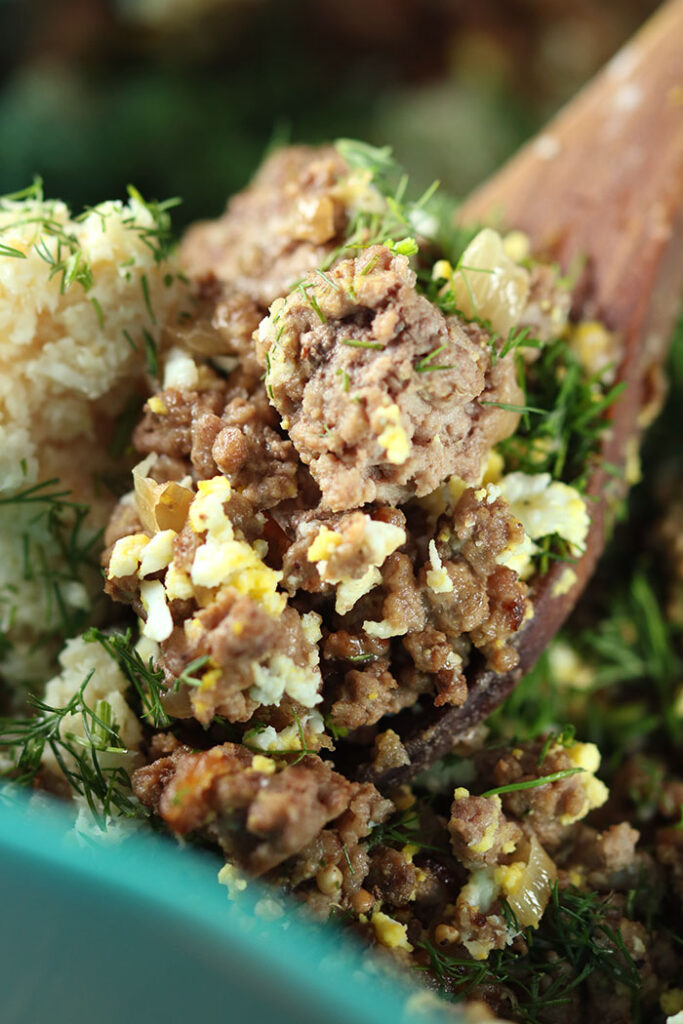
That meat pie recipe I received so long ago did in fact have sieved hard-boiled eggs in it, and I kept that intact, making good use of one of my favorite tools, the potato ricer. It helps bind the mixture and is a nod to its Russian roots. I changed all the spices and added fresh dill and an entire bottle of prepared horseradish, because we like our flavors a bit more assertive here in ‘Murica.
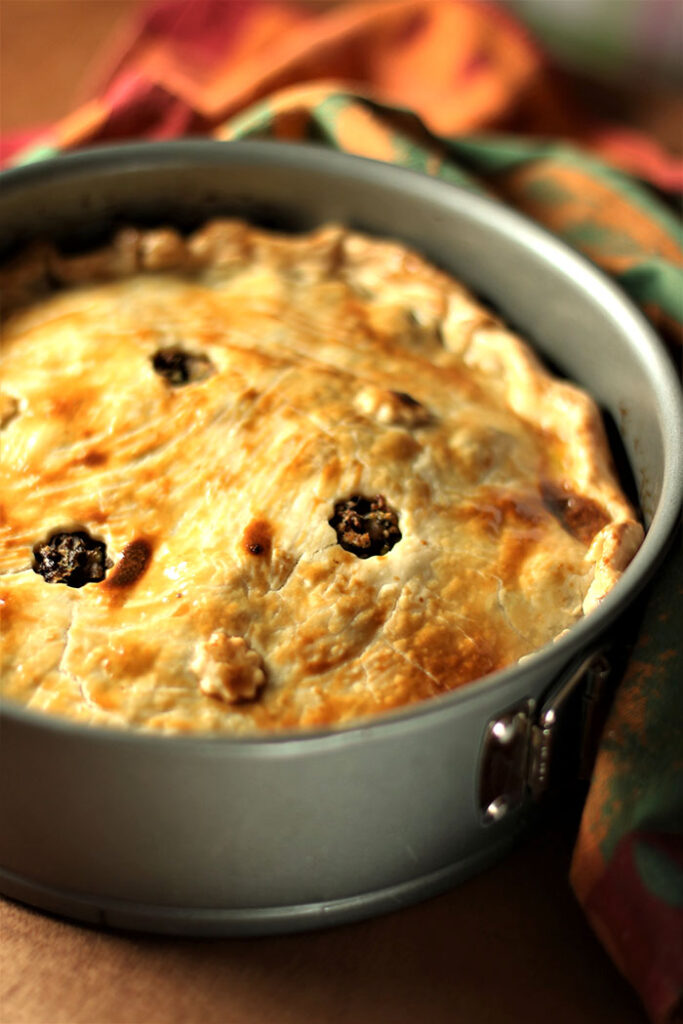
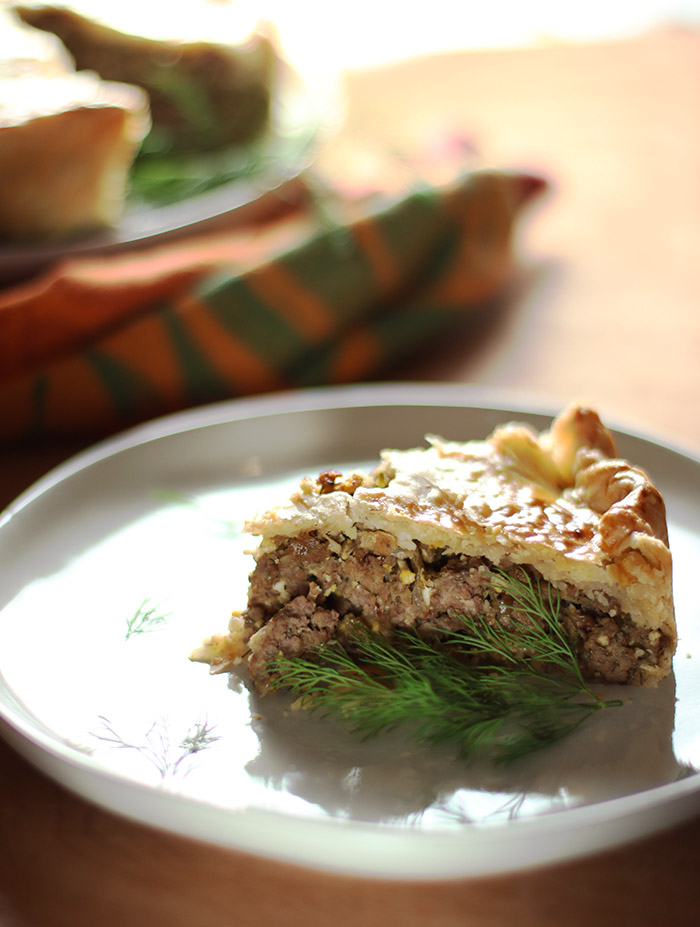
There are no real secrets to make this a perfect party addition, and it’s also great for a cozy night at home, served with just a simple salad. Serve it cold, serve it hot; make it an app, make it an entrée. I used a springform pan here, but I have also made it in a scalloped-edge tart pan which gives it a great look. Take some of the extra dough scraps and create flowers or leaves to decorate the top. Just make sure you have a removable-bottom pan for easy removal. Give it a whirl and let me know what you think!
This tasty beef pie is great hot or cold. Easy to pull together and pour into a ready-made crust, it is a real crowd pleaser year-round.
Ingredients
Scale
Pastry for a double crust pie
2 pounds lean ground beef
3 Tablespoons butter
2 small onions, minced, about 3 cups
3 hard-boiled eggs, peeled
1/4 cup all-purpose flour
1/2 cup beef stock
1 8-ounce bottle prepared horseradish, drained
3/4 teaspoon black pepper
1 teaspoon mustard seeds, coarsely ground (pulse in a spice grinder)
1 teaspoon celery seeds, coarsely ground (pulse in a spice grinder)
1/2 teaspoon salt
1 bunch fresh dill, stems removed and finely chopped
1 egg yolk
1 Tablespoon half & half (cream, milk, whatever you have)
Instructions
Preheat oven to 400oF. Lightly butter a 9-inch, deep-dish, removable-bottom springform or tart pan. Arrange the bottom crust, pressing into the bottom and sides. Refrigerate until needed.
Sauté beef, breaking into small pieces, until no longer pink, about 8 minutes. Transfer to a strainer and let fat drain off. Wipe out the pan and add the butter. When melted, add the onions and sauté until golden brown, about 13 – 15 minutes.
Meanwhile, press the hard-boiled eggs through a potato ricer or strainer until finely sieved.
Add the drained beef to the onions, and heat through. Sift the flour over the beef and stir in. Add the stock and stir again, cooking through 1 to 2 minutes. Remove from heat.
Stir in the sieved eggs, the horseradish, pepper, mustard seeds, celery seeds, salt, and dill. Let the mixture cool.
Spoon cooled mixture into the bottom crust. Press down with the back of a spoon to compact. Cover with the remaining pie dough, seal edges, and crimp decoratively. Cut several vent holes to allow steam to escape.
Mix egg yolk and half & half in a small bowl and brush the top of the pie. Place pan on a sheet pan to bake.
Bake for 30 to 35 minutes until the top is golden brown.
Serve hot or cold, as an appetizer or main.
Notes
If you cut the pie straight from the oven it will be a bit loose. Better to let it rest for 10 minutes to firm up.
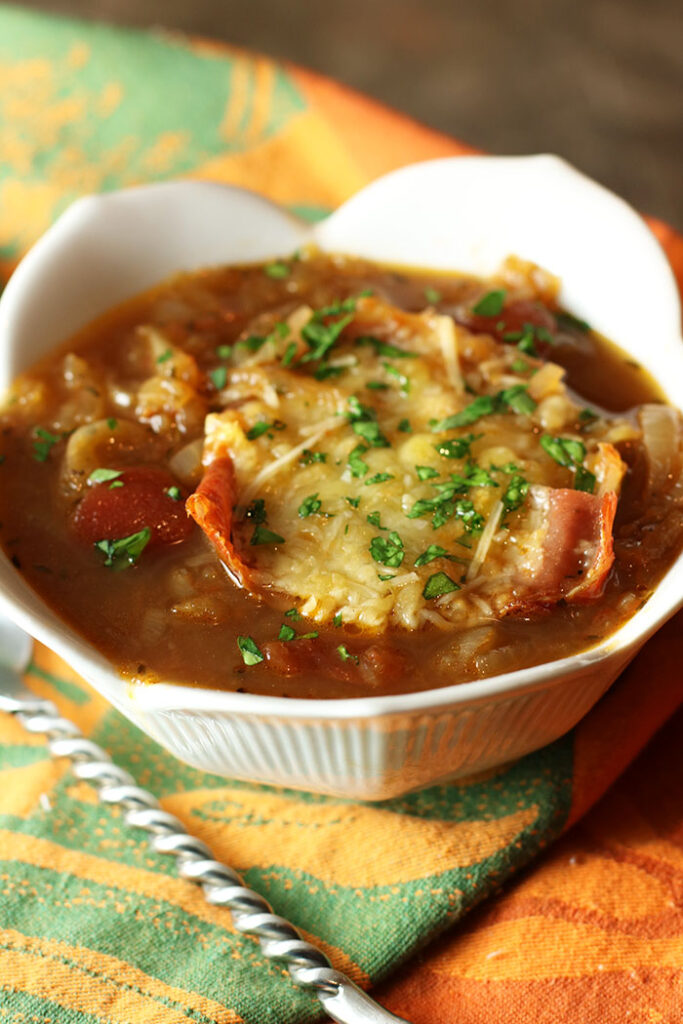
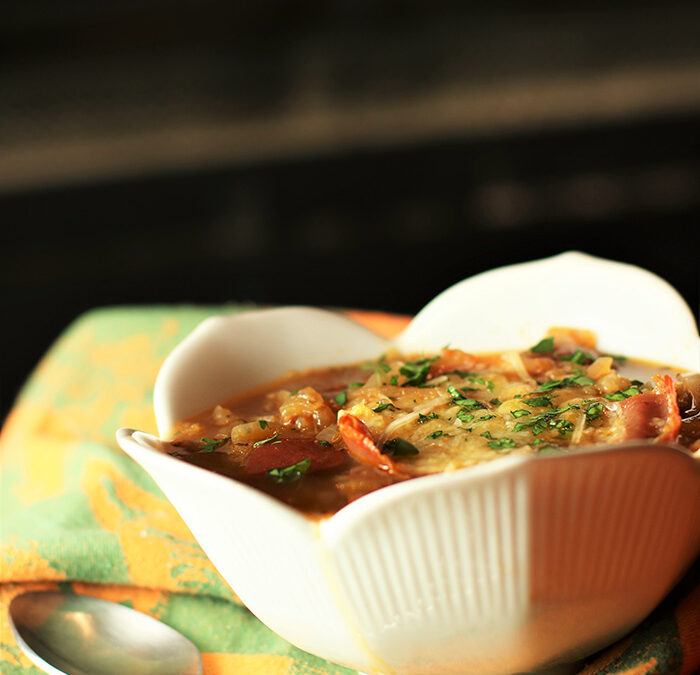
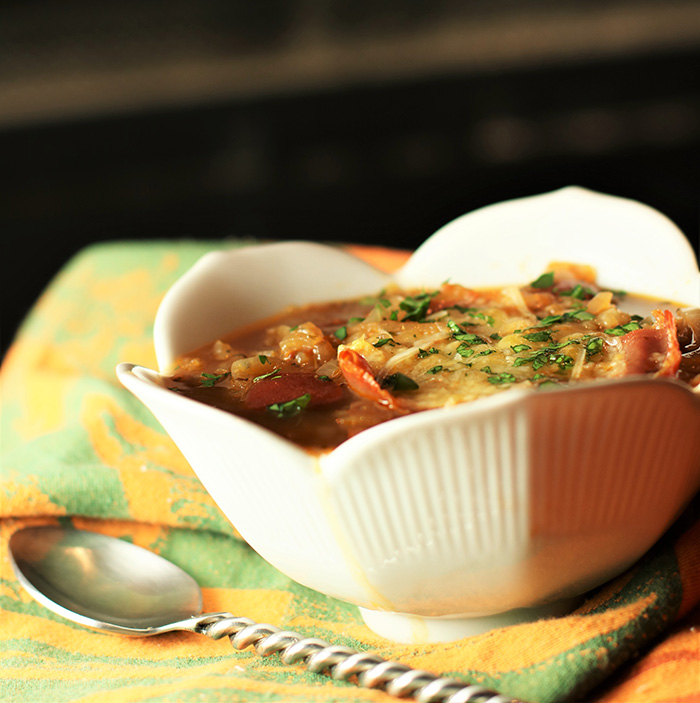
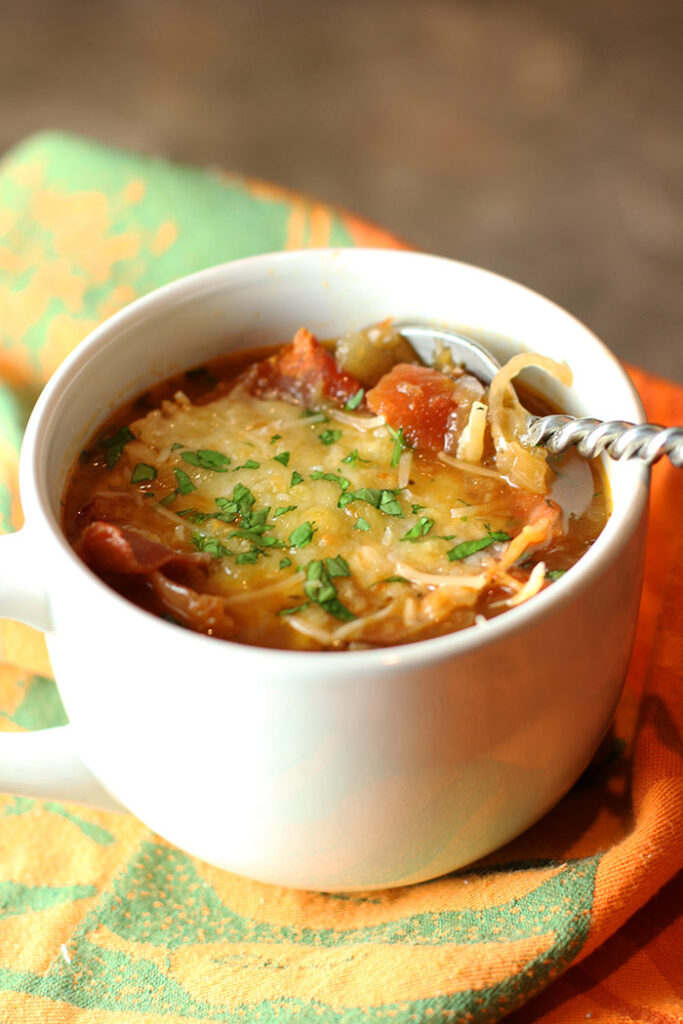
I can’t let #NationalSoupMonth roll by again without setting you up for another win. With only three types of onions and a couple of cans of tomatoes, this Cipolline Onion Soup will surprise you with its stick-to-the-ribs quality. Have you thought about having a Soup Pot Lucky yet? Trust me, it’s a great way to fill your freezer with soups in oh so many flavors. Traditionally, onion soups are topped with a crusty bread slice and some melty cheese. What’s wrong with that? Well, uh, nothing. But can it be better? Yes, it can! How about creating a “crouton” out of prosciutto topped with Gruyere and Parmesan that has taken its turn under the broiler. Oh yeah! I’m talking crispy pork and melty cheese. Game over!
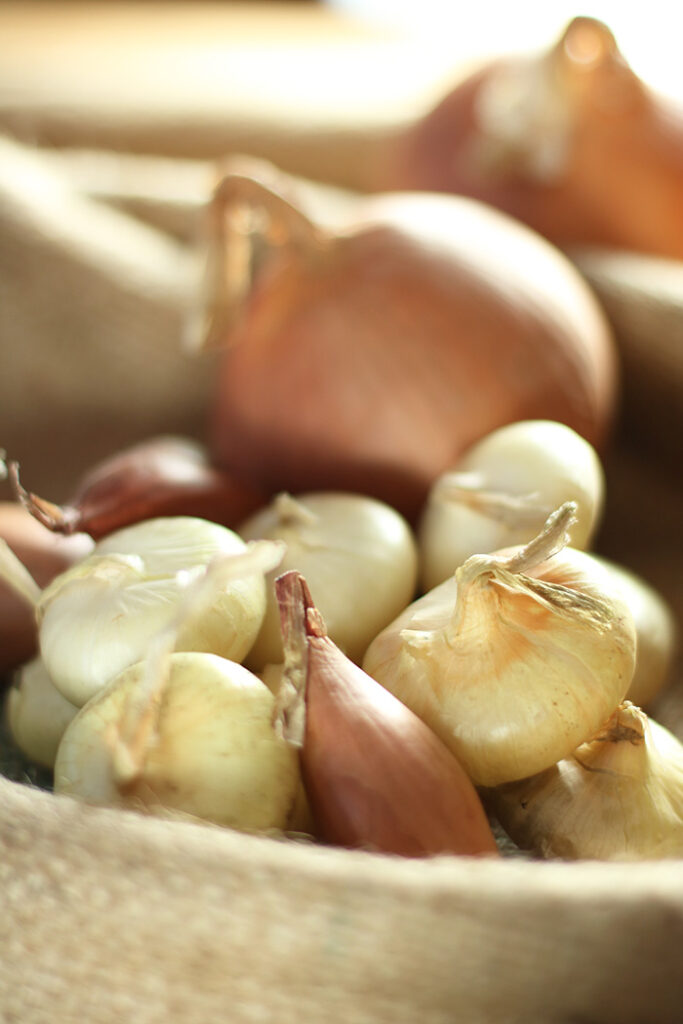
Best Onions for Onion Soup
Onion soup is most commonly made with Vidalia or Spanish onions, and there’s nothing wrong with that. They both bring a certain level of sweetness which provides a nice layered flavor when offset by the wine used to deglaze the pan. But I recently spied some boxes of cipolline onions from our friends at Melissa’s at my local grocery. Yaaas! I bought a mixture of cipolline, some large Spanish onions and a few shallots for this soup. When picking cipolline, like other root vegetables, choose onions that are firm and show no signs of moisture, green shoots, or dark spots. Humidity is no BFF to onions or garlic, so it’s best to store them outside the fridge in a cool place to extend their life. If you are worried about peeling all those small flat cipollines – or if you ever have shied away from pearl onions just because of the peeling process – check out my notes in the first step of the recipe below.
With all the sweetness from the three types of onions, I chose port wine to deglaze the pan. Adding a liquid to the pan after caramelizing the onions makes it easy to scrape up all those flavorful brown bits stuck in the pan. Don’t leave that behind! We work hard for that fond. You could also use a red wine in this recipe, but port is fortified and adds a robust depth of flavor, elevating simple ingredients to something more sublime.
Once you brown the onions, the rest is pretty much a dump and simmer recipe. It takes some time – an hour of simmering – to reduce the liquid and develop the rich flavors, but you just need to throw a little side-eye in the pot’s direction from time to time. It doesn’t need your full attention.
Swap Your Top
I love the idea of replacing a soggy – although admittedly tasty – blob of bread with a crispy prosciutto crust on top of the onion soup. Just fold a piece of prosciutto to double it up, then top with grated Gruyere and Parmesan and run it under the broiler. You will NOT be sorry.
Capping off #NationalSoupMonth this year with a hearty three-onion soup, topped with a “crouton” of prosciutto and melted Gruyere and Parmesan. This will warm your soul.
Trim, peel and slice thinly. To peel the cipolline onions easily, trim the root end and drop in boiling water for 2 minutes, then transfer to an ice bath to stop the cooking. Spread the cipollines out on a towel to dry. The skin should slip off quite easily at this point. To make slicing more stable, cut the cipollines in half from root to stem and lay cut side down on a cutting board. Slice cross-wise into half rings.
Divide butter between two heavy-bottom stockpots (or one stockpot and one large skillet). Likewise, divide both kinds of onions and the shallots between the pans, and sauté until deeply golden brown, about 20 – 25 minutes.
Deglaze the pans:
Divide the port between pans, and reduce until almost evaporated, scraping up brown bits. Transfer all onions to one stockpot.
Simmer:
Add tomatoes and simmer 5 minutes.
Puree 2 cups of the onion-tomato mixture with 2 cups beef stock and add puree back to stockpot. Alternatively, add 2 cups beef stock to the pot and pulse with an immersion blender a couple times to thicken the mixture, while leaving lots of texture in tact. Add remaining beef stock, thyme and salt and pepper. Bring to a boil, reduce heat and simmer for 1 hour. Taste and adjust seasonings.
Prepare garnish:
Fold each prosciutto slice in half and arrange on a foil-lined sheet pan. Sprinkle with Gruyere and about half the Parmesan. Melt the cheese until bubbly and the prosciutto starts to crisp under the broiler.
Serve:
Divide the soup between bowls and float a prosciutto on each bowl. Sprinkle lightly with remaining Parmesan and top with chopped parsley.
Notes
I divided the onions into two pans while browning to increase the cooking surface area. This will prevent sweating (instead of the intended browning) the onions which happens when you do too many at once. If you want to keep this to one pot, you could also do this in batches.
If you are not a fan of prosciutto, you can old-school it with toasted baguette slices topped with the cheeses and popped under the broiler. And if you are vegan, skip the butter in favor of olive oil, use vegetable stock, and ditch the toppings altogether. The soup has layered flavors and is yummy with or without the toppings.
Prep Time:20 minutes
Cook Time:1 hour 45 minutes
Category:Soup
Method:Stovetop
Here are some other great soups to fill your freezer. I make a big pot almost every Sunday and freeze most of it in 2-4 portion containers so that I always have a half-dozen flavors on demand. Just take it out in the morning and put it in the fridge to thaw, and you will be set for a hearty dinner when you get home.


 Once you brown the onions, the rest is pretty much a dump and simmer recipe. It takes some time – an hour of simmering – to reduce the liquid and develop the rich flavors, but you just need to throw a little side-eye in the pot’s direction from time to time. It doesn’t need your full attention.