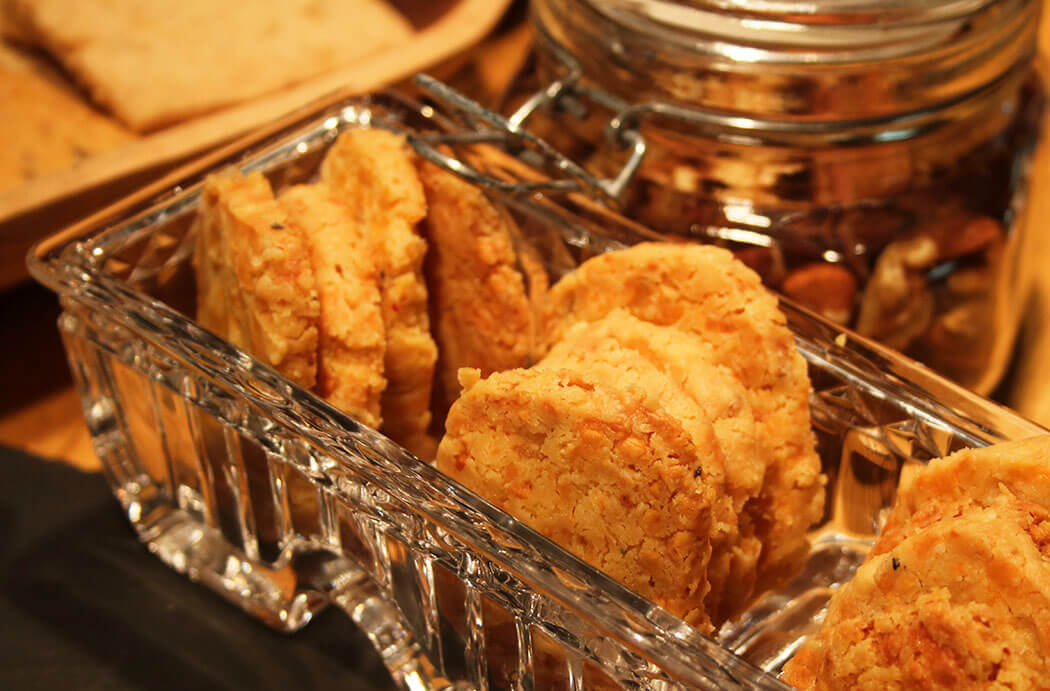
Nothing screams holidays like cranberries, citrus and spice. Mulled wine, orange pomanders (that’s fancy talk for oranges poked full of cloves), and cranberry garlands. So imagine my delight when the good people from the healthy living site Mambo Sprouts shot me a box of the finest spices to review. Squealing! I like to make edible gifts for the holidays – are you with me? We really don’t need one more thing to dust or store. But devour? Hells yeah! Last year I made cheese wafers and put them in a nice little cracker dish (okay, one more thing to store).
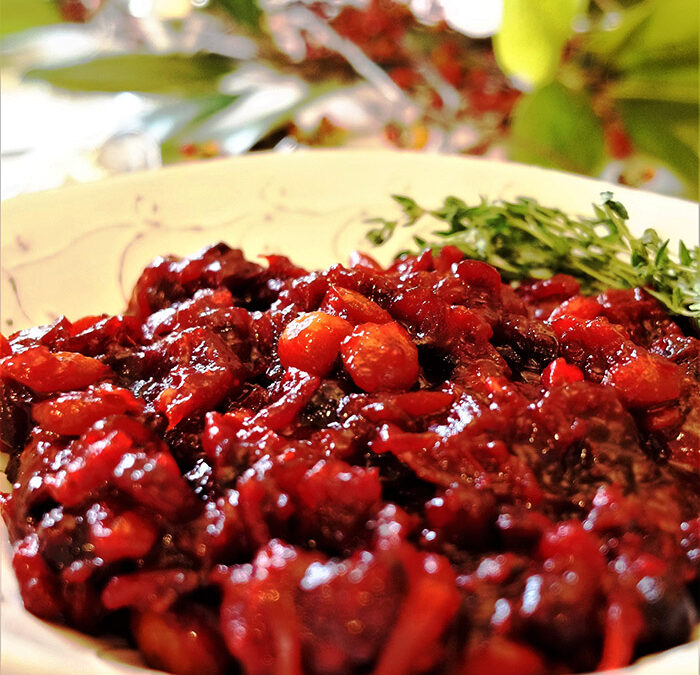
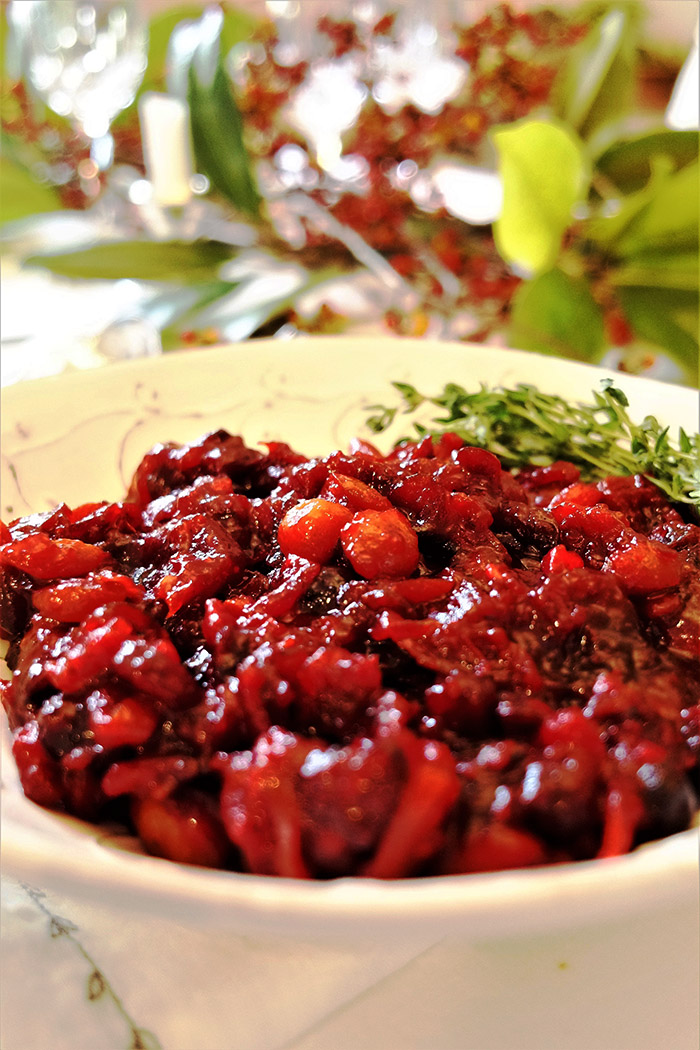
This year I have on my radar some spice blends and chutney. What’s that you say? Chutney is weird? No, no. Ain’t so. Yes. You are right. But only if you are referring to the more traditional, pungent (read: medicinal tasting) versions that are fortified with mustard oil and strong vinegar. This Anglo spin balances its tarts with equal measure sweets (sugar, dried cranberries and candied ginger), and the acid from kumquats (unlike strong vinegar) borders on sweet. It’s practically dessert, wink wink. It can be the perfect foil to too-rich-double-crème brie or the right amount of sweetness to tangy goat cheese. One chutney can do both! Spicy (think turmeric, allspice and cinnamon), zippy (crystallized ginger), tart (kumquats and crans) and sweet (yeah, there’s some sugar – but not as much, by half, of what you would normally see.)
Palate. Passion. Purpose.
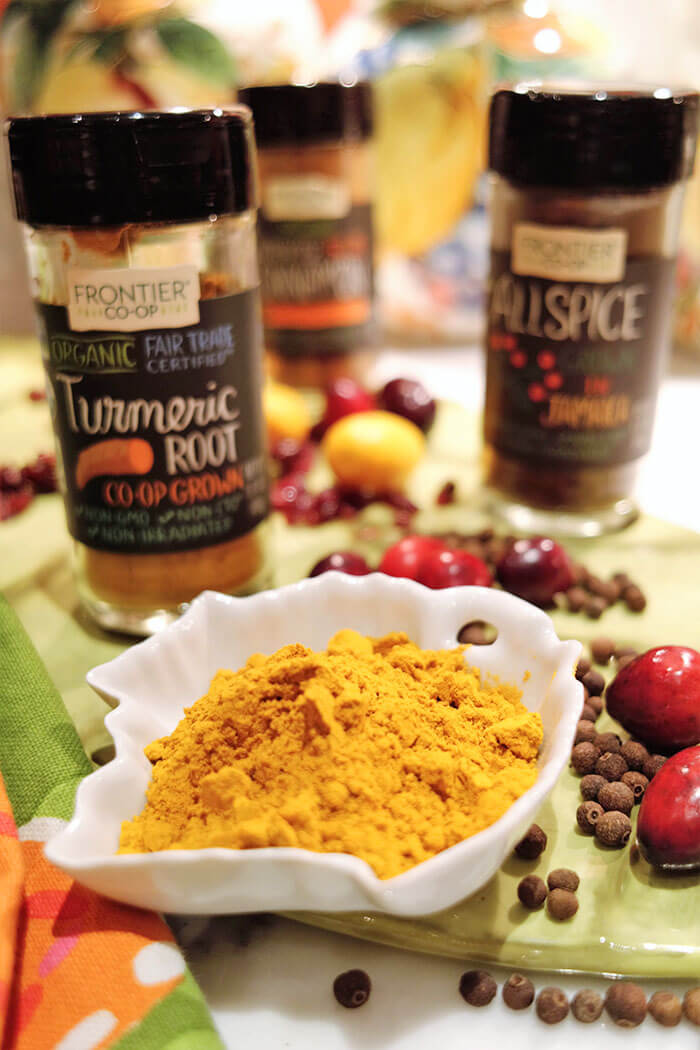
You already know I’m all about this, right? But I have met my match in partnering with Frontier Co-op. A purpose-driven company, Frontier’s theme is Cook with Purpose. Every bottle contains products with a story and the label tells that story. Frontier, as one of the earliest to advocate organics, firmly believes that social responsibility is the foundation for great products and that sustainable agriculture and ethical sourcing yield quality. Since their 1976 Iowa founding (in a river cabin!), they have worked with growers worldwide to build a safe food supply. A large part of that is education and they have created charitable funds (three to be exact) that train farmers and co-ops on how to protect themselves and the environment. The turmeric, sourced in Sri Lanka, was produced by a co-op that benefited from a Frontier grant which enabled an organic training center for the farmers. The cinnamon is Vietnamese. Frontier provided its producers with educational supplies, beds, room & board so the children in these remote communities can be educated. Worldwide, producers are blessed by the generosity of Frontier providing so many basics, ranging from clean water to roads to medical care. Frontier is on a mission – responsibility to people and planet. And btw interesting timing…our paths crossing now. I’m a month away from joining the board of CWS, a global agency with key initiatives in sustainability, hunger, development, and advocacy, among other important work. #fullcircle Frontier had me at Purpose!
Spicing It Up!
Armed with my box of Frontier Co-op goodies, and knowing it’s the time of year when warm spices soothe the soul, I decided to dose this chutney with Vietnamese cinnamon, turmeric, and allspice. The great thing about warm spices is they can flow from sweet to savory, and in fact this chutney does a bit of both. I spent some time a few years ago in southern India and learned more about Ayurvedic cooking. (I also learned a thing or two – first hand – about Ayurvedic massage. Ever have a massage by two people with a whole lotta oil and choreographed moves? Inner-resting! But, that’s for another post.)
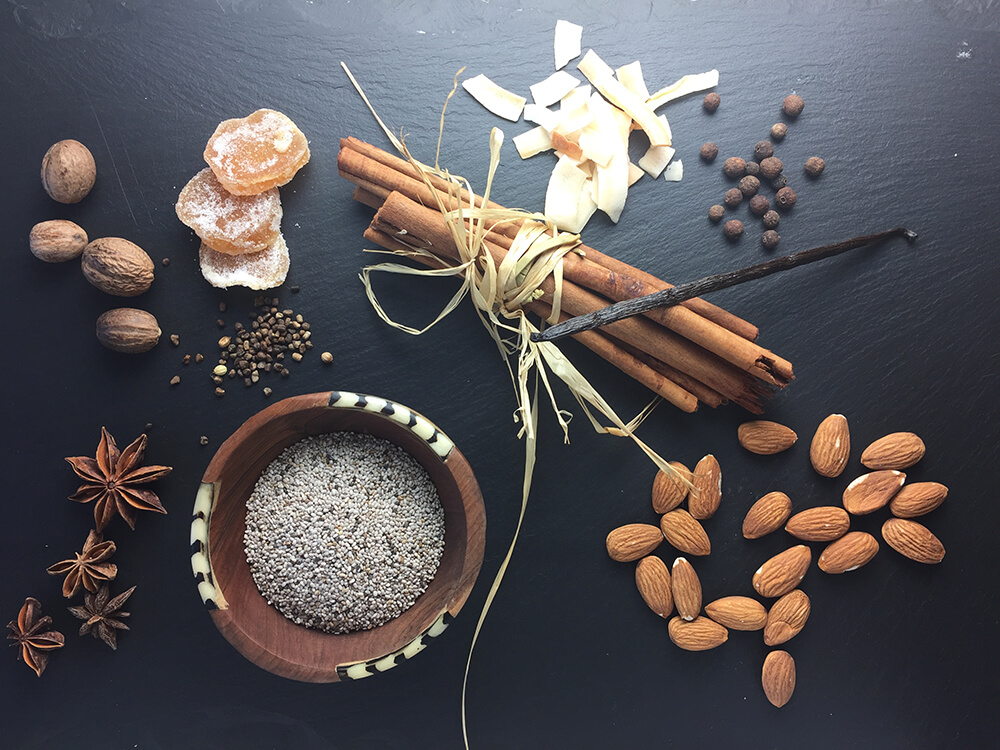
A word…or two…about the star ingredients – the spices!
Quality cinnamon is different from supermarket cinnamon (generally cassia) due to its super high oil content, a result of specific harvesting techniques. This Vietnamese (fka Saigon) cinnamon has at least a 5% oil content, which makes it more than double the regular stuff. That results in an abundance of flavor, but especially the pungent, sweet and spicy notes. It also means a little bit goes a long way. The difference in color compared with supermarket brands is remarkable.
You may remember that Buddha Bowl post with fresh turmeric from the winter. While it’s lovely to source fresh ingredients, chances are that rhizome has been on the road a while. If you want real flavor, reach for a quality dried spice. Often called Indian saffron, turmeric – a member of the ginger family – not only gives curry its bright golden color, but it also adds a pepperiness that makes it a regular in Asian cuisine.
And our old friend allspice – I just used it in that yummy pumpkin chia pudding recipe. While it seemingly combines cinnamon + clove + nutmeg and has a very big name, it’s just a single spice and it hails from Jamaica. No doubt you have seen it as an essential ingredient in jerk chicken. It is in fact the unripe berry of a small evergreen. How very Christmasy!
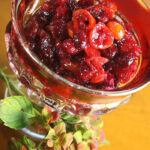
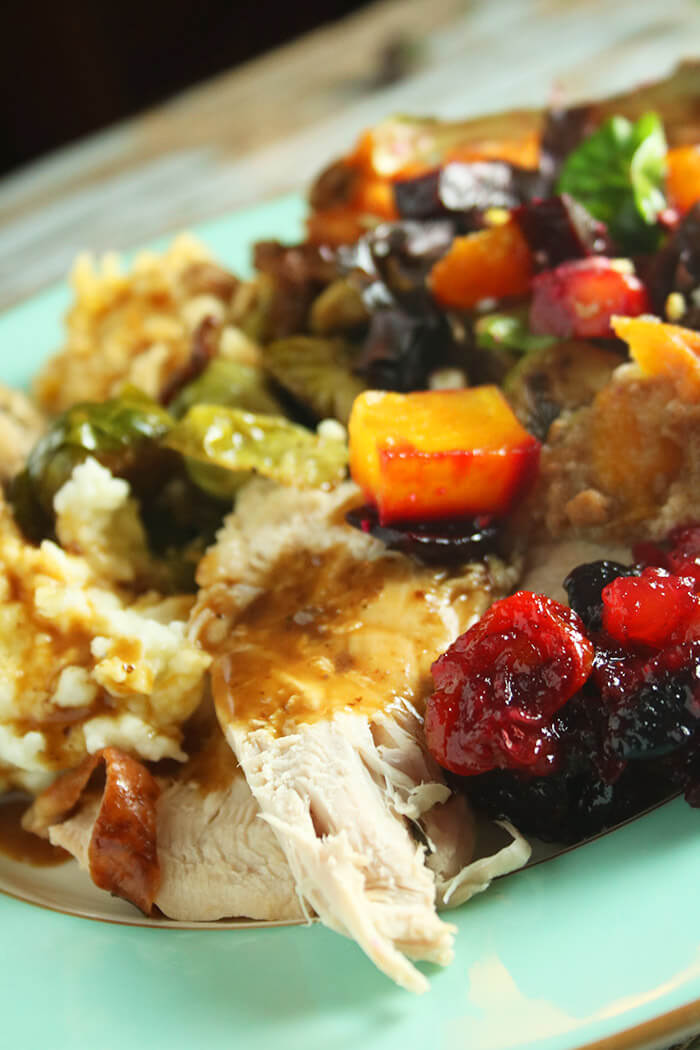
Spiced Cranberry Ginger Kumquat Chutney adds just the sass your Thanksgiving or other wintery meal needs. Jewel-like in color, this chutney not only delivers a sweet-tart-spicy contrast to turkey and mashed potatoes, but it also saves a very beige meal from being oh-so-brown.
In a medium non-reactive saucepan, combine the cranberries, kumquats, sugar, applesauce, and lemon juice. Cook over moderate heat, stirring constantly, until the sugar dissolves and the mixture comes to a simmer. Reduce the heat to low and cook, stirring often, until the cranberries begin to pop, about 5 minutes.
Add the dried cranberries, crystallized ginger, vanilla extract, cinnamon, allspice, turmeric, salt, and pepper. Continue simmering until the fruit is softened and the chutney is slightly thickened, about 5 minutes more.
Remove from heat and let cool completely. Refrigerate, covered, and serve at room temperature.
Notes
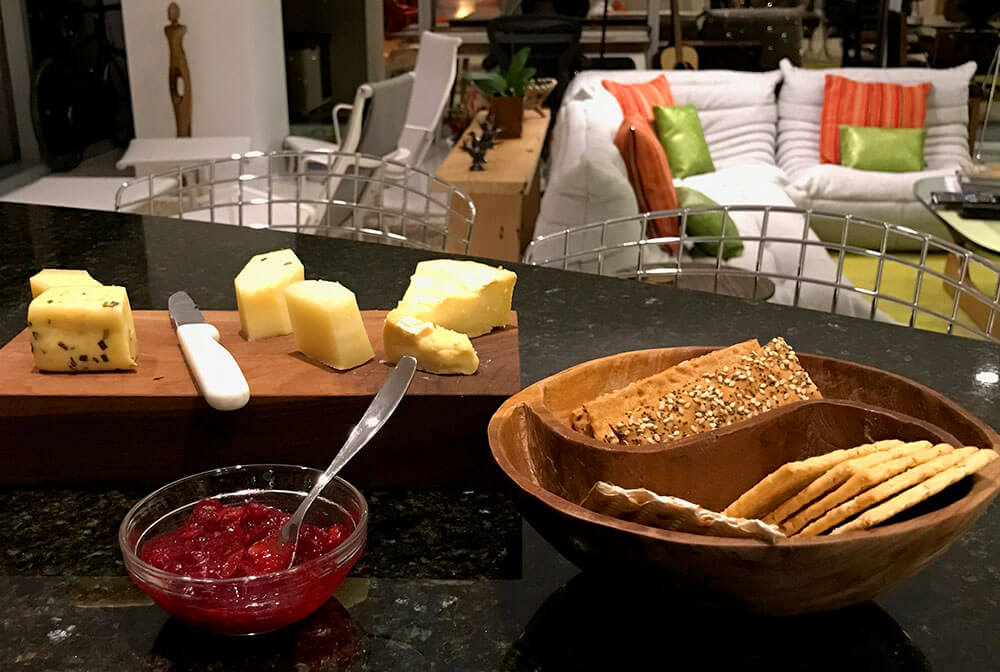
Serving Suggestions: This is great with roast meats, slathered on a sammie, or served alongside or atop cheeses. If you warm it up, it will thin a bit and it makes the best glaze for your Christmas ham.
Substitutions: For kumquats: use the zest of one medium orange and chop the flesh coarsely, pith removed. For applesauce: chop one apple, any variety.
This post contains affiliate links.
Prep Time:10 minutes
Cook Time:15 minutes
Category:condiments
Method:stovetop
Cuisine:American
Keywords: cranberry chutney, ginger
Serving and Giving Notes
The chutney can be made up to 1 week in advance, and stored, covered, in the refrigerator. It will easily last several weeks, but I’m just not going to tell you to prepare it weeks ahead. Scraping the last bit out of the bottom of the jar 3 weeks in? Well, that’s a different story. By all means!
If you are making this to give as a gift, make sure to sterilize the jars (glass only, please), and let your giftee know this has not been canned, needs to be refrigerated, and is for current consumption.
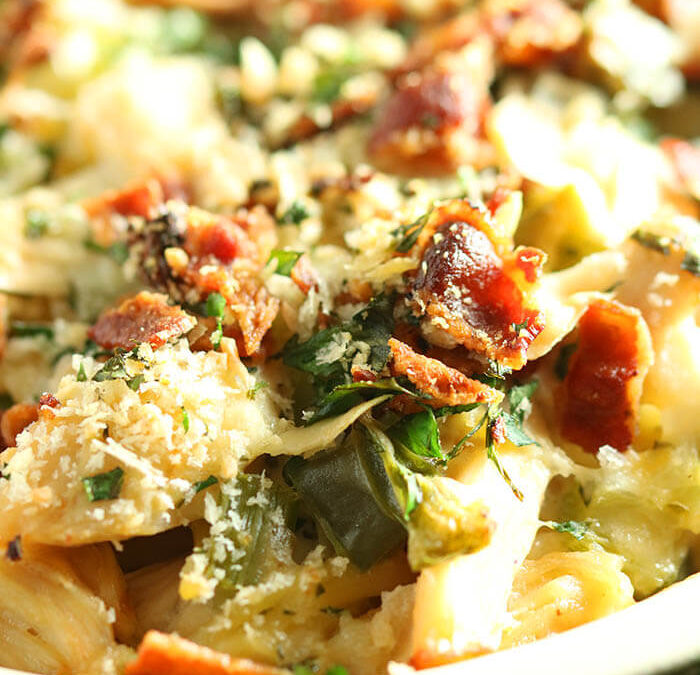
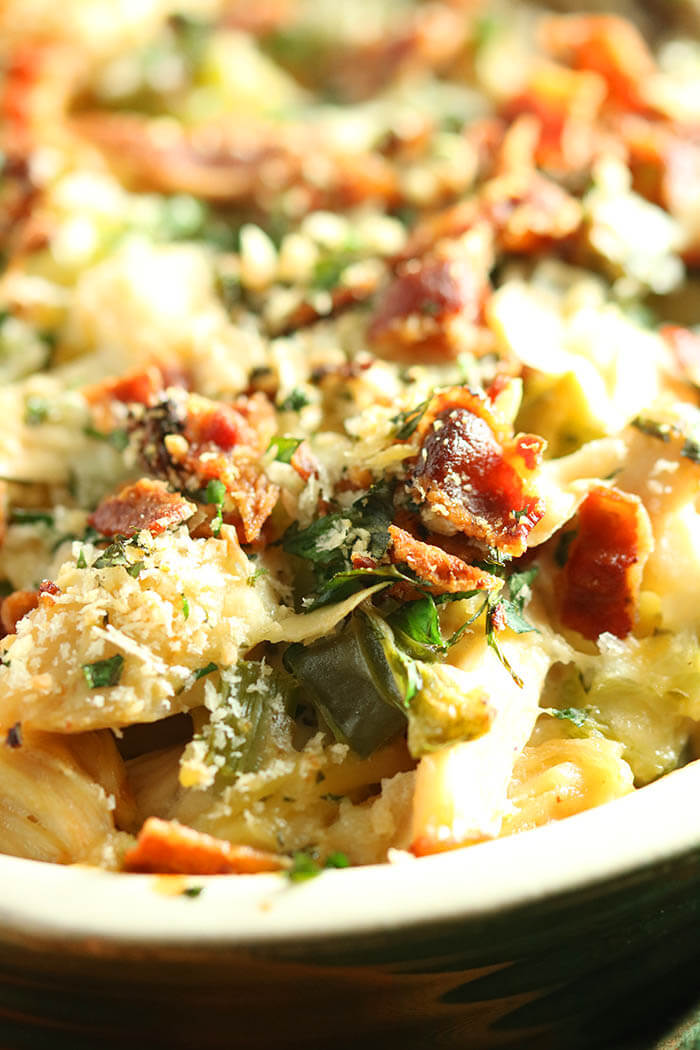
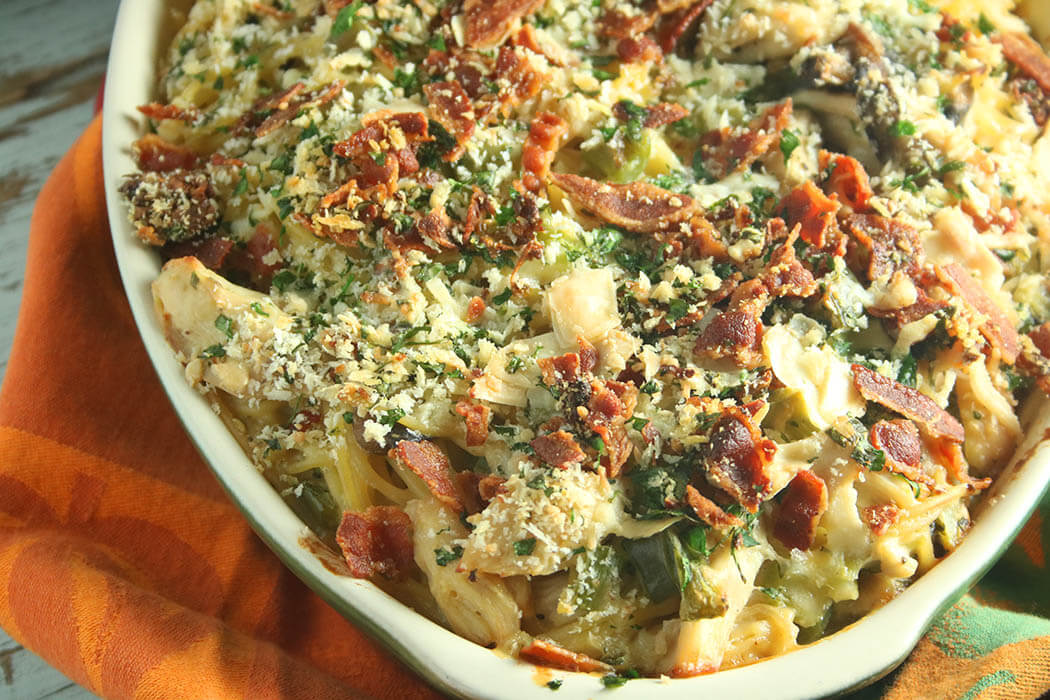
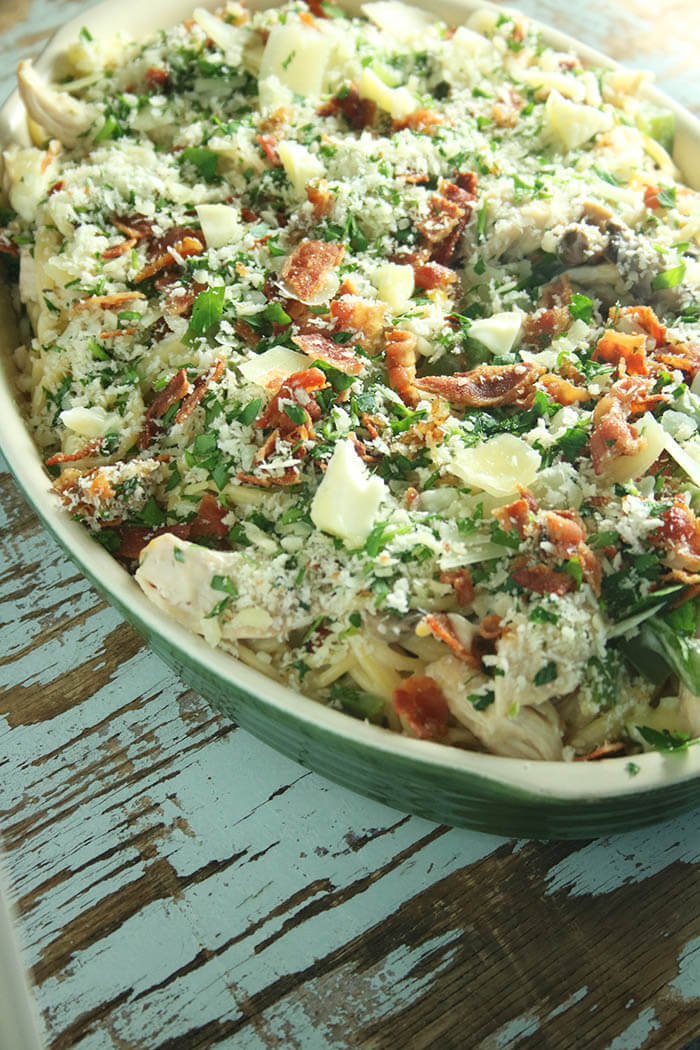
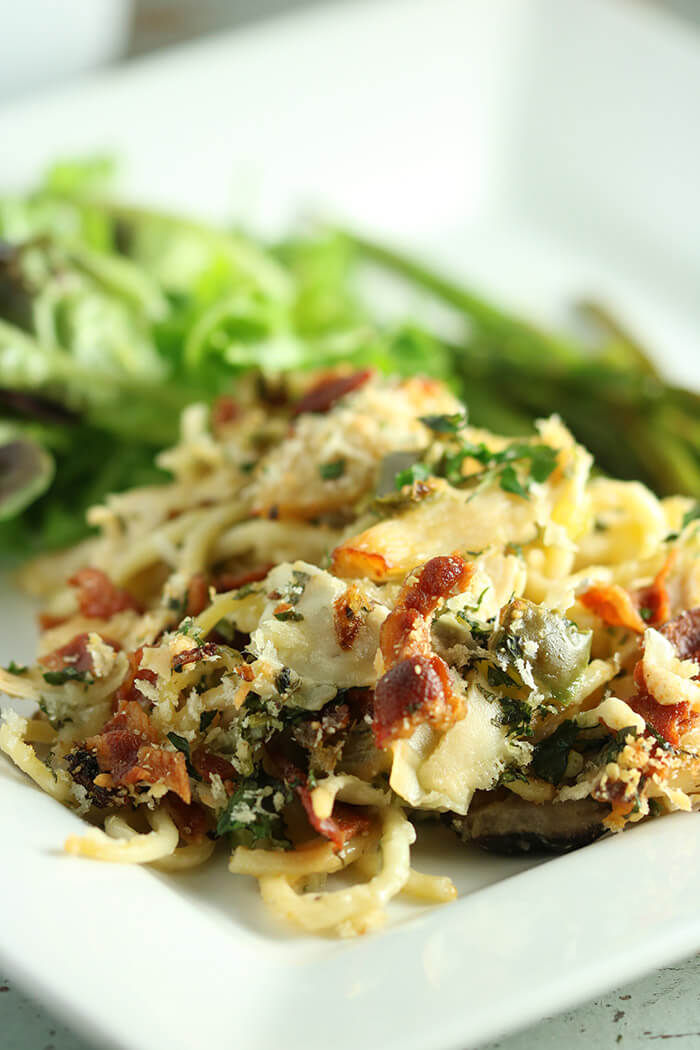
Are you full yet? I know. I know. The mind reels that we are still talking about food. But trust me – this dish does not disappoint. And, be honest. Turkey sandwiches start to feel redundant. Turkey Tetrazzini, a dish I grew up on, however is creamy, hearty, and full of mushroomy goodness. My mom found her recipe (very, very loosely translated below, in part because 50 years ago directions were vague and ingredients were more a suggestion when “the homemaker” already knew how to cook) in the 1968 Panhellenic Meats Cookbook. “Every home should have a good meats cookbook. This cookbook is filled with wonderful recipes submitted by sorority members over the nation. Here you will find all sorts of mouth-watering meats – from tried-and-true favorites such as hamburger pie to exotic foreign treats.” These gals surely got around because despite foreign dishes starting off with lasagna and Canadian meat pie, they also ranged from Turkey to Taiwan to Tahiti.
Speaking of the 60s…who’s doesn’t like a good road trip to pick out dinner? I’ll take THAT one!
Tetrazzini was invented in a hotel (debates over whether it was San Francisco or NYC) in the early 1900s. Opera star Luisa Tetrazzini is its namesake. There is seemingly no standard for what ingredients are required, but it generally includes poultry, a cream sauce and long thin pasta. The Meats Cookbook recipe may or may not call for sautéing the onion in bacon grease. I am not sure I can in good conscience call for that. And I’m here to assure you that I always choose the healthier EVOO. But you should know that is probably a lie. It is definitely a lie. It’s your cholesterol. Do what you will. For goodness sake, it’s the day after Thanksgiving. Is this really the time to show restraint?
Instead of talking turkey, let’s just let the Tetrazzini do the talking!
Turkey Tetrazzini
3 Tablespoons flour
About 4 ounces butter, divided per instructions
1/2 teaspoon salt
1/4 teaspoon ground black pepper
1 1/2 cups milk
1 1/2 cups chicken broth
4 ribs celery, sliced
1 green bell pepper, stem removed, seeded and diced
4 shallots, minced
8 ounces shiitake mushrooms, sliced
1 pound spaghetti
4 cups chopped turkey
2 cups grated cheddar
1/2 cup chopped parsley
1/2 cup grated Parmesan
6 pieces of bacon, cooked and crumbled (are you saving the fat for shallot sauté?)
1/4 cup panko breadcrumbs or seasoned breadcrumbs
Preheat the oven to 350oF. Butter a 9x13x2-inch 3-quart casserole.
I’m switching it up here and making a cross between a milk-based Béchamel white sauce and a chicken broth based Velouté. That makes it creamy and also a bit lighter.
Start by making a roux, using 3 Tablespoons each of butter and flour. Melt the butter and whisk in the flour to make a roux the texture of wet sand. Let it start to bubble and continue for one minute. Whisk in the milk and chicken stock. Combine well. Season with salt and pepper. Add the celery and peppers and simmer for 15 minutes until thickened, whisking from time to time to make sure the sauce does not stick, and the vegetables are softened.
Prep the Veggies:
Meanwhile, add 1 Tablespoon of the remaining butter (or the bacon fat if using) to a sauté pan and add the shallots. Sauté until golden and a bit crispy, about 8 minutes. Drain on a paper towel.
Add an additional 2 Tablespoons of butter to the pan and sauté the mushrooms until browned.
Cook the Pasta:
Cook the pasta according to package directions, under-cooking by a minute or so. Drain.
Time to Combine:
In a small bowl, combine the parsley, shallots and Parmesan.
In a large bowl, add the pasta, turkey, mushrooms, cheddar, and gradually add the sauce, folding to combine evenly. Add half the parsley/shallot/Parmesan mixture and toss well. Transfer to the prepared casserole dish.
Top the pasta mixture with the remaining parsley/shallot/Parmesan mixture and sprinkle with the bacon and breadcrumbs, dotting with 1 Tablespoon butter.
Bake it Off:
Bake in preheated oven for 45 minutes until bubbly.
Note: Sometimes when I make this, I let it cool to room temperature and freeze until I need it. In that case, I add all the parsley/shallot/Parmesan mixture to the pasta before freezing, and wrap well, without additional toppings. Then when I am ready to bake it off, I top the thawed casserole with bacon, breadcrumbs, and a bit of fresh Parmesan or grated cheddar. Per Darryl Hannah in Steel Magnolias, “it’s in the freezes beautifully section of my cookbook.”
Bon appetit!
Serves ??? How much do you love this? At least 6 or 8, and more if you are willing to share.
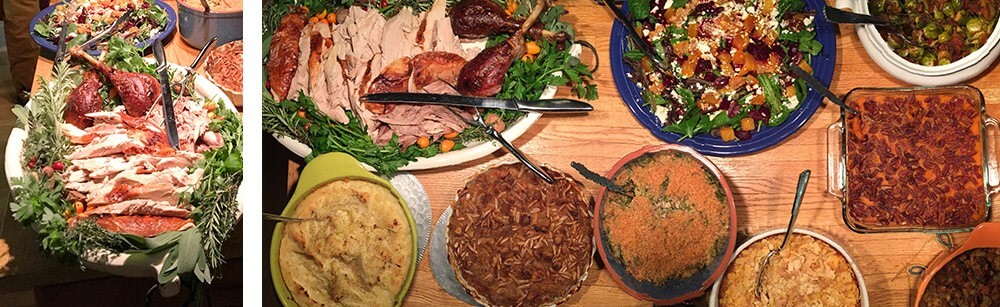
Nary has a Thanksgiving rolled by that I am not peppered with queries from dawn to dusk. I heed the call, alternating with “Gobble Gobble” and “Butterball Hotline.” This year, I say bring it on. I’ve got nothing but time. Yup! I have already cooked my Thanksgiving feast – the roast turkey and the gravy – and served it up with a “Family Favorites Pot-lucky.” Food served. Wine drunk. Dishes done. Trash at the curb. Sorry. Not sorry.
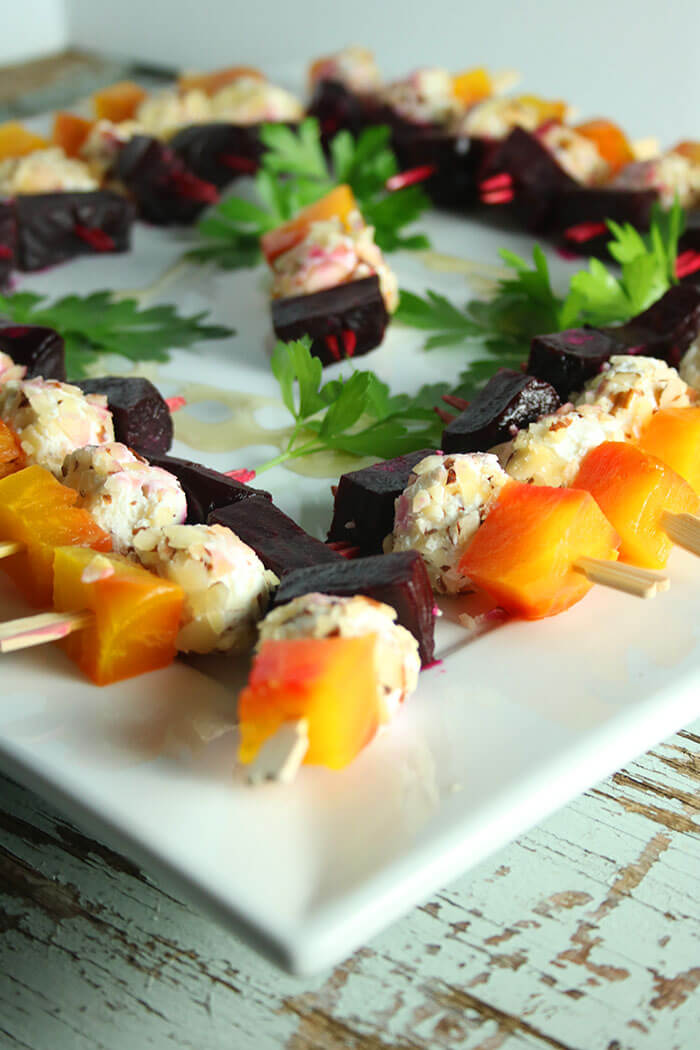
We gathered earlier this month and the pot-lucky theme was Family Treasures – the iconic culinary treats that are essential for fall family feasts. I brought Gaga’s Delmonico apples and a cranberry kumquat chutney, that’s a newer tradition. One couple brought a wonderful red and yellow beet with nutty goat cheese appetizer. The other dishes were both familiar and uniquely twisted – a modern green bean casserole & sweet potatoes with pecans, scalloped corn & sprouts with bacon, and mash taters & an amazing sausage stuffing. It was a tasty trip seeing how others celebrate the season.
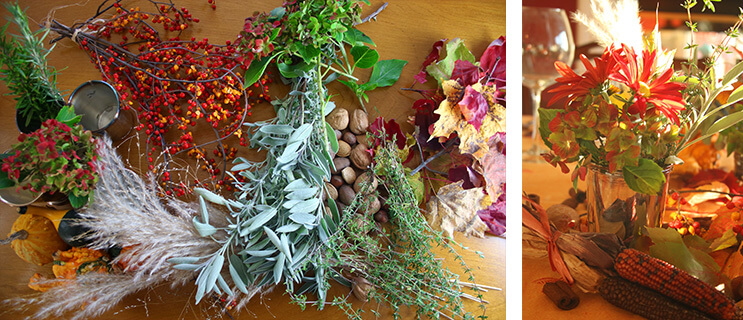
And because it has been so warm, I was able to get most of the décor from the herb bed, grasses and colorful leaves. After one too many table settings that hogged the site line and got moved off the table about 5 minutes after we were seated, I decided to keep it low and used a collection of mismatched short silver cups, more commonly used at Derby time – julep cups! That plus a few candles and some nuts and gourds was all I needed.
I was also in charge of the turkey and over the years I’ve had my share of turkey prep. Some years I have gone from perfect turkey on the Today Show Thursday to turkey leftovers on Good Morning America Friday. By noon on Thursday when others were thinking about the big dance, I had moved on to leftovers prep. One year my balcony was lined by so many wall to wall coolers filled with turkey parts that you’d have thought I was running a soup kitchen. Suffice it to say I have done every show with every possible technique and turkey part. Whole turkeys, turduckens, spatchcocked and deconstructed. Done. It. All.
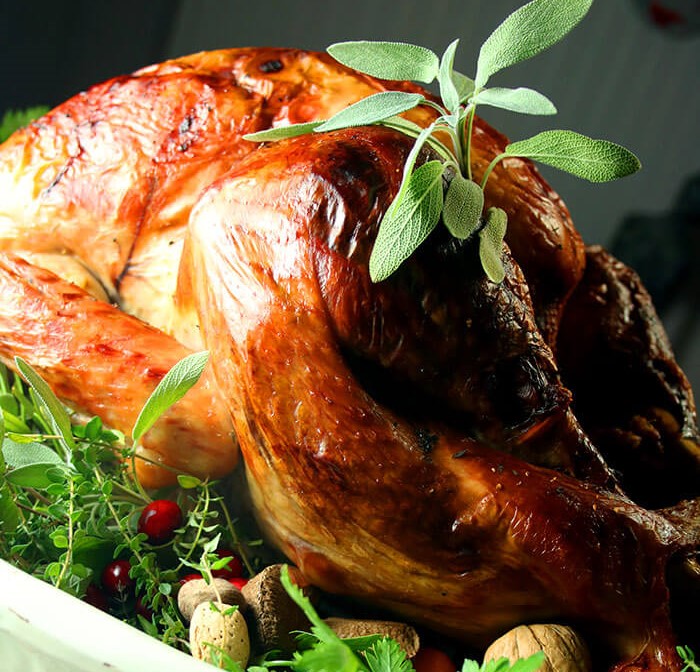
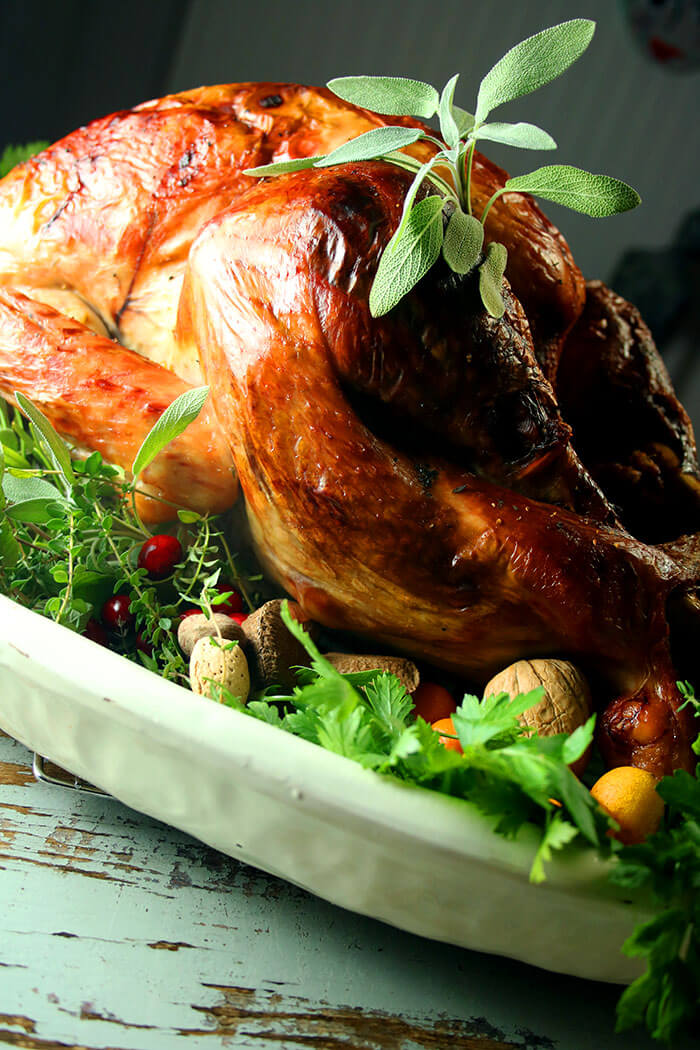
The real secret to Turkey Perfection comes from good preparation, organization, great ingredients and having the right equipment. My turkey this year came from Wise Family Farm and was about 16 pounds. I hope you are so lucky as to have a fresh, locally pastured bird, but if you are only able to source a frozen turkey, you need to get busy now. The safest way to thaw a frozen turkey is in the refrigerator over several days. And don’t forget that it takes 24 hours to thaw every 4 pounds of frozen bird.
If you head to my shop, you will find the tools I find most invaluable – a good Roasting Pan, about 2-3” deep (I prefer “stick” over non-stick – that results in a nice dark brown gravy), a Roasting Rack that raises the turkey for essential airflow, an Instant Read Thermometer to validate estimated cooking time, a Fat Separator to skim off fat and pour the rich stock from the bottom of the vessel, and anything written by Rick Rodgers, including The Turkey Cookbook, Thanksgiving 101, and The Big Book of Sides. I can safely say everything I know about turkey and gravy I learned from Rick. He IS Mr. Turkey.
I find the recipe below to be quite foolproof. It is a classic technique for an average-sized 18-pound turkey, but the instructions can be adjusted depending on the size of your bird. There are many tweaks and twists that can bedazzle the bird, but it always helps to know the basics before you start embellishing. Learned that one from Julia herself! And one of the things I learned from Rick is to have a stock pot going all day so that you can baste before your bird gets juicy and you have everything needed to make gravy, regardless of the amount of juices your bird yields. I have included details on how to do that so you can relax and know you will be gravy-prepared.
Roast Turkey Perfection with Gimme-More Gravy
Turkey Perfection
One (18-pound) fresh turkey
Freshly ground black pepper
Kosher salt
2 carrots, coarsely chopped
2 stalks celery, coarsely chopped
1 small onion, coarsely chopped
3 quarts turkey or chicken stock (I prefer low sodium since this will reduce for hours – you can always add seasoning later)
1 Tablespoon olive oil
4 sprigs Italian parsley
2 sprigs fresh thyme
6 peppercorns
1 bay leaf
1/2 cup* plus 2 Tablespoons unsalted butter, at room temperature
1/2 cup all-purpose flour
*You may not need this if the turkey releases enough fat to yield a half-cup. Commercially produced birds tend to be fattier, but the pasture-raised bird I cooked was very lean and I needed to supplement with the butter when making the roux for the gravy.
Position oven rack in the lower part of oven and preheat to 325° F.
Remove any pieces/parts inside the turkey – the neck and giblets (which includes the gizzard, heart, and liver) – and set aside.
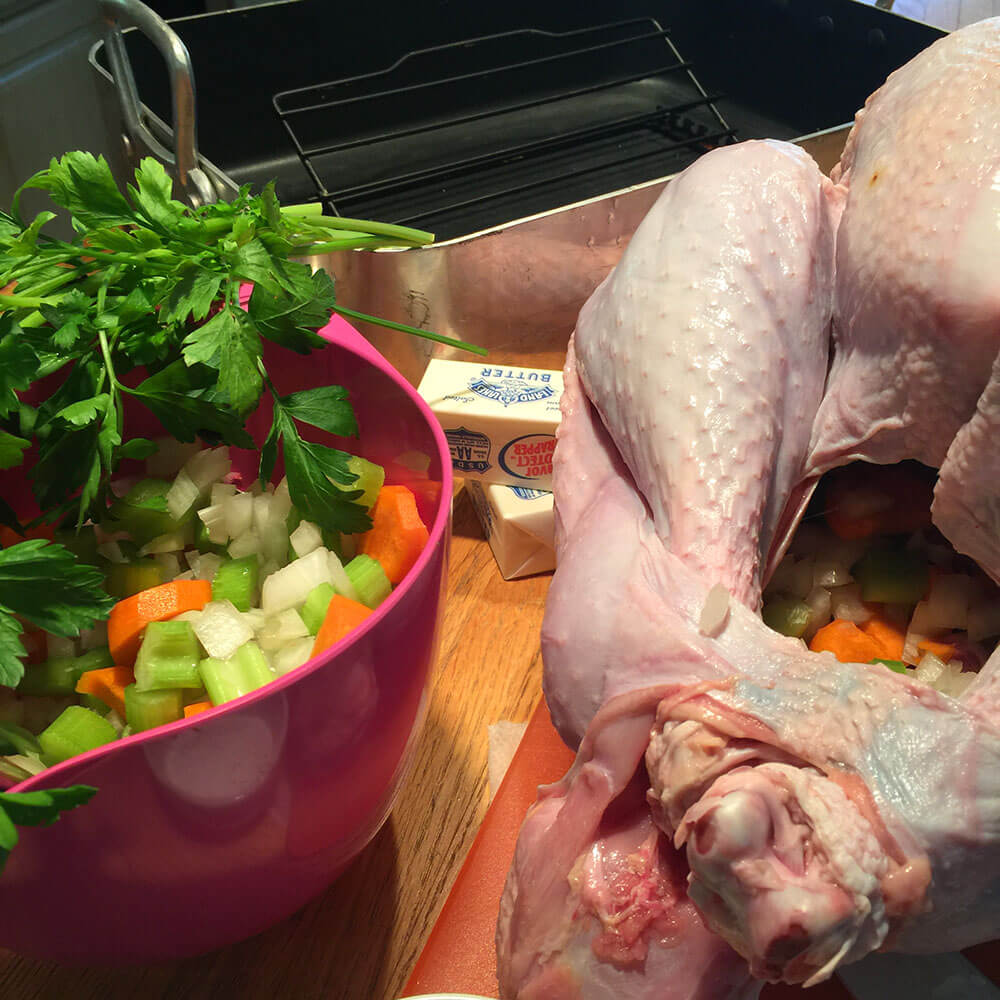
Rinse the turkey inside and out with cold water. Pat dry with paper towels and wipe out the cavity. Rub cavity with salt and pepper and stuff loosely with 1/3 of the carrots, celery, and onions.
Pin the turkey’s neck skin to the back with a bamboo skewer or trussing pin. Tuck the wings akimbo (“hands” behind the back, elbows turned outward) to keep the tips from burning.
Place the drumsticks in the hock lock. Some birds will be butchered with a skin flap as shown above. Others may have a plastic loop to lock the legs. If all else fails, tie them together with kitchen string.
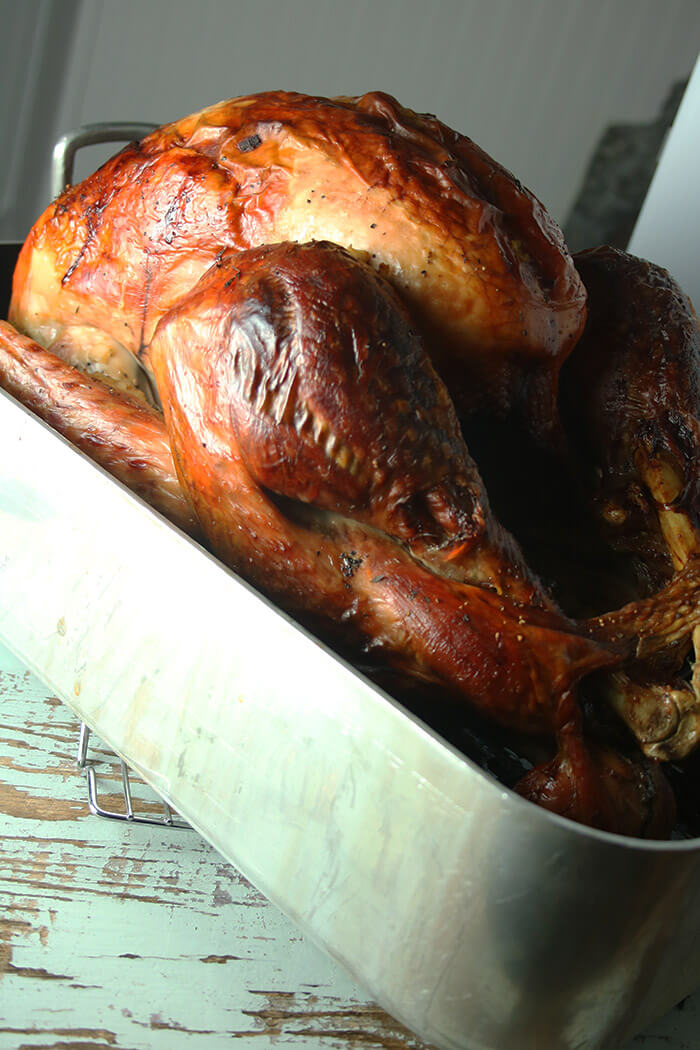
Place the turkey, breast side up, on a rack in a roasting pan. Rub all over with 2 Tablespoons softened butter. Season with salt and pepper.
Tightly cover the breast area with aluminum foil. (Not tented, just pressed tightly onto the breast. You will remove this during the last hour of roasting).
Pour 2 cups of turkey or chicken stock into the bottom of the pan and place in the pre-heated oven.
Stock Pot
As soon as the bird is in the oven, start the stock pot. This will give you juices for basting during the early hours when the bird hasn’t given off much liquid. It will also provide backup turkey stock for a bird that is a low juice producer.
Hack the turkey neck into 4 or 5 pieces. Trim away the gizzard’s silver skin and membrane and coarsely chop. Some like to also chop up the liver and heart and add it here, but I think they are a bit bitter when boiled. I’m more likely to save them and sauté later with onions and then add them to stews, fried rice, or place atop avo toast.
In a large stock pot, heat the olive oil, add the turkey neck, any giblets, and sauté until brown, about 5-7 minutes. Add the remaining carrots, celery, and onions and sauté for 5 minutes. Add 1 quart of turkey stock, along with the parsley, thyme, peppercorns and bay leaf. Bring to a boil and reduce to a simmer. Continue to simmer, using this to baste the turkey as needed. Periodically skim any floaters. (I’m trying really hard not to say scum, but you know what I’m talking about.) Add additional turkey stock to the pot to maintain a 1-1 ½ quart level.
Basting
Roast the turkey, basting all over every hour with the juices in the bottom of the pan or from the stock pot. Lift up the foil to baste the breast area. I usually rotate the pan periodically to make sure there are no oven hot spots and the bird roasts evenly. Roast until an Instant Read Thermometer inserted in the meaty part of the thigh (but not touching the bone) reads 180° F and the breast is 165° F, about 4 hours. Whenever the drippings evaporate, baste from the stock pot and add a bit more stock to the roasting pan. Remove the foil from the breast during the last hour to let the skin brown.
It’s better to pad your estimated cooking time by 30 minutes, so nobody is standing around drinking too much while waiting for the bird. I say that like it’s a bad thing. I always defer to the thermometer, but use the times below as a guideline. Stuffing your turkey will add about 5 minutes per pound, so I cook the stuffing on the side (doesn’t that make it dressing??). Since you need to let the bird rest 30 minutes and carving takes time, you have most of an hour to finish or warm the rest of the sides when the oven is no longer needed for the turkey.
Estimated Roasting Times – Unstuffed Turkey – about 15 – 20 min a pound
Transfer the turkey to a large serving platter and let it stand for at least 30 minutes before carving. Pour any juices that have run off back into the roasting pan.
Gimme-More Gravy
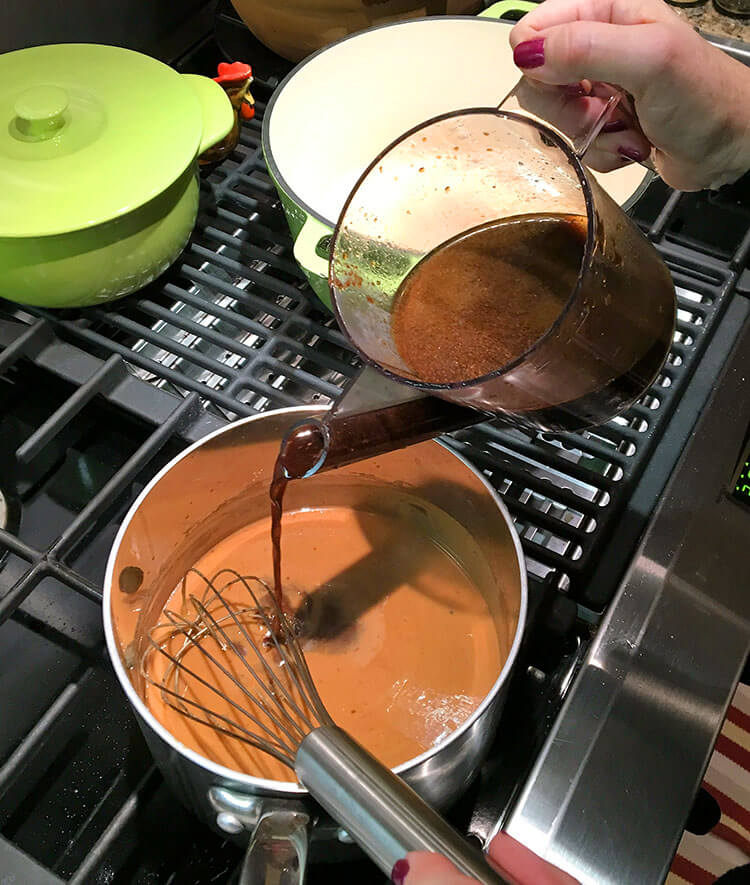
Once the turkey is out of the oven and resting, pour the drippings from the roasting pan into a Fat Separator or heatproof glass measuring cup. Let stand 5 minutes, then skim off and reserve the clear yellow fat that rises to the top. Measure 1/2 cup fat, adding butter, if needed, to make 1/2 cup.
Check the measurement on the broth remaining in the fat separator, once you have skimmed the fat. If you have less than one quart of liquid, add enough strained liquid from the stock pot to the skimmed drippings to make 4 cups.
Place the roasting pan on low across two stove burners (or scrape all the brown bits from the roasting pan into a saucepan) and add the turkey fat or fat/butter combo (1/2 cup total).
Whisk in the flour to make a roux, scraping up the browned bits on the bottom of the pan, and cook until the paste is lightly browned, about two minutes. Whisk in the turkey broth. Cook, whisking often, until the gravy has thickened and no trace of raw flour flavor remains, about ten minutes.
If desired, finely chop whatever giblets you have prepared and add to the gravy. Check the seasonings and add salt and pepper, as needed. Transfer the gravy to a warmed gravy boat.
Carving
Remove the wing and leg on one side and slice the breast, carving parallel to the center/breast bone. Repeat on the other side. It’s become very popular to remove the breast and slice cross-wise like a loaf of bread. It’s not the way I was trained. But my Dad’s process which took an hour to carve…one slice for the platter, one for the man with the knife….and never ended up with enough food on the platter (What? You want more than one paper-thin slice???) has left some family members in therapy. I can’t be sure but I think some people that I may or may not be related to shred their turkey by hand just to avoid any brush with our torturous past. You are on your own – #NoJudgment – but know that there are plenty of videos on carving techniques!
However you carve it, enjoy and be sure to smother with amazing gravy and serve with gratitude! And be sure to share your family favorite sides in the comments below.
Serves 18 with about 4 cups of gravy
Take a page from this book and consider liquid dessert! Kind of a perfect way to end a meal – no further chewing needed.
Gobble! Gobble!
This post contains affiliate links. For more of my must-have faves, check out my shop.
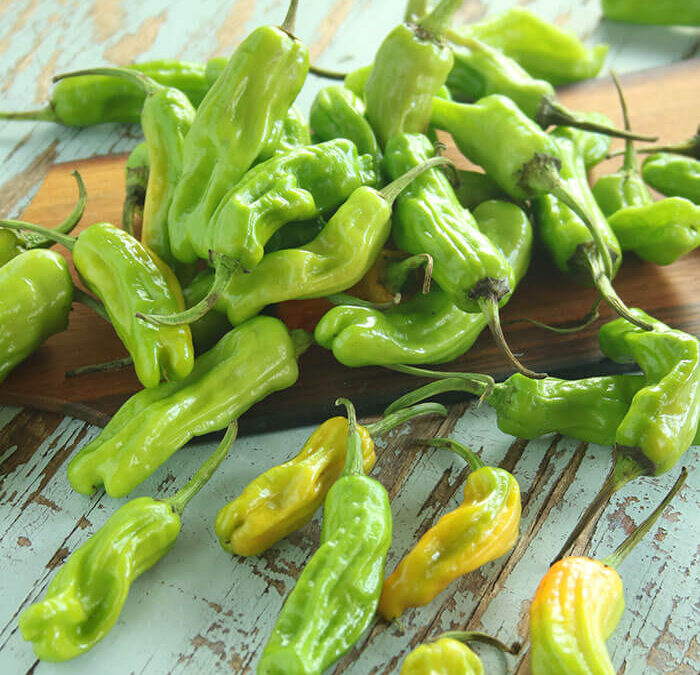
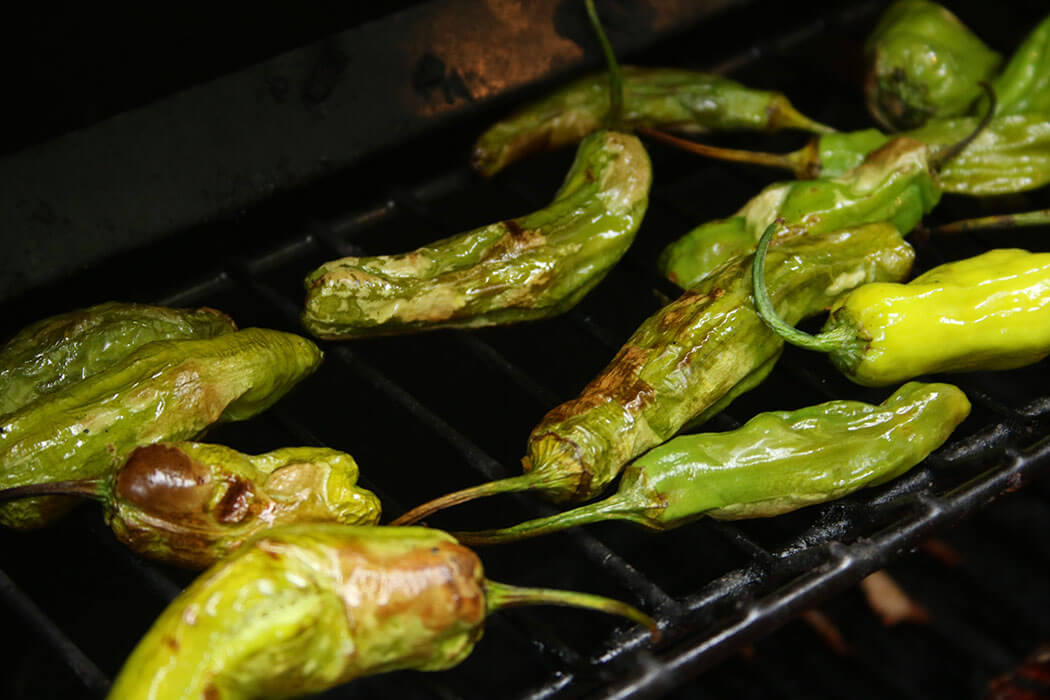
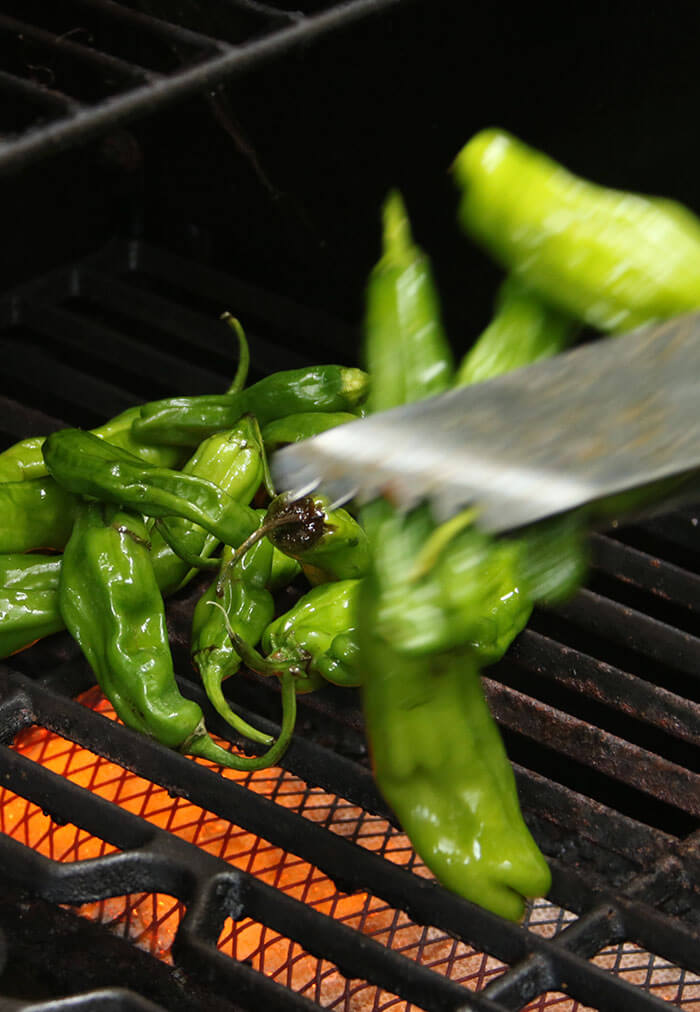
In this impending season of eating too much – and loving every minute of it – here’s an appetizer that is a real crowd pleaser and won’t bust the gut. Roasted shishito peppers! Super-fast to prep, full of flavor with just an occasional touch of heat, shishito peppers have an “I-want-more-ish” quality to them and are pop-able like edamame, though they have the added benefit of being just as good at room temp.
Shishitos are a Japanese pepper, long and slim and a bit twisty, with a tip that allegedly looks like a lion’s head (shishi in Japanese). A bit citrusy and herbal, they are pretty close to the Spanish Padron pepper. Cooking them until blistered brings a smokiness that makes this a veritable party in your mouth.
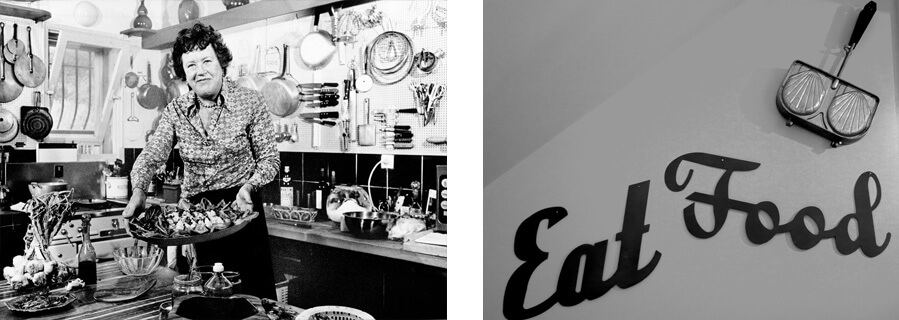
Not long ago shishitos would have been impossible to source outside a fancy greenmarket, but now they are widely available at the grocery, thanks to Melissa’s, the largest distributor of specialty produce in the country. I love the unique items that Melissa’s carries, ranging from tiny coconuts (coquitos) to dried Bhut Jolokia chiles. And I have a special place in my heart for Melissa’s owner Sharon Hernandez who once blessed me with a gift of culinary history – one of Julia Child’s beloved sandwich presses – the very one that almost took me down.
During the run of the Rosie O’Donnell show, I styled cooking segments with Julia Child on many occasions. This particular day Julia was scheduled to appear live and demonstrate a lovely recipe for a toasted Croque Monsieur sandwich. Rosie, who built her shtick on an alleged pedestrian palate, was making her spin on the famous French fancy. Wonder Bread in place of Pepperidge Farm Toasting White, Bologna in lieu of Black Forest Ham. No Gruyere – just Velveeta. And the plan was that Rosie’s sandwich would not be precious and pressed, but 1-foot high. Bigger is funnier, or so was the show’s mantra.
As the foodstylist for the show, I had assembled all the groceries and props, but awaited Julia’s arrival to make the “beauty” sandwich. She was hauling her prized shell-shaped sandwich iron from her Cambridge home, and with that I could create the final dish. She arrived on schedule, and I made several test sandwiches for her approval. Routine as always, we were good to go.
As the show counted down to its live cold open, I fired up the burner and started browning some butter. Through an epic fail on the part of the special effects department (heads rolled that day) and completely unbeknownst to me, the smoke detector in my make-shift kitchen (better known as a hallway) at historic 30 Rock had not been disabled as was our norm. Being a landmark building, working with open flames and having an unventilated kitchen was strictly forbidden. That had never stopped us before.
No sooner did I turn on the flame than NY’s Bravest stormed the building, throwing my pan against the wall and dragging off with the burners. Silent in the hallway, the alarm was blaring on set with a full studio audience. Mere minutes until the show went live… or would they have to throw to rerun? With just seconds to spare, the alarm was silenced, the audience calmed, and the call was made to continue with a live show. And NYFD was interrogating me as an enemy of State. Well, it wasn’t that drastic, but they did take away my flame.
I found myself with few options. I had minutes, not hours; I had no burners or sauté pans. So, by hand, I smashed the cold bread into the iron to shape it shell-like. I hauled out a Preval paint sprayer and mixed up a combo of bitters and browning agent and lightly spray painted/“toasted” the bread. I dipped the cheese in the Propmaster’s hot tea to melt it. It wasn’t half bad. And, yes, it was the full extent of my equipment and tricks.
And then SHE sauntered from her dressing room, oblivious to the surrounding chaos, and passed final judgment on my creation. “Dear girl, it’s awfully pale.” She had no clue – her dressing room, like my hall, had no blaring sirens!! But she kept walking. And the show went on. And it was just another day in live television.
A few years later, long after Julia went to the big Panini Press in the sky, four sandwich irons came up at a culinary auction. Heavy hitters in the biz got into a bidding frenzy and I was left in the dust. My friend Gerry told me I was out of my league: “That’s some tall cotton, girl.” But not long after, thanks to Melissa’s and Sharon’s generosity that shell-shaped sandwich iron appeared on my doorstep. It is mine, all mine. It’s hanging on my wall, just like Julia used to hang it…well, minus the hospital green pegboard with blue magic marker outlines drawn by her husband Paul, indicating the one and only place each gadget was to be stored. I pull it down every once in a while, but mainly it’s retired out of respect to the woman who made it look so easy and laughed all the while.
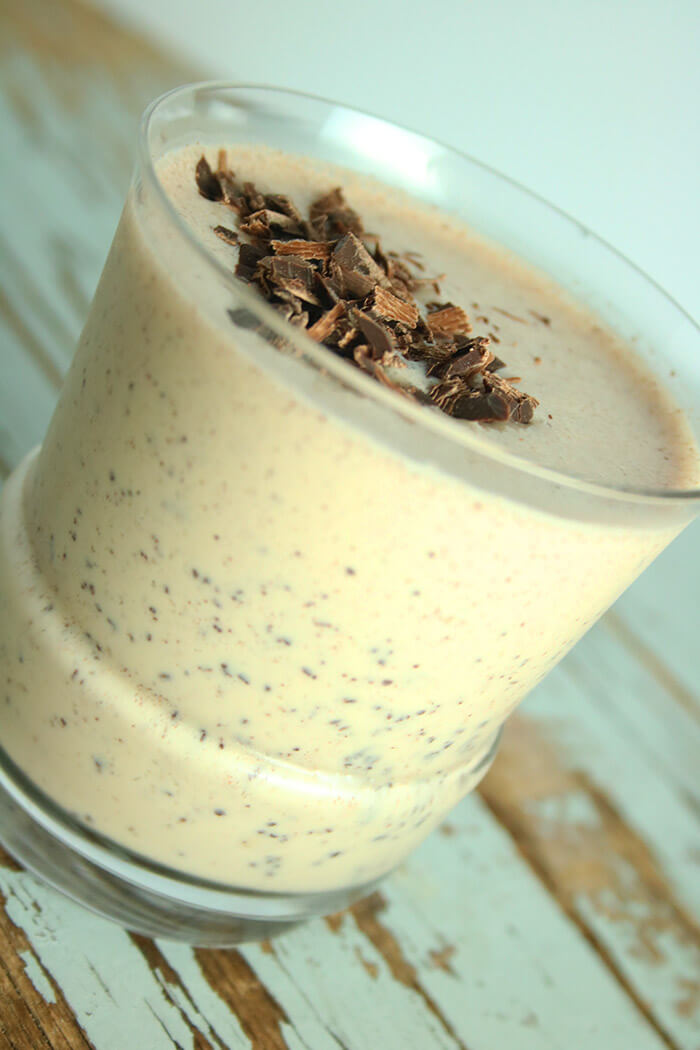
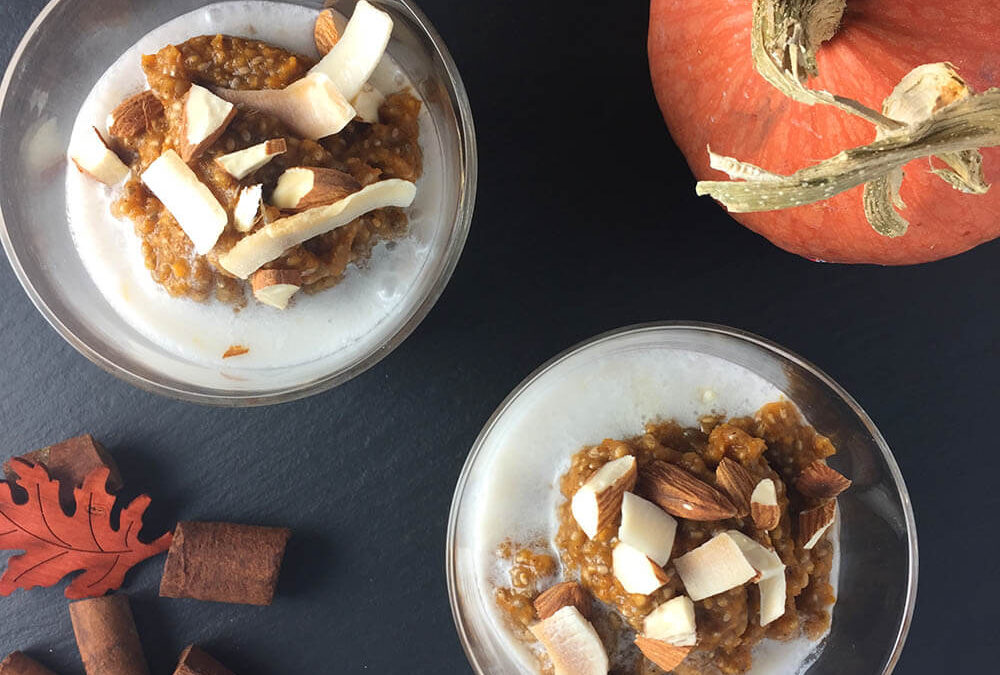
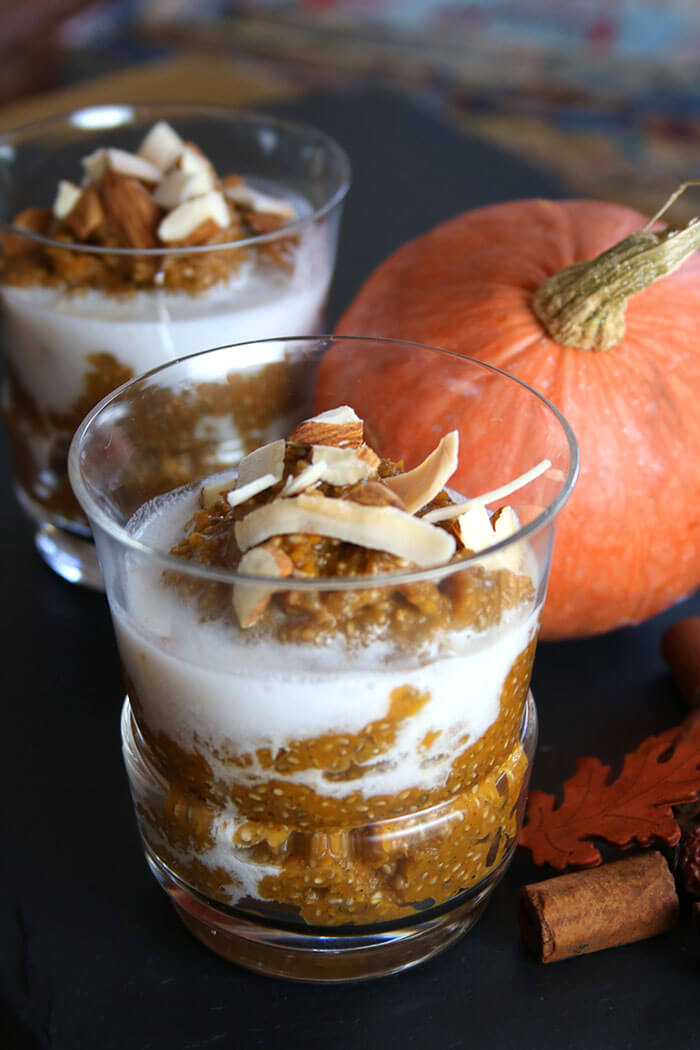
Well color me surprised! If you ever told me I would be writing about Pumpkin Chia Pudding, I would have called you a big fat liar. Not really my thang. But a couple weeks ago I ran across a post called Chia Seed Pudding Is Disgusting, and You Know It and
I also felt compelled to set the record straight. True, the commercially produced products that the author referenced can be “gelatinous, slimy, and look like frogspawn”, but I have the secret ingredient for a homemade version, and it’s probably already in your pantry. Pumpkin puree. The author of the post, Bailey Bennett, seems to be most horrified by the mouth-feel (“chewy mucous”………are you howling yet?? Come on!!! It’s a healthy seed, people, not the apocalypse). I propose that with the mere addition of pumpkin, it is neither slimy nor looks like tadpoles in training. This is not the first time I have let pumpkin do my heavy lifting. A client once had me try to sneak a secret healthy ingredient into a dessert bar. They wanted brownies, but I knew it would be too obvious – I went with pumpkin pie bars, figuring that pumpkin was already famous for making the leap from vegetable to dessert. I needed to merely ride her coattails.
Adding pumpkin to chia goo actually makes for a hearty breakfast pudding (or porridge, your call) that takes zero cooking and can be made ahead. To serve, I just zap it in the micro with a splash of coconut milk (the beverage in the refrigerated milk alternative section, not the canned full-fat Asian ingredient) and top with chopped almonds for added protein. It’s also great straight from the fridge – kind of like Siggi’s pumpkin yogurt, minus the dairy devil.
Mine is a creamy, full-flavor, dessert-like breakfast dish, ready on the fly. None of the “gelatinous mold that wiggles, jiggles and squelches with every touch of a spoon”. I can’t be sure, but I suspect Bailey’s brother stuffed chia pudding in her sneakers at some point. I had a similar experience with Vienna Sausages and I feel her pain.
Chia is an herb in the mint family and a rich source of Omega 3, B Vitamins, Calcium, and Manganese. (For more on those nutritional benefits, check out Health Ambition). For me, the real rock star is its protein content. A life-long struggler with eating in the a.m. (I went to work in television at 4am way too often, sometimes after closing the restaurant at 2 am), breakfast was for me theeeeee meal to skip. And if I grabbed something in the studio, I can assure you it was not worthy. No doubt, it was carb-heavy and protein-free. Though I wanted to….I. Just. Could. Not. The elusive fantasy meal needed to be tasty, high protein (or sleepless me would sugar-crash soon), portable, and bonus points for being able to be sucked down. Fast. During my Bush’s Best Beans days, I concocted a smoothie secretly filled with Great Northerns. It worked really well for a long time, but then Greek Yogurt came on the scene and caught my eye. I am nothing if not a serial breakfast loyalist. More recently I have wanted to find several options of the perfect combo (delish, hi-protein, fast, portable) with less reliance on dairy. After devouring everything written by Lyn-Genet Recitas, creator of The Plan, I committed to 10 grams of protein for breakfast – non-dairy. Whaaaaaaaaaat? You’re scaring me!!!!!! How will YOU EVER do that?????? That’s when I started dabbling with spelt flakes, flax granola and chia pudding. And, we’re back. Chia Pudding! Pumpkin Chia Pudding!!
This recipe is made in 2 minutes – dump and stir – and packs 8-10 grams of protein (depending on how many almonds in your topping (shout out to pumpkin seeds – a small handful has 9 grams of protein and is a great source of zinc)). It’s very low in sugar (bonus in preventing late morning crashes) and is high in fiber – 45% of your RDA. And of course, all those spices are amazing for digestion and so much more. Cinnamon alone aids digestion, is helpful with controlling type 2 diabetes and cholesterol, and serves as an anti-inflammatory. It’s all good!
But most importantly, it’s tasty and easy to take to work or eat on the fly. And it does not, I’m quite sure, include, as Bailey suggests, the “tears of all the poor souls who’ve wasted their afternoon snack on a bowl of grayish goo.”
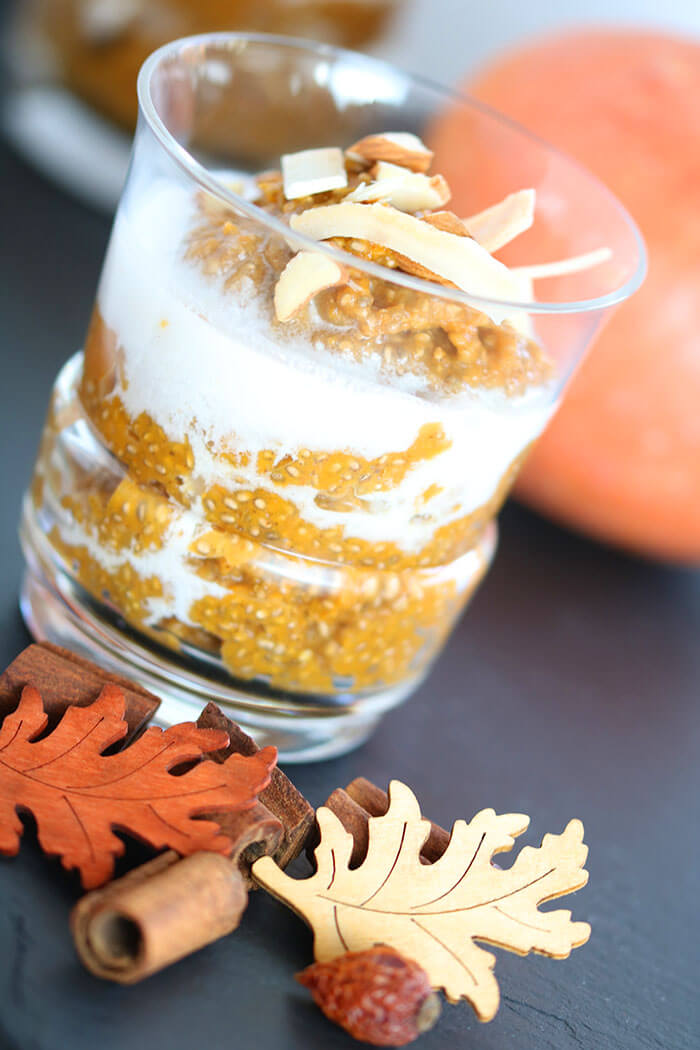
This rich and creamy pumpkin chia pudding is actually a healthy, high-protein, high-fiber, low-sugar breakfast-on-the-run kind of dish. It doubles as a dessert.
Ingredients
Scale
½ cup chia seeds
1 teaspoon ground cinnamon
½ teaspoon ground allspice
½ teaspoon ground ginger
¼ teaspoon ground cardamom
1/8 teaspoon ground nutmeg
1 ½ cups unsweetened coconut milk beverage (I like Silk, Trader Joe’s, or So Delicious – 45 calories per 8 ounce cup. The sweetened versions have another 40–50 calories of sugar).
1 Tablespoon maple syrup (or more to taste)
1 teaspoon vanilla extract
½ teaspoon almond extract
15-ounce can pumpkin puree
Instructions
This is basically a dump and stir recipe. But, I’ve listed the ingredients in the order I like to add them:
First – the chia and 5 dry spices. Dump. Stir.
Then the milk, maple syrup, and two extracts. Dump. Stir.
Once they are combined and the spices are dissolved, then I fold in the pumpkin.
Store, refrigerated, in an airtight container.
To serve, microwave with an additional splash of coconut milk until warmed through (or serve cold) and top with chopped almonds and coconut flakes.
Notes
Serving suggestions: chopped raw almonds and/or toasted coconut flakes
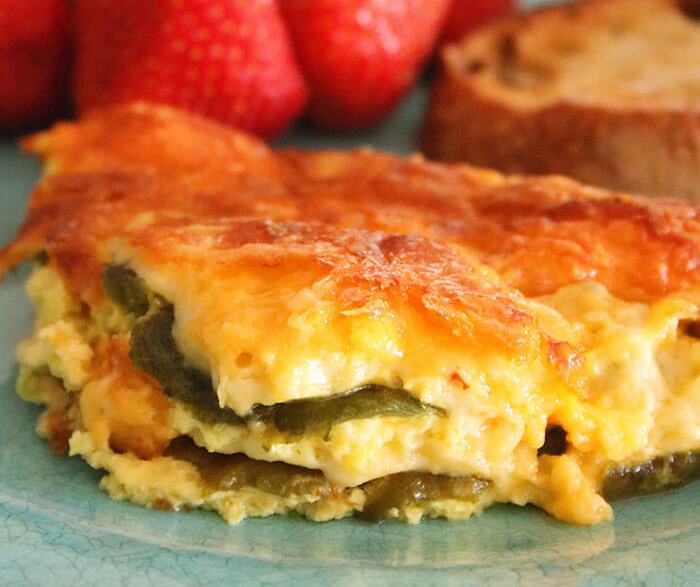
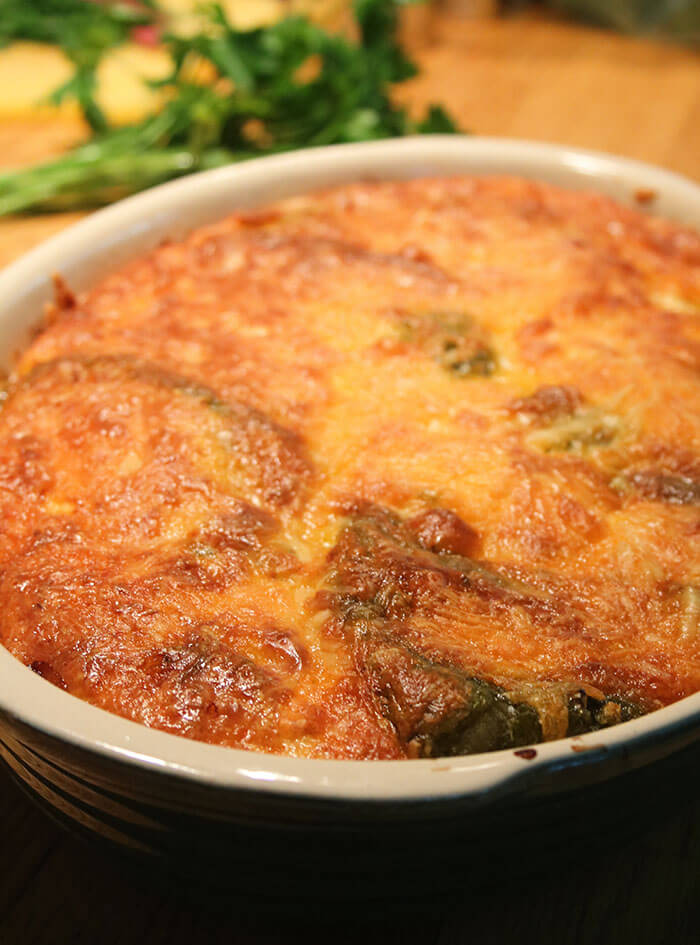
Now that you have eggstracted all the info needed to pick the best possible, freshest, and ethically, pasture-farmed eggs for your roasted poblano strata, it’s time to get cooking. But what’s that you ask? What’s a strata?? Come on! You know what a strata is even if you don’t call it that. It’s a poor man’s soufflé, relying on bread instead of whipped egg whites. My mom was legend when it came to the classic one – an egg/milk mixture that she poured over chunks of bread and allowed to sit overnight in the fridge. The “chunkies” could be almost anything, but she (always a measurer) stuck to her recipe and used cubes of ham and cheddar. She called it a fondue, and while really more quiche-like (custard-based), it was probably closer to a fondue with all that melted cheese (yes, you CAN add too much cheese) than a strata which derives from the Latin word stratus, meaning layers. It was the ladies of the Silver Palate that popularized calling a layered brunch dish strata back in the 80s.
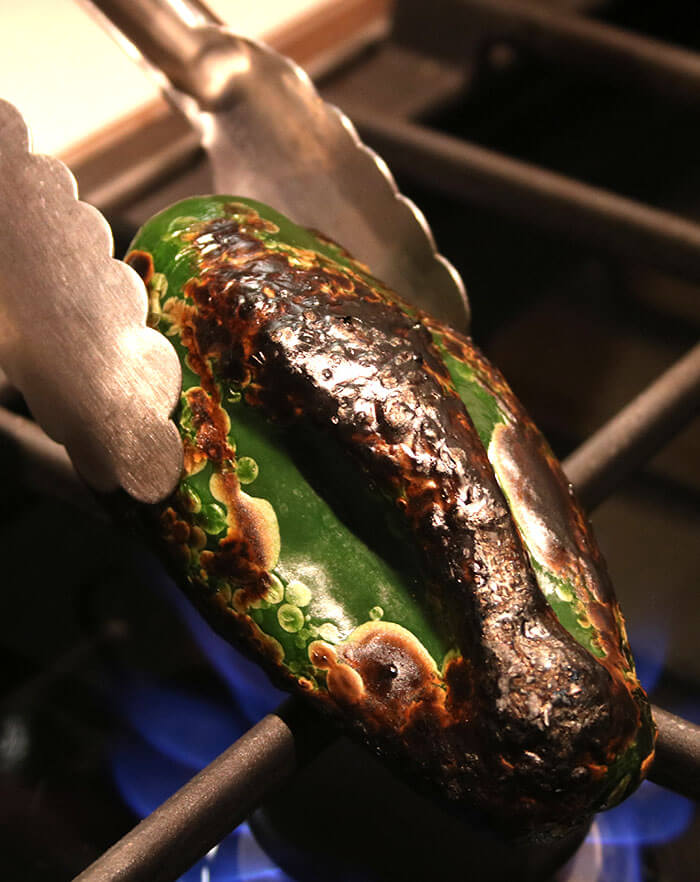
In this version, I am bringing layers back. This dish is assembled lasagna-style. And while I roast and peel the poblano peppers, if you are lucky enough to live in a place where you can get big cans of chilis, by all means, go for it. I first fell in love with my inspo on this dish at a cattle branding in Nebraska many many moons ago. It was featured in the Denver Junior League cookbook Colorado Cache and seemed almost soufflé like and probably hard to make, though I was told “doll, if it was that hard, we wouldn’t be making it.” There wasn’t a meal with less than 60 hungry ranch hands at the table. I brought the idea home, found no such canned chilis available, and created this brunch favorite.
1 ¼ cups milk (plus 1/2 cup more if you are soaking the poblanos overnight – see below)
3 Tablespoons flour
½ t salt
8 ounces habanero or pepper jack cheese slices
3 cups shredded cheddar
Prep the poblanos: Grill (or char over a gas burner) the poblanos until blackened. Place in a plastic bag and close to sweat. Once cool enough to handle, run under cold water and peel off the charred skin. Trim off stems and discard seeds and ribs. You should be able to get two or three “filets” from each poblano. If you are prepping your peppers a night ahead (recommended), cover with about 1/2 cup of milk and store in the refrigerator, covered. This will turn down the heat to a reasonable breakfast temp.
Prep the strata: Preheat the oven to 325oF degrees.
Butter a 2 or 3 quart baking dish.
Whisk together the eggs, milk, flour and salt.
Place a layer of poblanos in the baking dish and top with sliced cheese. Repeat, creating as many layers as needed to use all the poblanos and the cheese slices, at least two layers of each.
Pour the egg mixture over the poblanos. Sprinkle with shredded cheddar.
Bake at 325oF for 50 minutes until egg mixture is set and slightly puffed.
Allow to cool for about 10 minutes and serve warm!