So Long. Farewell. Auf Wiedersehen. Goodbye.
Oh for crying out loud. I’m a grown-ass woman. You would think I could get over the end of the farmer’s market and the demise of my herb bed without this drama. But…….have you met me?
Deep breath in. Deep breath out. In. Out. Focus! You know what to do. Pretty much any time between now and Thanksgiving (a bit earlier if you are in the northern reaches and will have extended hard freezes before), you can cut back all your perennial herbs and hang them upside down to dry. I tend to focus on Thanksgiving because it’s one last chance to harvest the herbs you will need for stuffing et al. Besides, cutting back your herb beds and throwing down some mulch has the added benefit of getting them ready for spring – which really can’t be that far away when you think of it.
The main reasons to hang and to hang upside down are to stiffen the stems and provide enough airflow to keep from molding. Once dry, you can pick them off the stems, crumble and keep in an airtight tin. If you have hangups about the whole hanging scene, you can also pack the stemless leaves between layers of a good quality coarse salt and make, for example, your own rosemary salt. A little herb goes a long way. And then of course you could always gently heat olive oil and infuse it with some sprigs of herb. Discard the herbs in a few days or a week when you get the desired flavor.
But what to do with the annual herbs? Basil, Parsley, Arugula, Cilantro?? These are definitely a goner after the first frost. I favor pastes for these which I keep in the freezer for a quick addition to other dishes, a theme you may be picking up on from You’ll Thank Me in the Winter Oven-Dried Tomatoes. Pureed with some oil and whatever else you want, these pastes make great flavor boosts for those bleak winter months. Some people like to leave the cheese (Romano or Parmesan, or other hard grating cheese) out, if freezing the pesto. I think if there is enough oil to coat the cheese, there is no reason why it can’t be incorporated up front. Play around with the combos and see what tastes good to you. When making a basil pesto, I often add some spinach or arugula or even parsley – all depends how much basil taste I want to show up later. And if the basil has already started to go to seed, it can be a bit bitter, so adding some other herbs can round out the flavor and boost the color.
Basil Pesto is something that really does have to be made to taste. (I’m not making this up because I’m too lazy to give you a proper recipe). Am I sensing a little anxiety that there will be no real recipe again?? Come one folks, you can do it! The key components for traditional pesto are basil, garlic, olive oil/EVOO, pine nuts and cheese, generally Parmesan. I’m probably going out on a limb here, but I don’t get pine nuts, pretty much at all but definitely in this dish. They are super expensive, very delicate both in flavor and handling (sold rancid way too often), and provide no texture contrast to the paste. But what DO you like, you ask? Good question! Many use walnuts, but I love toasted pistachios. You can almost always find them shelled at a health food store. I spread them on a sheet pan and roast all naked (uh……….the pistachios, not me) for about 10 minutes at 400°F. You can definitely smell them getting to the right point. After cooling completely, I pulse in a food processor, keeping them a bit chunky. From there, I set them aside and stir in at the end by hand.
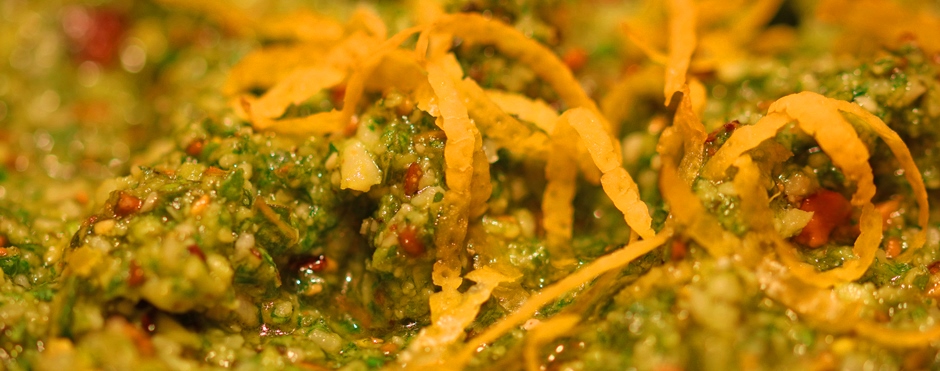
I also like to add lemon zest – which works best if you are freezing. If you are trying to keep it fresh in the fridge for more than a few days, the acid will start to kill the green in the basil. Something about the roasted nuts and fresh lemon zest though that really elevate the flavor profile.
So here you go – make it your way.
Pistachio Lemon Pesto
4 cloves (or more if you love it) garlic, pulsed in the food processor til minced
4 packed cups fresh basil (mixed with spinach, arugula, parsley or whatever you want/have), pulsed til coarsely chopped
¾ cup grated Parmesan or Romano cheese (you got it – your choice), pulsed a couple times
About 1 cup extra virgin olive oil, drizzled in while motor is running. Don’t let it get too runny if you are planning to freeze without an ice cube tray, but you do want the ingredients well coated.
Then, transfer to a bowl, and stir in:
¾ cup roasted, chopped pistachios
Zest of one lemon
Taste, and adjust seasonings (salt and pepper).
Press plastic wrap onto the surface of the pesto and refrigerate until it firms up a bit. Some like to use ice cube trays to freeze this. (I don’t have any). I usually just spoon out a 2 Tablespoon dollop onto a sheet pan, then once frozen place the pesto blobs into a Ziplock. You could use an ice cream scoop I’m guessing if you want to get fancy. If it seems a bit thin for scooping, you can thicken with a bit more cheese. More cheese is always good, I’m pretty sure.
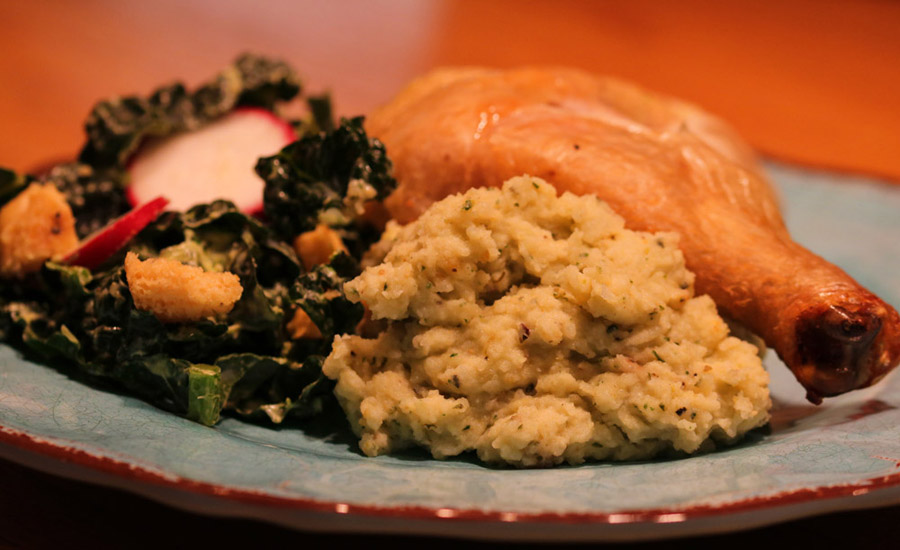
There are so many ways to use this – add to a soup or stew, jazz up your mashed potatoes, spread on pizza dough before adding the toppings, slather it on bruschetta or toss into a pasta dish. What would you do if you had a freezer-full (again, you’ll thank me) come January? Sharing is caring, so let us know.
Winner winner chicken dinner – with pistachio lemon pesto mashed potatoes.
Hey, we want to hear from you! Don’t forget to Comment below, Share & Subscribe to our blog.


