Though I know you are all set with the full menu I linked to in the last post, I couldn’t in good conscience send you off for Thanksgiving without a new dessert to be the crowning glory to your feast. A simple apple crisp at its heart, the addition of Jim Beam Apple liqueur with Kentucky Straight Bourbon Whiskey elevates this fruity finish to something truly special. Must be that American oak wafting over the apples that sets this apart. I had house guests while working on this dish and one or two of them may or may not have had three or four portions. Who’s counting? If you don’t use spirits, you can easily sub with non-alcoholic extracts – vanilla or almond – or a dash of cinnamon, clove, or nutmeg. As written below, this dish is largely unseasoned, letting the farm-fresh apples and healthy splash of apple liqueur with bourbon do the heavy lifting. If you want to swap out the JB Apple, try a straight bourbon, Hotel Tango Whiskey (from a new-ish Indiana distillery run by friends), Gentleman Jack, or even Calvados. I’ll do me, you do you.
There are just so many apple varieties available these days, whether you shop at the farmers’ markets, the grocery or with instacart. But it’s really important to grab a cooking variety so, kids, don’t try this at home. We need an apple whisperer to the rescue. This fall I have really enjoyed Sweet Tango and so I asked my local farmer – Skinner’s Homestead Acres out of Fennville, MI – how they would fare. No bueno. He said they had tried to cook Sweet Tangos a few ways and they cooked to mush. Good to know, since they are super crispy and very flavorful. Try one raw if you can. I heart!!! I suspect it may have to do with the water content – too much and there is nothing but pulp left. So it’s a balance between crispy, juicy, and flavorful that makes the perfect cooking apple.
Cooking classics are Jonagold (“fluffily crisp,” juicy, and aromatic), Ida Reds (firm, tart, and juicy) and Northern Spy (juicy, crisp, and mildly sweet with a high acid balance). The farmer recommended Snow Sweet which was new to me and so perfect. It was fantastic raw too – very white flesh which is slow to oxidize. On a subsequent test, I used Northern Spy and they worked well too. I always ask which apples will store well and load up before the season ends. I go with the farmer’s rec on “good-keepin’ apples”.
A friend introduced me to the apple cutting technique below (note that the apples should first be peeled for this recipe). Just cut through the center on both sides of the stem, top to bottom. You can get a slice off that center slab on either side of the core. Take the two halves and lay them cut side down and slice thinly from bottom to top. It is so much easier than trying to cut a rolling side and makes it simple to get uniformly thin slices. It’s really upped my apple cutting game, and I use it for everything including cheese boards, snacks, salads, and more. It’s perfect for a Crisp when you want uniform slices for even cooking.
So this raises that age old question – Cobbler? Crisp? Slump? Crumble? Grunt? Betty? Pandowdy? Buckle? There is definitely both a geographical and time element to these names. While they are all fruit-based, I’m ruling out Cobblers off the bat. They have biscuits dropped on top and resemble cobblestones (old English). Grunts are right behind – New England and named for the sound the dough makes while cooking and – like Pandowdy and Slumps – are typically cooked on the stove top. Legitimate Bettys are layered with crumbs or grahams and are more cakey, and a Buckle (which is very cakey) tends to buckle around the bubbling fruit. So finally we arrive at Cobbler or Crisp – and drum roll please…the Crisp has oatmeal. Voila! That’s what makes it more crispy than a Cobbler, which is generally pure sugar, flour, and butter streusel. Exhausted from that marathon around the dessert aisle? Hmmm…think we better dig into this delicious dessert RIGHT NOW.
Bourbon-Spiked Apple Crisp
Now that we have the recipe name – CRISP! – and the perfect apple (your choice), and we have made the decision of adding hooch or not, there is little else to do but get peeling. This recipe comes together very quickly and then you can be on your way to worry about other details of the feast – namely is the Prosecco cold enough. I make the topping in the food processor because I like to chop the oats and the nuts just a bit. So I start by putting the other ingredients – cold butter, brown sugar, flour, and salt in the processor and pulse that until it resembles coarse meal. Then I add the oats and walnuts, in turn, giving each their half-dozen pulses. Oats will get a few more pulses than nuts, but both retain some texture. As with all things baking, set the timer 10 minutes early, so you can keep an eye on the browning factor. If it seems to crisp up before the apples are tender, lay a loose layer of foil over the top. You don’t want anything to steam, but you also don’t want it blackened.
However you celebrate and with whomever, I send Thanksgiving blessings to you, your friends and family. It’s so wonderful to spend a day, or even a part of a day, during this season of running too fast in gratitude for our many blessings. Have a wonderful, food-filled day! Gobble! Gobble!
Though a simple apple crisp at its heart, the addition of Jim Beam Apple liqueur with Kentucky Straight Bourbon Whiskey, elevates this crisp to something truly special. Must be that American oak that wafts over the apples that sets its apart.
Ingredients
Scale
Topping:
2 ounces cold butter, cut into bits
1/2 cup brown sugar
2 Tablespoons flour
1/4 teaspoon salt
3/4 cup old-fashioned oats
1/2 cup chopped walnuts
Filling:
1/2 cup sugar
1/2 cup sour cream
1/3 cup Jim Beam Apple Liqueur infused with Kentucky Straight Bourbon Whiskey
1/4 cup all-purpose flour
2 eggs
¼ teaspoon salt
2 pounds apples, peeled, cored, and sliced thinly (see notes)
Instructions
Preheat oven to 350oF. Butter an 8×8 or 2 quart baking dish.
Prep topping: Add butter, brown sugar, flour and salt to the workbowl of a food processor. Pulse until mixture resembles coarse meal. Add the oats and pulse about 4-5 times, chopping coarsely. Add the walnuts and pulse 6 times more. The goal is that the butter/sugar/flour is fine, but that the oats and nuts retain some texture. Sprinkle ½ cup of the topping in the baking dish. Refrigerate remaining topping until needed.
Prep the filling: In a large bowl, whisk together the sugar, sour cream, bourbon, flour, eggs, and salt. Add the apples. Pour the mixture into the baking dish.
Bake on a sheet pan to avoid spills, in the center of the oven for 50 minutes. Sprinkle remaining topping over fruit, baking an additional 30 minutes.
Remove from oven and cool on a wire rack.
Serve warm with ice cream.
Notes
Be sure to choose an apple that can stand up to cooking. Sometimes we tend to grab a favorite eating apple, but that is not always the best choice. On my first try, the farmer suggested Jonagold, Snow Sweet or Ida Reds. I chose Snow Sweet and they were perfect, though I suspect not that easy to come by. They are also delicious “eating apples”.
The next time I tested the recipe, I used Northern Spy – a classic cooking apple. This fall I have fallen in love with Sweet Tango, but my farmer told me don’t bother. They cook to mush. That was a real surprise because they are so very apple-y tasting and super crunchy. But, I trust the farmer.
For the non-drinkers in the crowd, feel free to omit the bourbon and consider some extracts like vanilla or almond. I used vanilla on one of my tests but found it in competition with the bourbon, so ended up eliminating it. If you are not using the alcohol, try adding in some alcohol-free extracts.
For those adding the alcohol, consider a straight bourbon, Hotel Tango Whiskey (from a new-ish Indiana distillery run by friends), or even Calvados, in lieu of the JB Apple.
Serve with ice cream. Vanilla is classic or salted caramel would be a serious upgrade.
I know you probably can’t come down from your L-tryptophan rush on Thursday cold turkey, so how about easing in with some breakfast pumpkin chia pudding (though it has been served for dessert by many) or the best turkey leftover recipe ever!!
Time is nigh for setting the table and facing that big ole mess we call family…and all that that entails. This seems to be the one holiday when everyone descends on the same day and comes with baggage instead of picnic baskets. But let’s be real – we are indeed so lucky that we can in fact gather, break bread and give thanks. I am hoping the biggest debate your gang faces on Thursday is sweet potato or pumpkin. (I’m looking at you Val – duh, pumpkin!) And my picnic basket this year is loaded with a secret weapon – a dessert that you can make a day or two ahead. Check that box. Move on. Worry about the Beaujolais Nouveau and who will do the dishes. Dessert is mission-accomplished. This pumpkin ginger cheesecake falls smack in the middle of the “consider it done” category. That of course assumes you can keep it safeguarded til after dinner on Thursday. It’s tempting.
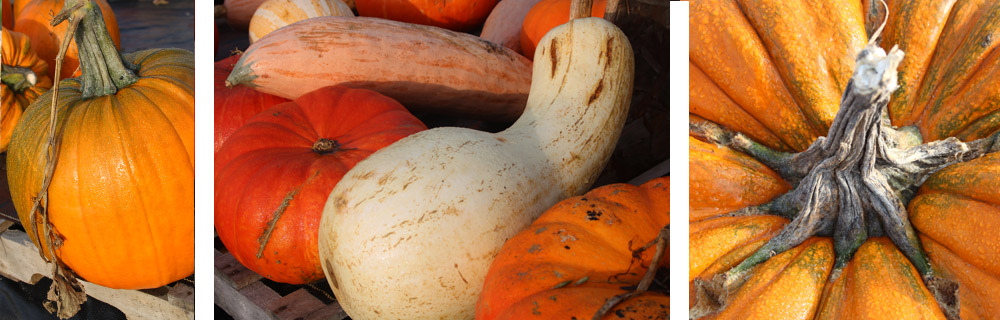
Thanksgiving dinner often gets a bad rap for being a brown meal. But I love the vibrant colors of fall squashes, pumpkins and gourds. Use them for table settings, roast them for a side or salad, make a quick bread, or whip them up in a dessert.
Cheesecakes are pretty flawless desserts to prepare even if you haven’t made them before, as long as you follow a few simple tips. They are super sturdy, so you don’t need a deft hand. I would argue quite the opposite. You really don’t want to be dainty with the batter – don’t incorporate lots of air, do bang the pan, get aggressive. Be bold. If you follow my instructions and read the accompanying notes, you will be a star performer – dare I say, a pastry chef. Start with your ingredients at room temperature, use a good quality springform, and use a food processor, not a mixer. A processor will combine the ingredients without incorporating air which will cause the cheesecake to puff and fall, leaving a crater in the center. Allow all the time needed for cooling to room temperature and then refrigerating. It takes time, but not active time. And know that if all else fails – craters or cracks – you will be slathering a cream topping on and that can cover a multitude of mistakes. Yes, indeed. You are definitely a pastry chef.
This pumpkin ginger cheesecake is surprisingly light, yet creamy. The nutty crust has that I want more-ish quality! And, a dose of Gentleman Jack Daniels keeps the party rolling.
Ingredients
Scale
Crust:
3/4 cup all-purpose flour
1/2 cup dark brown sugar
1/2 cup finely chopped pecans
1/4 cup melted butter
Filling:
15 ounce can pumpkin puree
24 ounces cream cheese, room temperature
5 ounces Gentleman Jack Rare Tennessee Whiskey
1 cup sugar
1 1/2 Tablespoons vanilla extract
1 Tablespoon ground ginger
1 teaspoon ground cinnamon
1 teaspoon ground clove
1/2 teaspoon ground nutmeg
6 eggs, at room temperature, lightly beaten
Topping:
1 cup sour cream
2 Tablespoons Gentleman Jack Rare Tennessee Whiskey
2 Tablespoons powdered sugar
Instructions
Make the Crust:
Preheat oven to 350° F. Combine flour, brown sugar, pecans, and melted butter and mix until crumbs adhere. Press into a 9 or 10″ sturdy nonstick springform pan and bake for 10 – 12 minutes. Remove and cool. Wrap pan in heavy duty foil. Reduce oven temperature to 300°F.
Make the Filling:
In food processor, puree pumpkin until smooth. Add cream cheese and puree until smooth. Add Gentleman Jack, sugar, vanilla, ginger, cinnamon, clove, and nutmeg and pulse until mixed. Add eggs and pulse 2 – 3 times only until just combined. Do not overprocess.
Pour filling into cooled crust and bang pan on the counter to eliminate extra air. Place in a roasting pan and fill with hot water, halfway up the side of the springform. Bake for 1 1/4 – 1 1/2 hours or until set. It may still be a bit wobbly in the center, but it will firm up as it cools.
Turn oven off and leave the cheesecake in the water bath in the oven for 30 minutes more. Remove the roasting pan from the oven, and carefully remove the springform from the water. Remove foil and cool on wire rack until room temperature. Refrigerate until fully chilled.
Make the Topping:
Combine sour cream, Gentleman Jack, and powdered sugar and spread on top of cheesecake. Refrigerate until set.
Gently run a knife or thin metal spatula around inside edge of pan. When cheesecake has released, open outer pan ring and remove.
Notes
Feel free to substitute a dark Rum or Bourbon if you prefer.
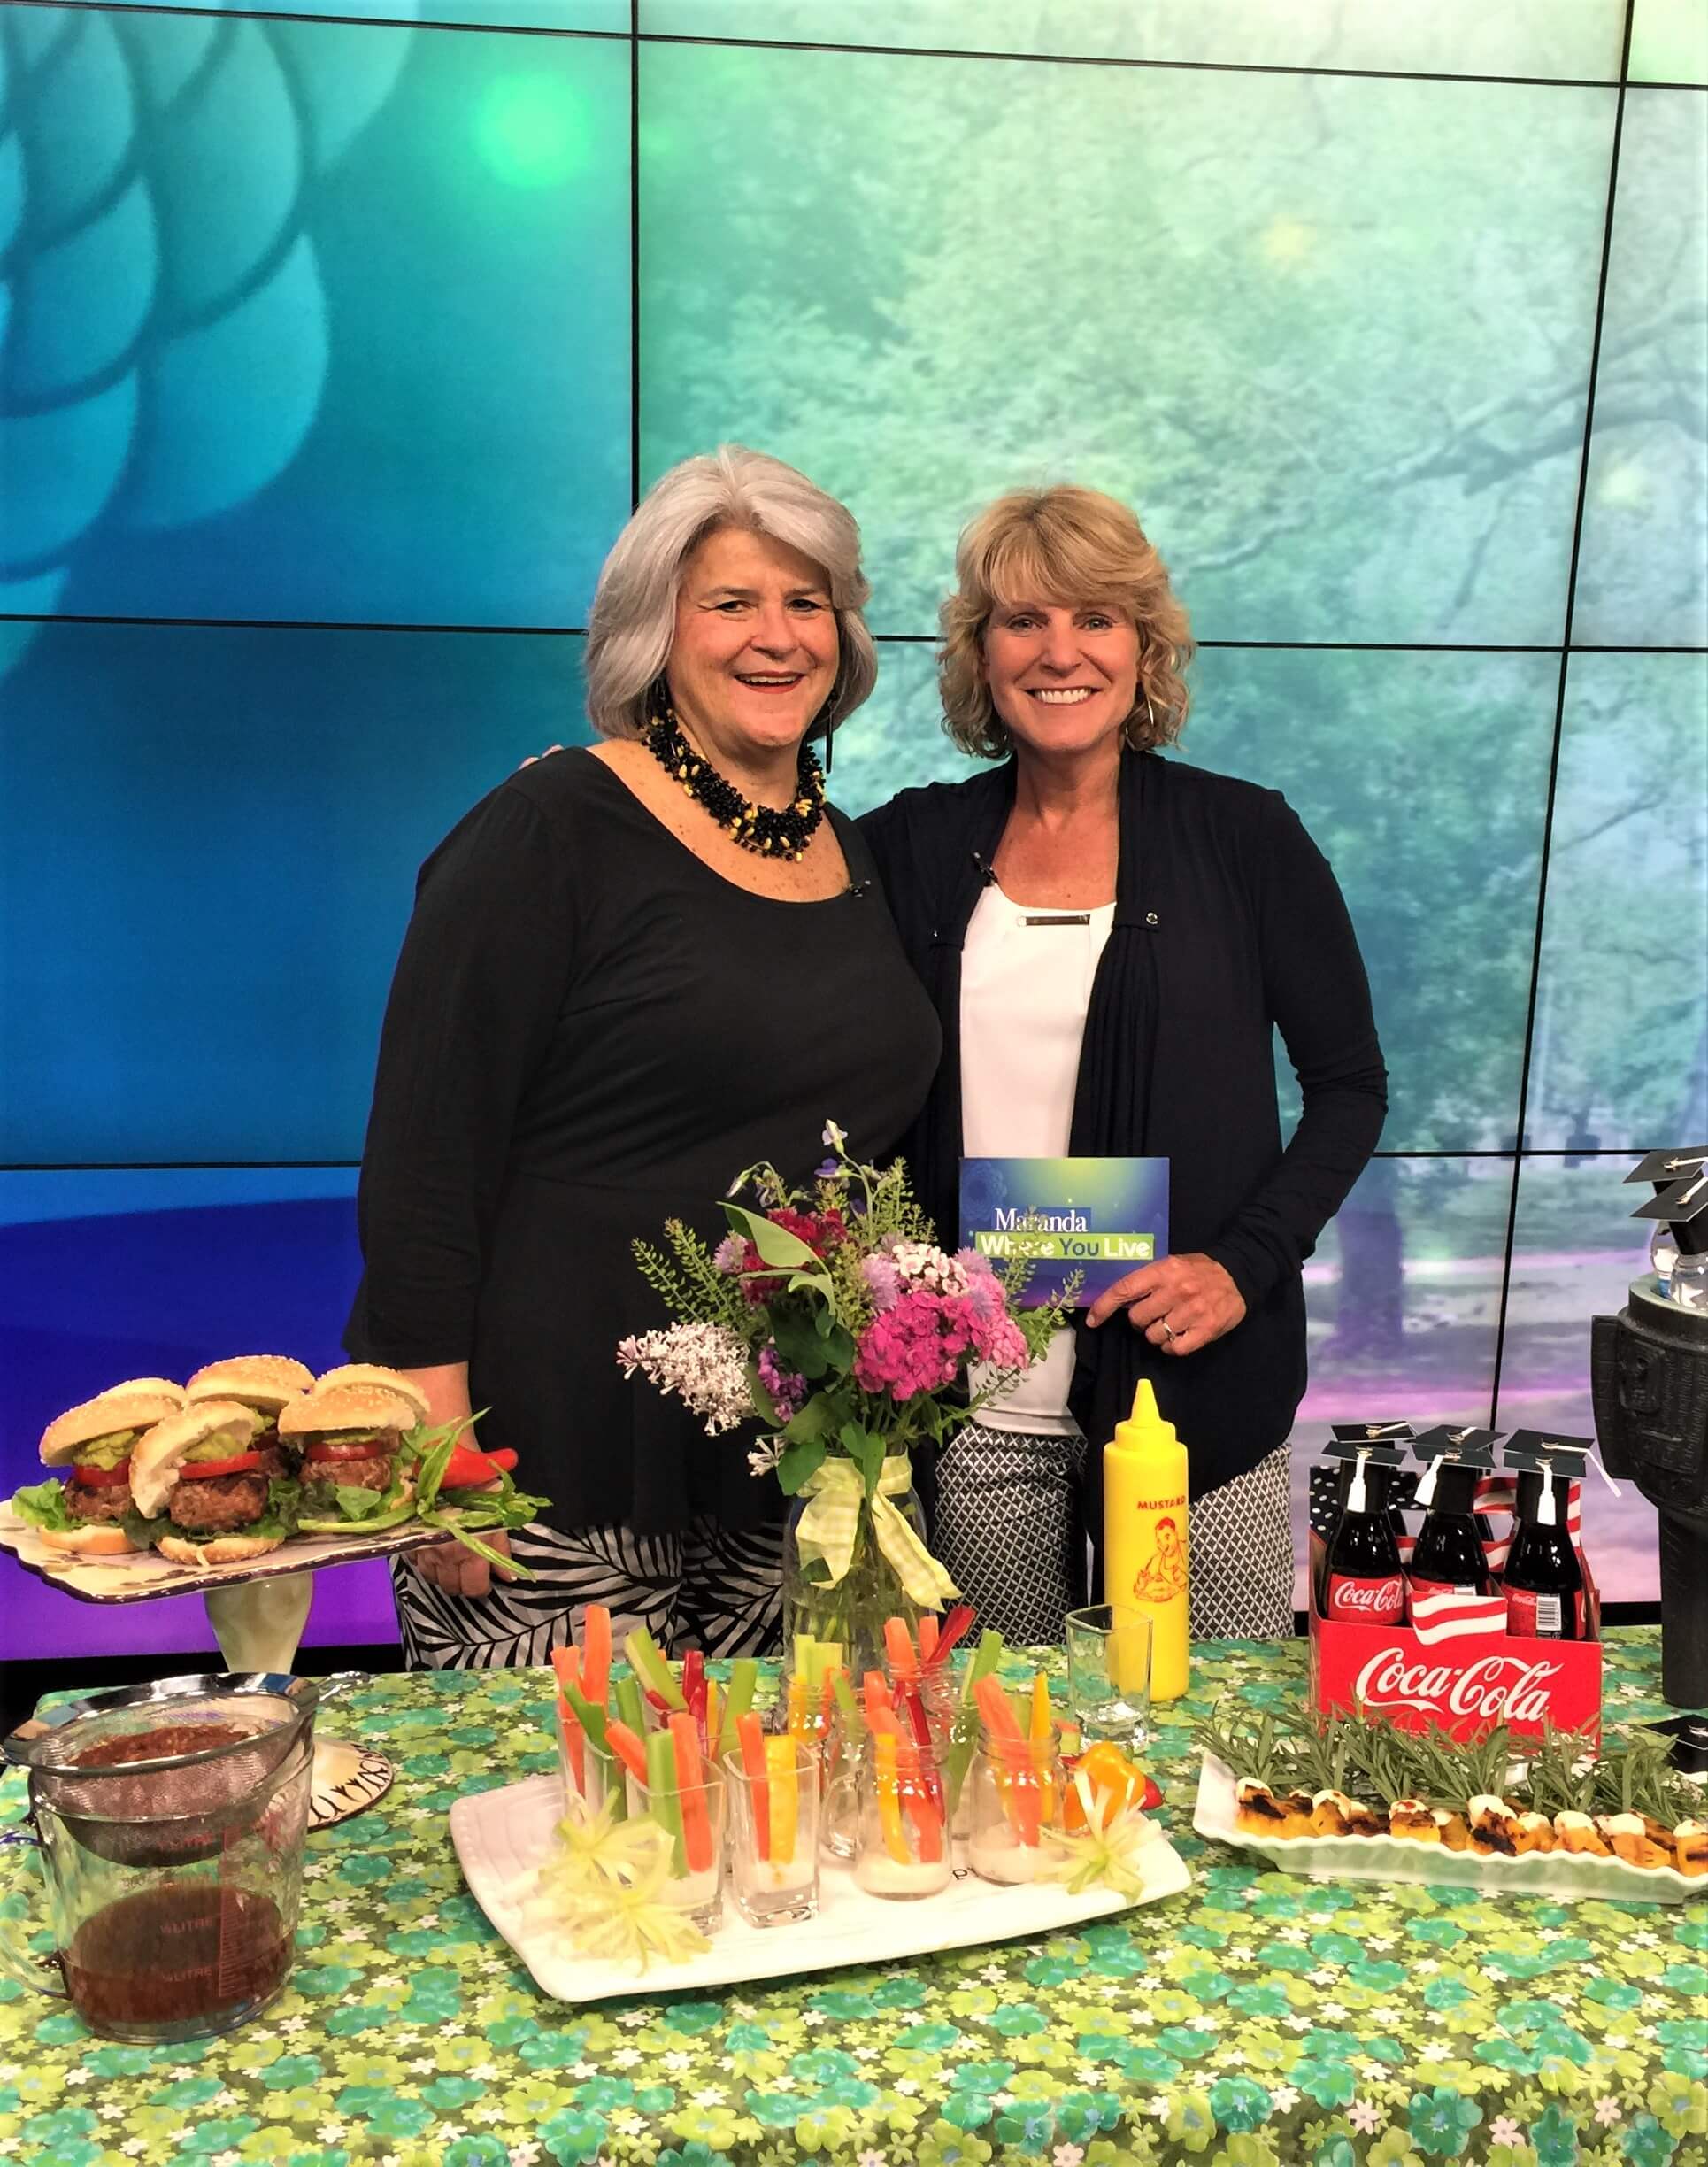
I just had the chance to join Maranda on WOTV 4 Women’s program Maranda Where You Live to share with her viewers some ideas on how to zhouzz up a party –in this case graduation – by adding a few easy details that give it real style. For entertaining, like most things in life, it’s the details that make the difference. Most of these style tips, with just a tweak here or there, will seamlessly slide from graduation, to Father’s Day…even to a wedding celebration. It’s summer entertaining at the brink of the season.
Summer Entertaining – Graduation with Style
I created a graduation celebration, themed around an outdoor event. In Western Michigan, we wait all year for this time. It’s great because the temps are mild, the days are long, and who doesn’t want to keep the masses and that mess outside. One of the tricky parts of any entertaining is how to avoid the long lines that form around buffets. I’m more likely to not at eat at a party than to stand in line, and as a host that is not something you want! To hack that, I created a menu that is grab and go. Everything is pre-served and portable. And I suggest scattering dishes around the patio, grouping two or three items together, to help spread the crowd. It’s best to cluster around a central theme – maybe a vegetarian station, or a dessert station, or together by temperature – the hots, the colds…you get the idea.
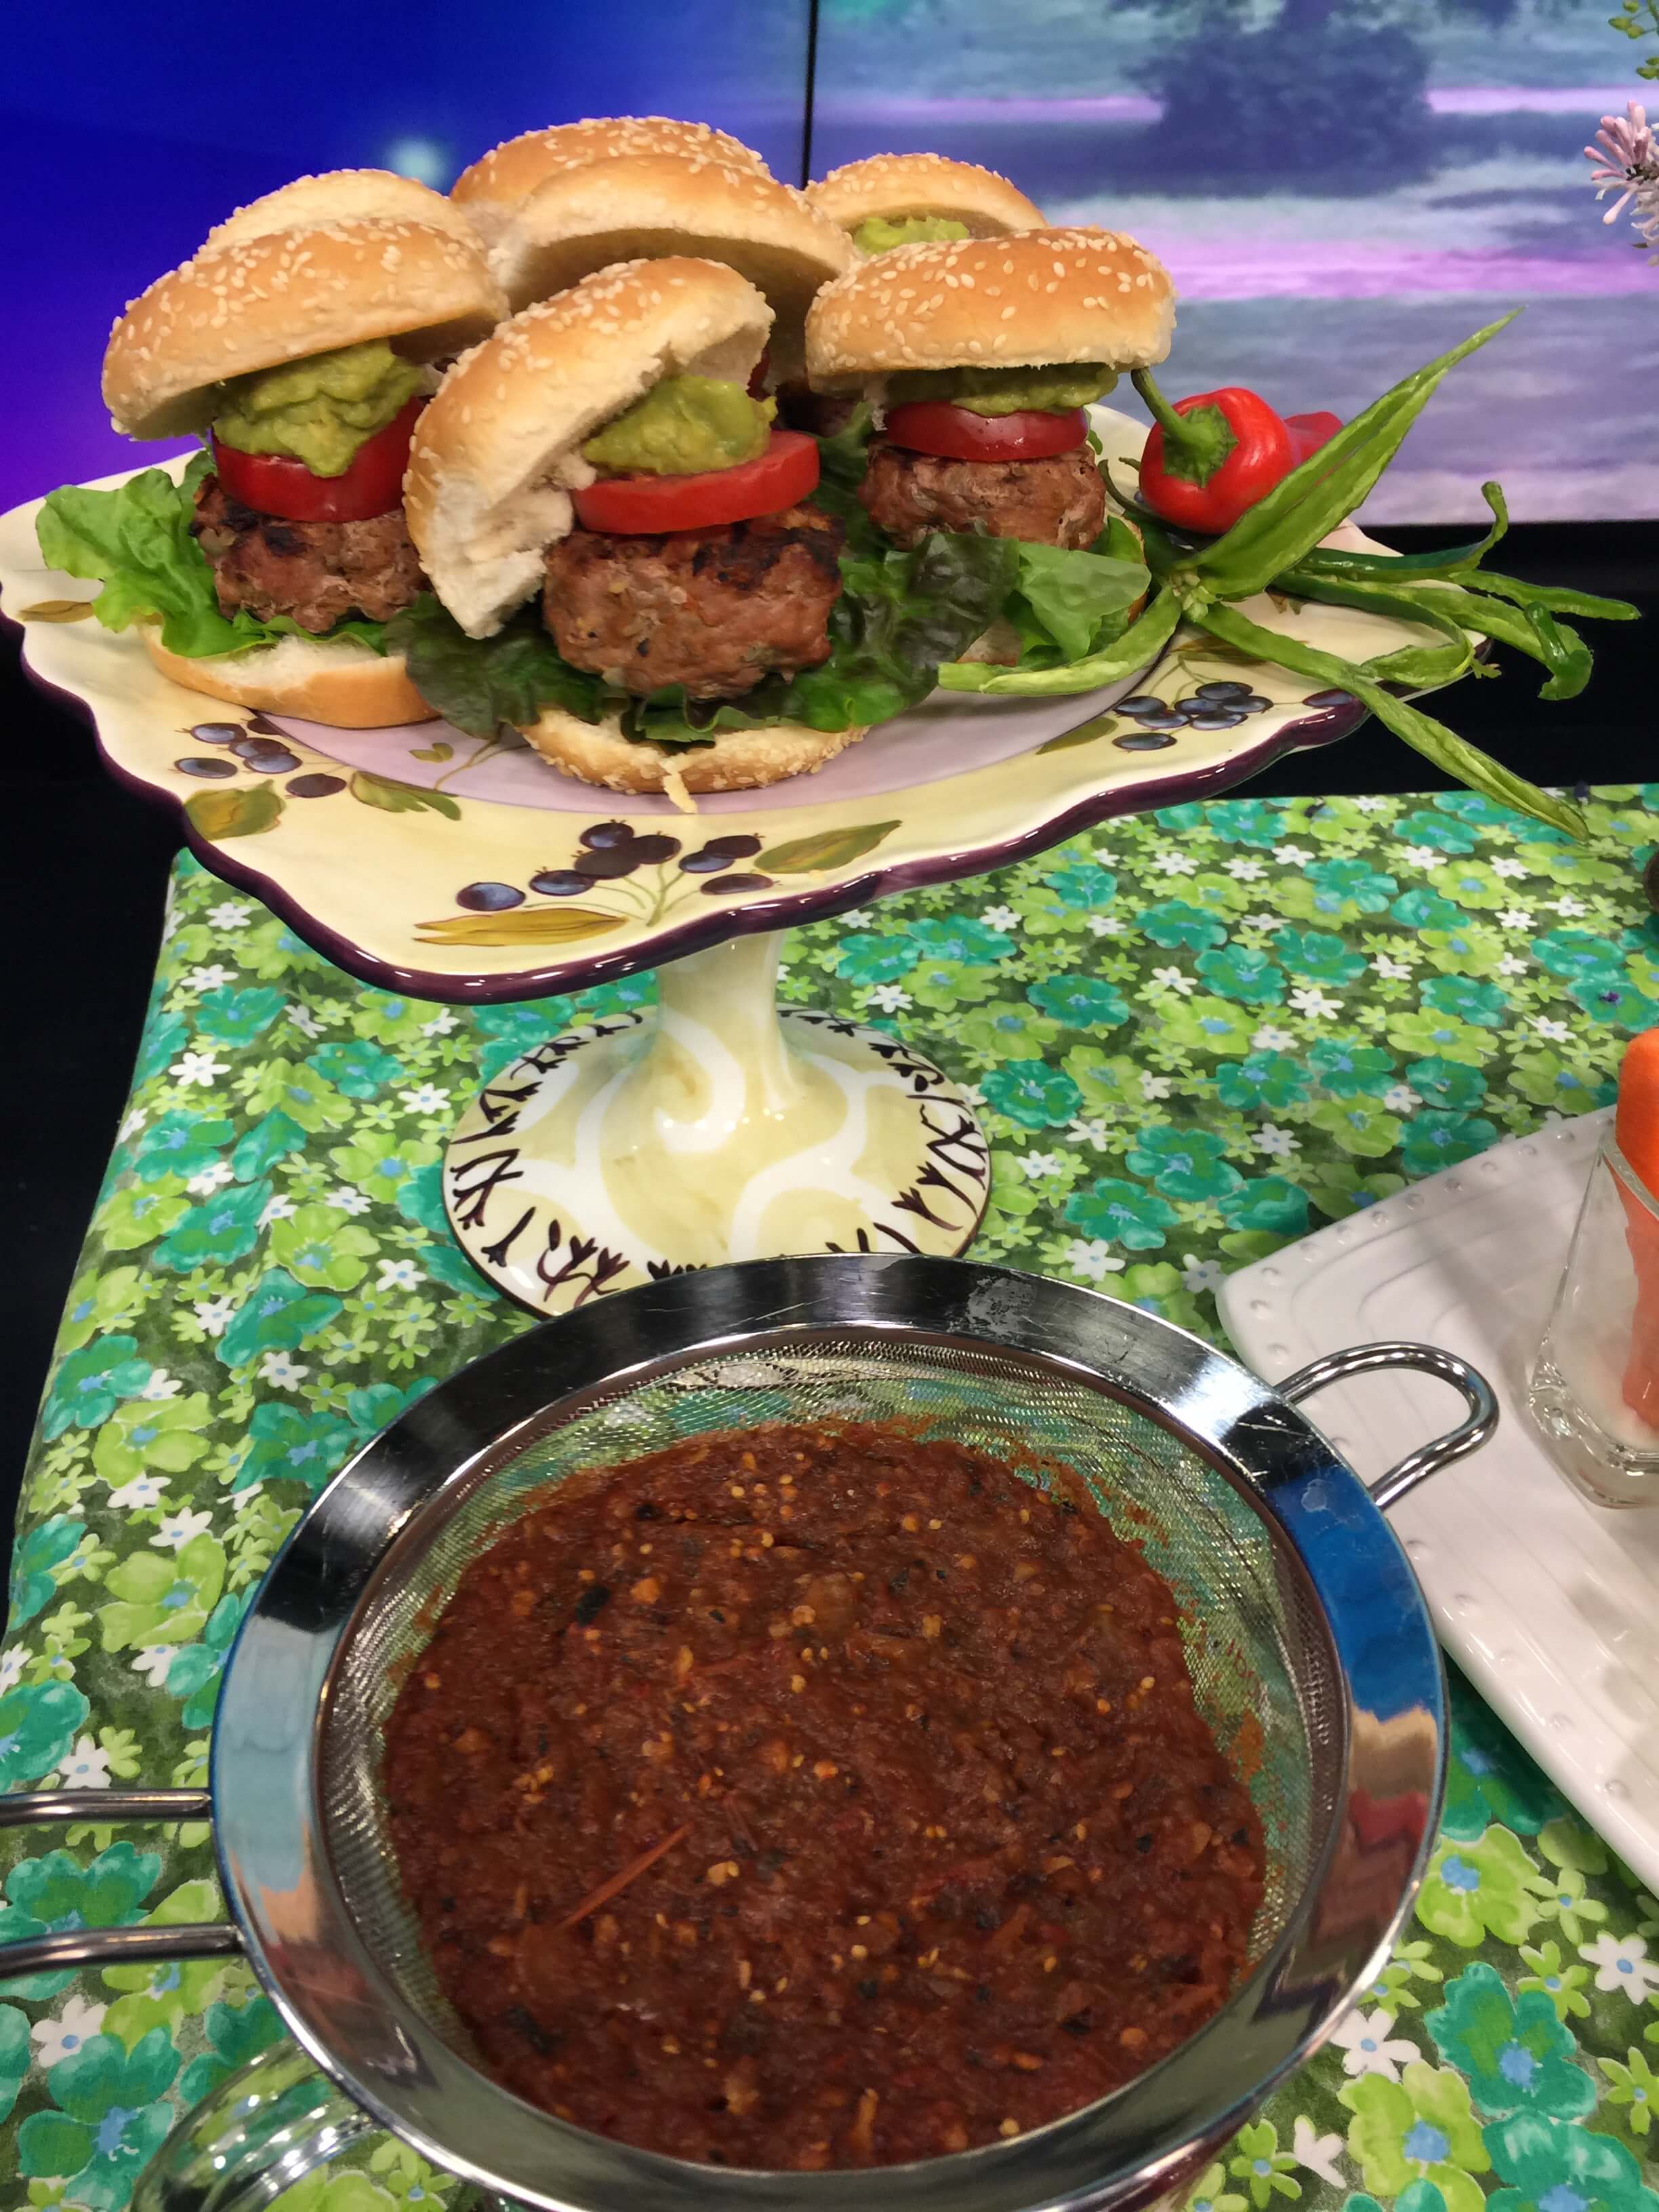
Kicked-Up Southwestern Turkey Burgers
One of the portables that I served was a slider. Assuming you don’t want to grill while you have guests – though I am fully aware that some hosts love that distraction – these turkey burger sliders can be grilled earlier in the day and reheated to serve. But won’t they dry out? Au contraire! By adding a jar of drained salsa to the ground turkey, the flavor profile is kicked up a notch and the salsa adds both moisture and depth of flavor. Its super simple and you are letting the salsa factory do all the heavy lifting of lots of chopping and roasting the chipotle.
Turkey burgers can get a real boost in the flavor profile category by just adding a jar of drained salsa to the ground turkey. The salsa adds both moisture and depth of flavor. Why not let the salsa factory do all the heavy lifting by roasting chipotles and doing all the chopping for you. More time to enjoy, less time in the kitchen.
Ingredients
Scale
16 ounce jar of favorite salsa, drained and liquid discarded (or saved to season a sauce)
3 pounds ground turkey
3 shallots, chopped
2 teaspoons ground cumin
1 teaspoon salt
1/2 teaspoon ground black pepper
Instructions
Pour the salsa into a fine mesh strainer, set over a bowl to drain. Set aside for 20 minutes or more until the liquid has been released.
Mix the turkey, drained salsa, shallots, cumin, salt and pepper by hand until mixed through and shape into patties.
Grill over a medium-hot fire until cooked through (timing depends on burger size). Poultry should always be thoroughly cooked.
Notes
These are best made ahead and left to chill in the refrigerator for an hour or up to a day or two. This gives the patty time to firm up.
They also freeze really well, and so I tend to make a large batch and wrap in plastic wrap, individually. I spread them out on a tray to freeze. Then once frozen solid, I transfer to a big Ziploc.
Prep Time:10 minutes (plus draining and chilling time)
Cook Time:20 minutes
Category:Mains
Method:Grilling
Cuisine:Southwestern
Veggie Shooters
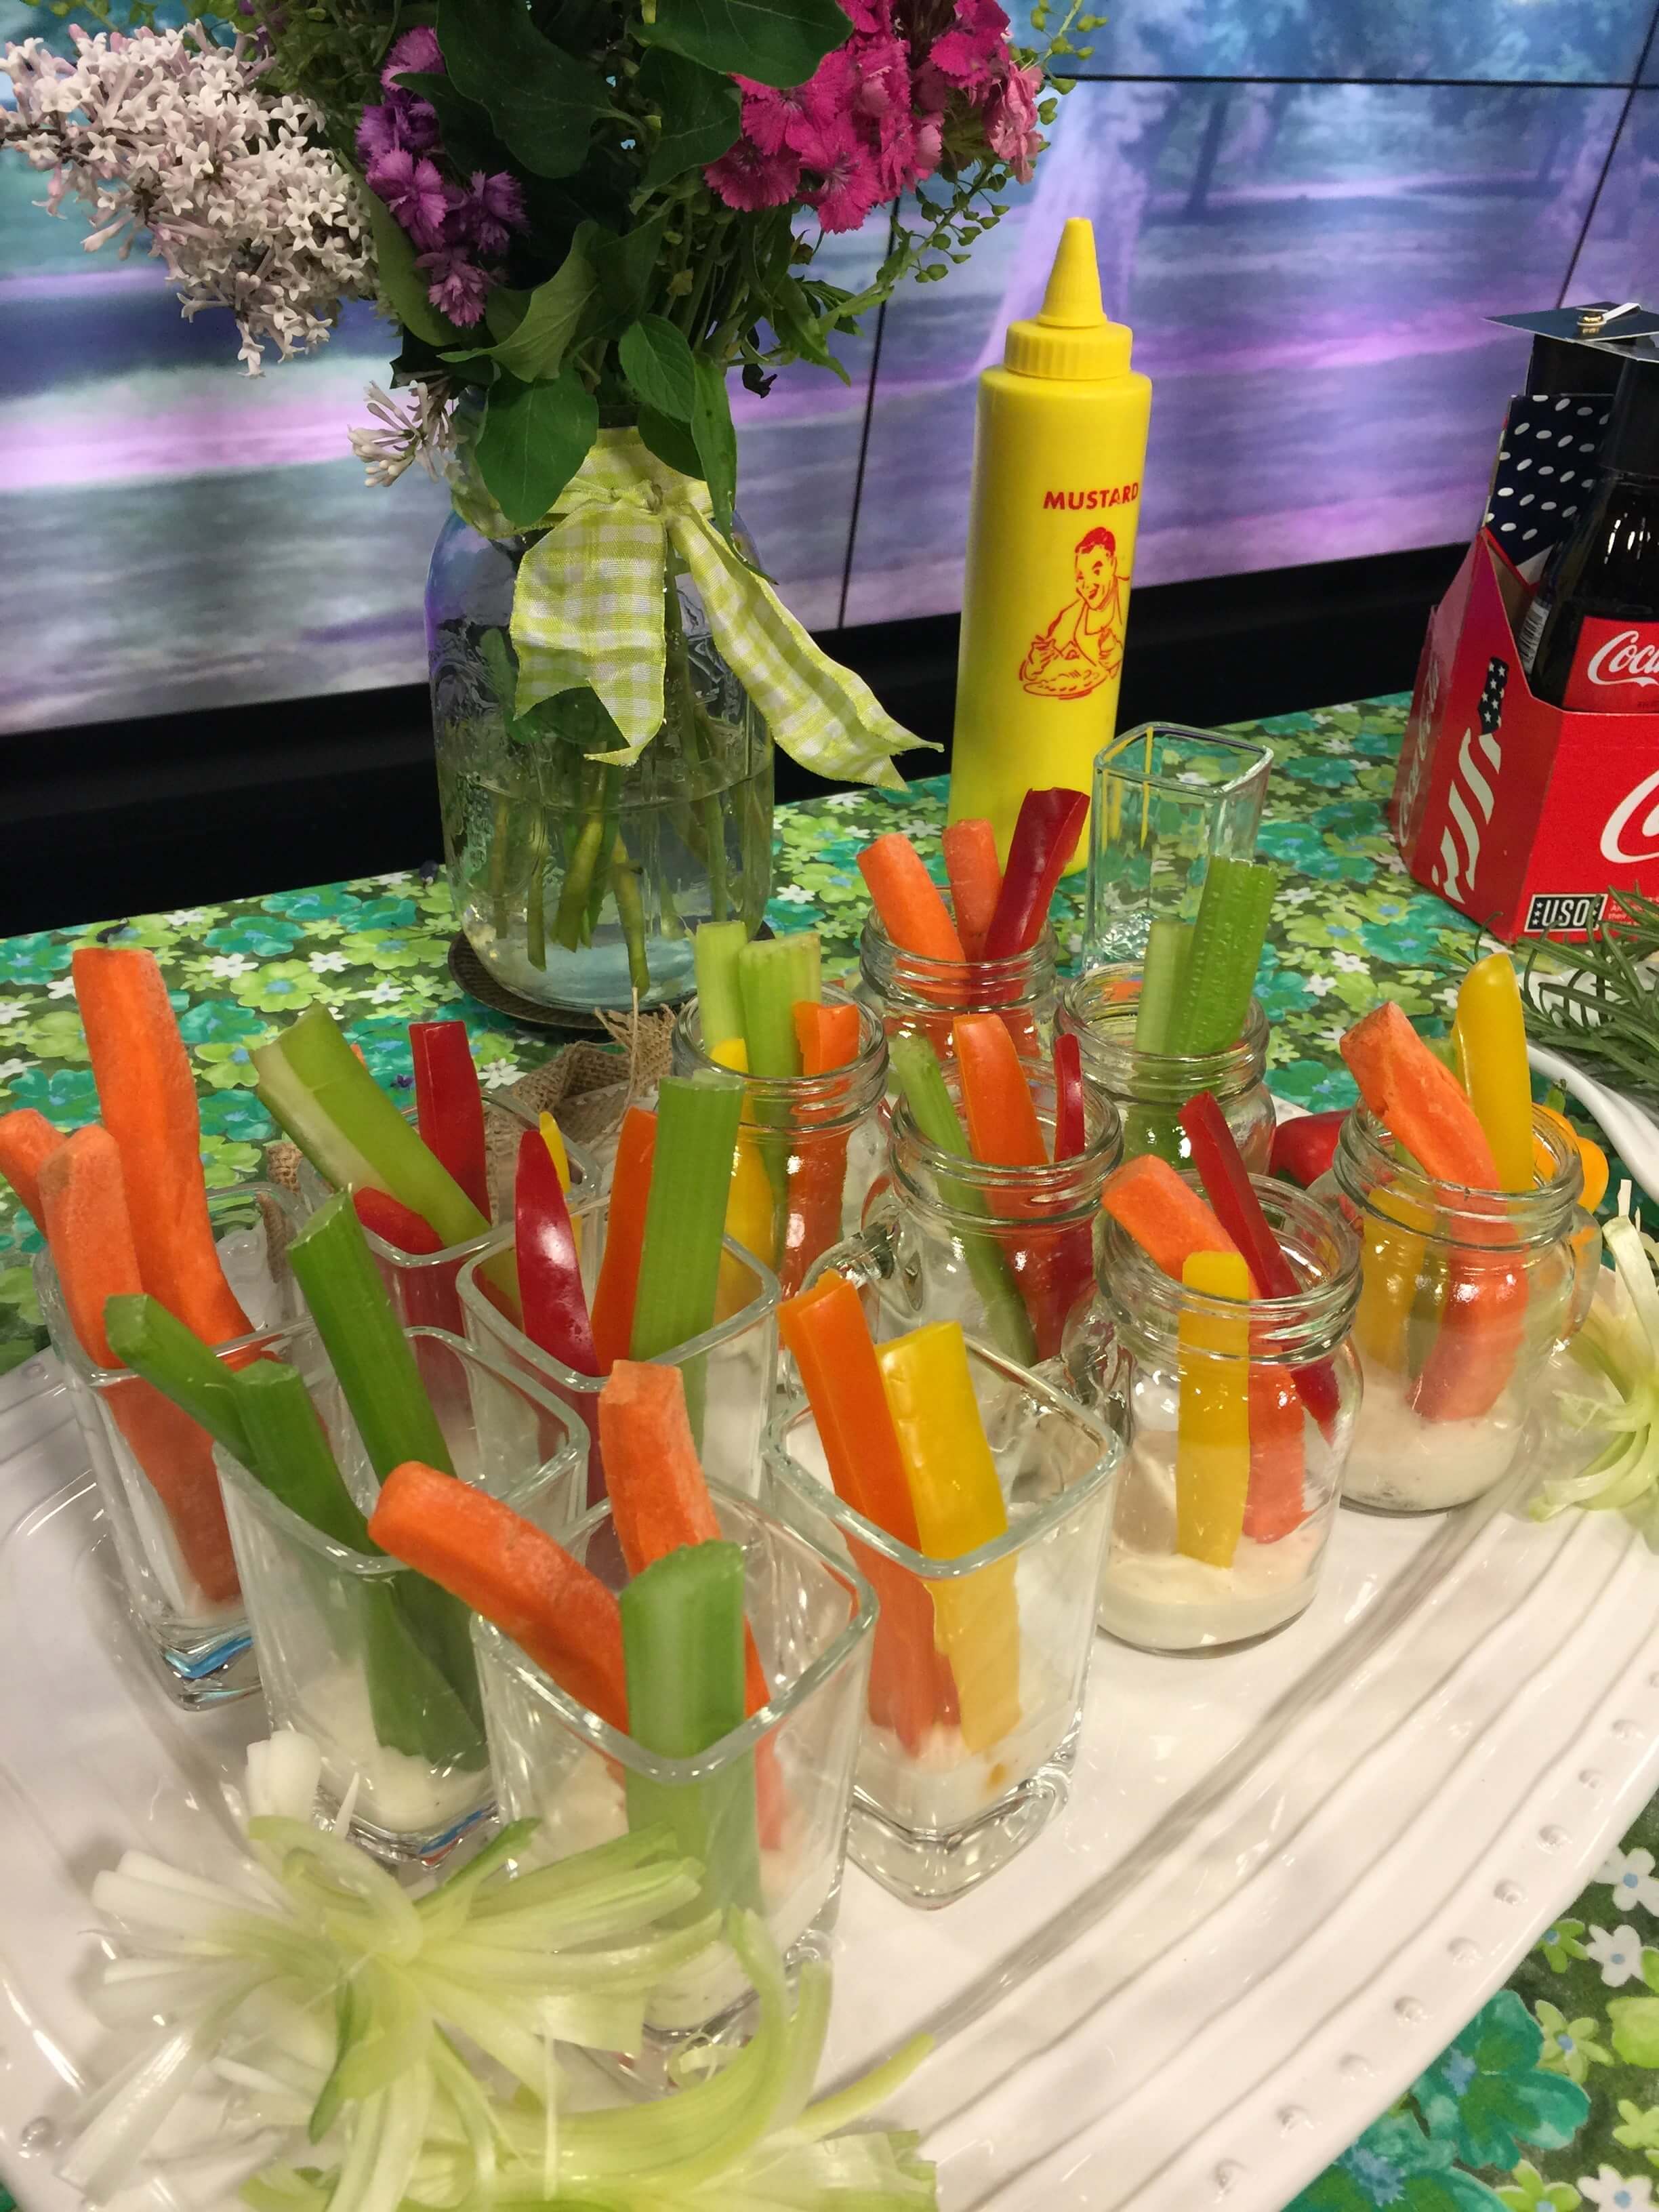
The next idea I showed was veggie shooters – using a shot glass or even a disposable clear plastic. By transferring the ranch dressing to a squeeze bottle (think diner ketchup or mustard bottle), you can put a squirt in the bottom of each shot glass without “sliming” the sides. Then just tuck in an assortment of fresh veggies – carrot sticks, celery, multi-color peppers, snow peas. And I tuck different combinations in each glass because not everyone will like them all, so pick let your guests pick what suits them. Could this be any cuter?
For all the dishes, both savory and sweet, I used herbs, flowers and vegetables to create super simple garnishes for each tray. It’s that little extra touch that will let your guests know you “THOUGHT OF EVERYTHING”!!
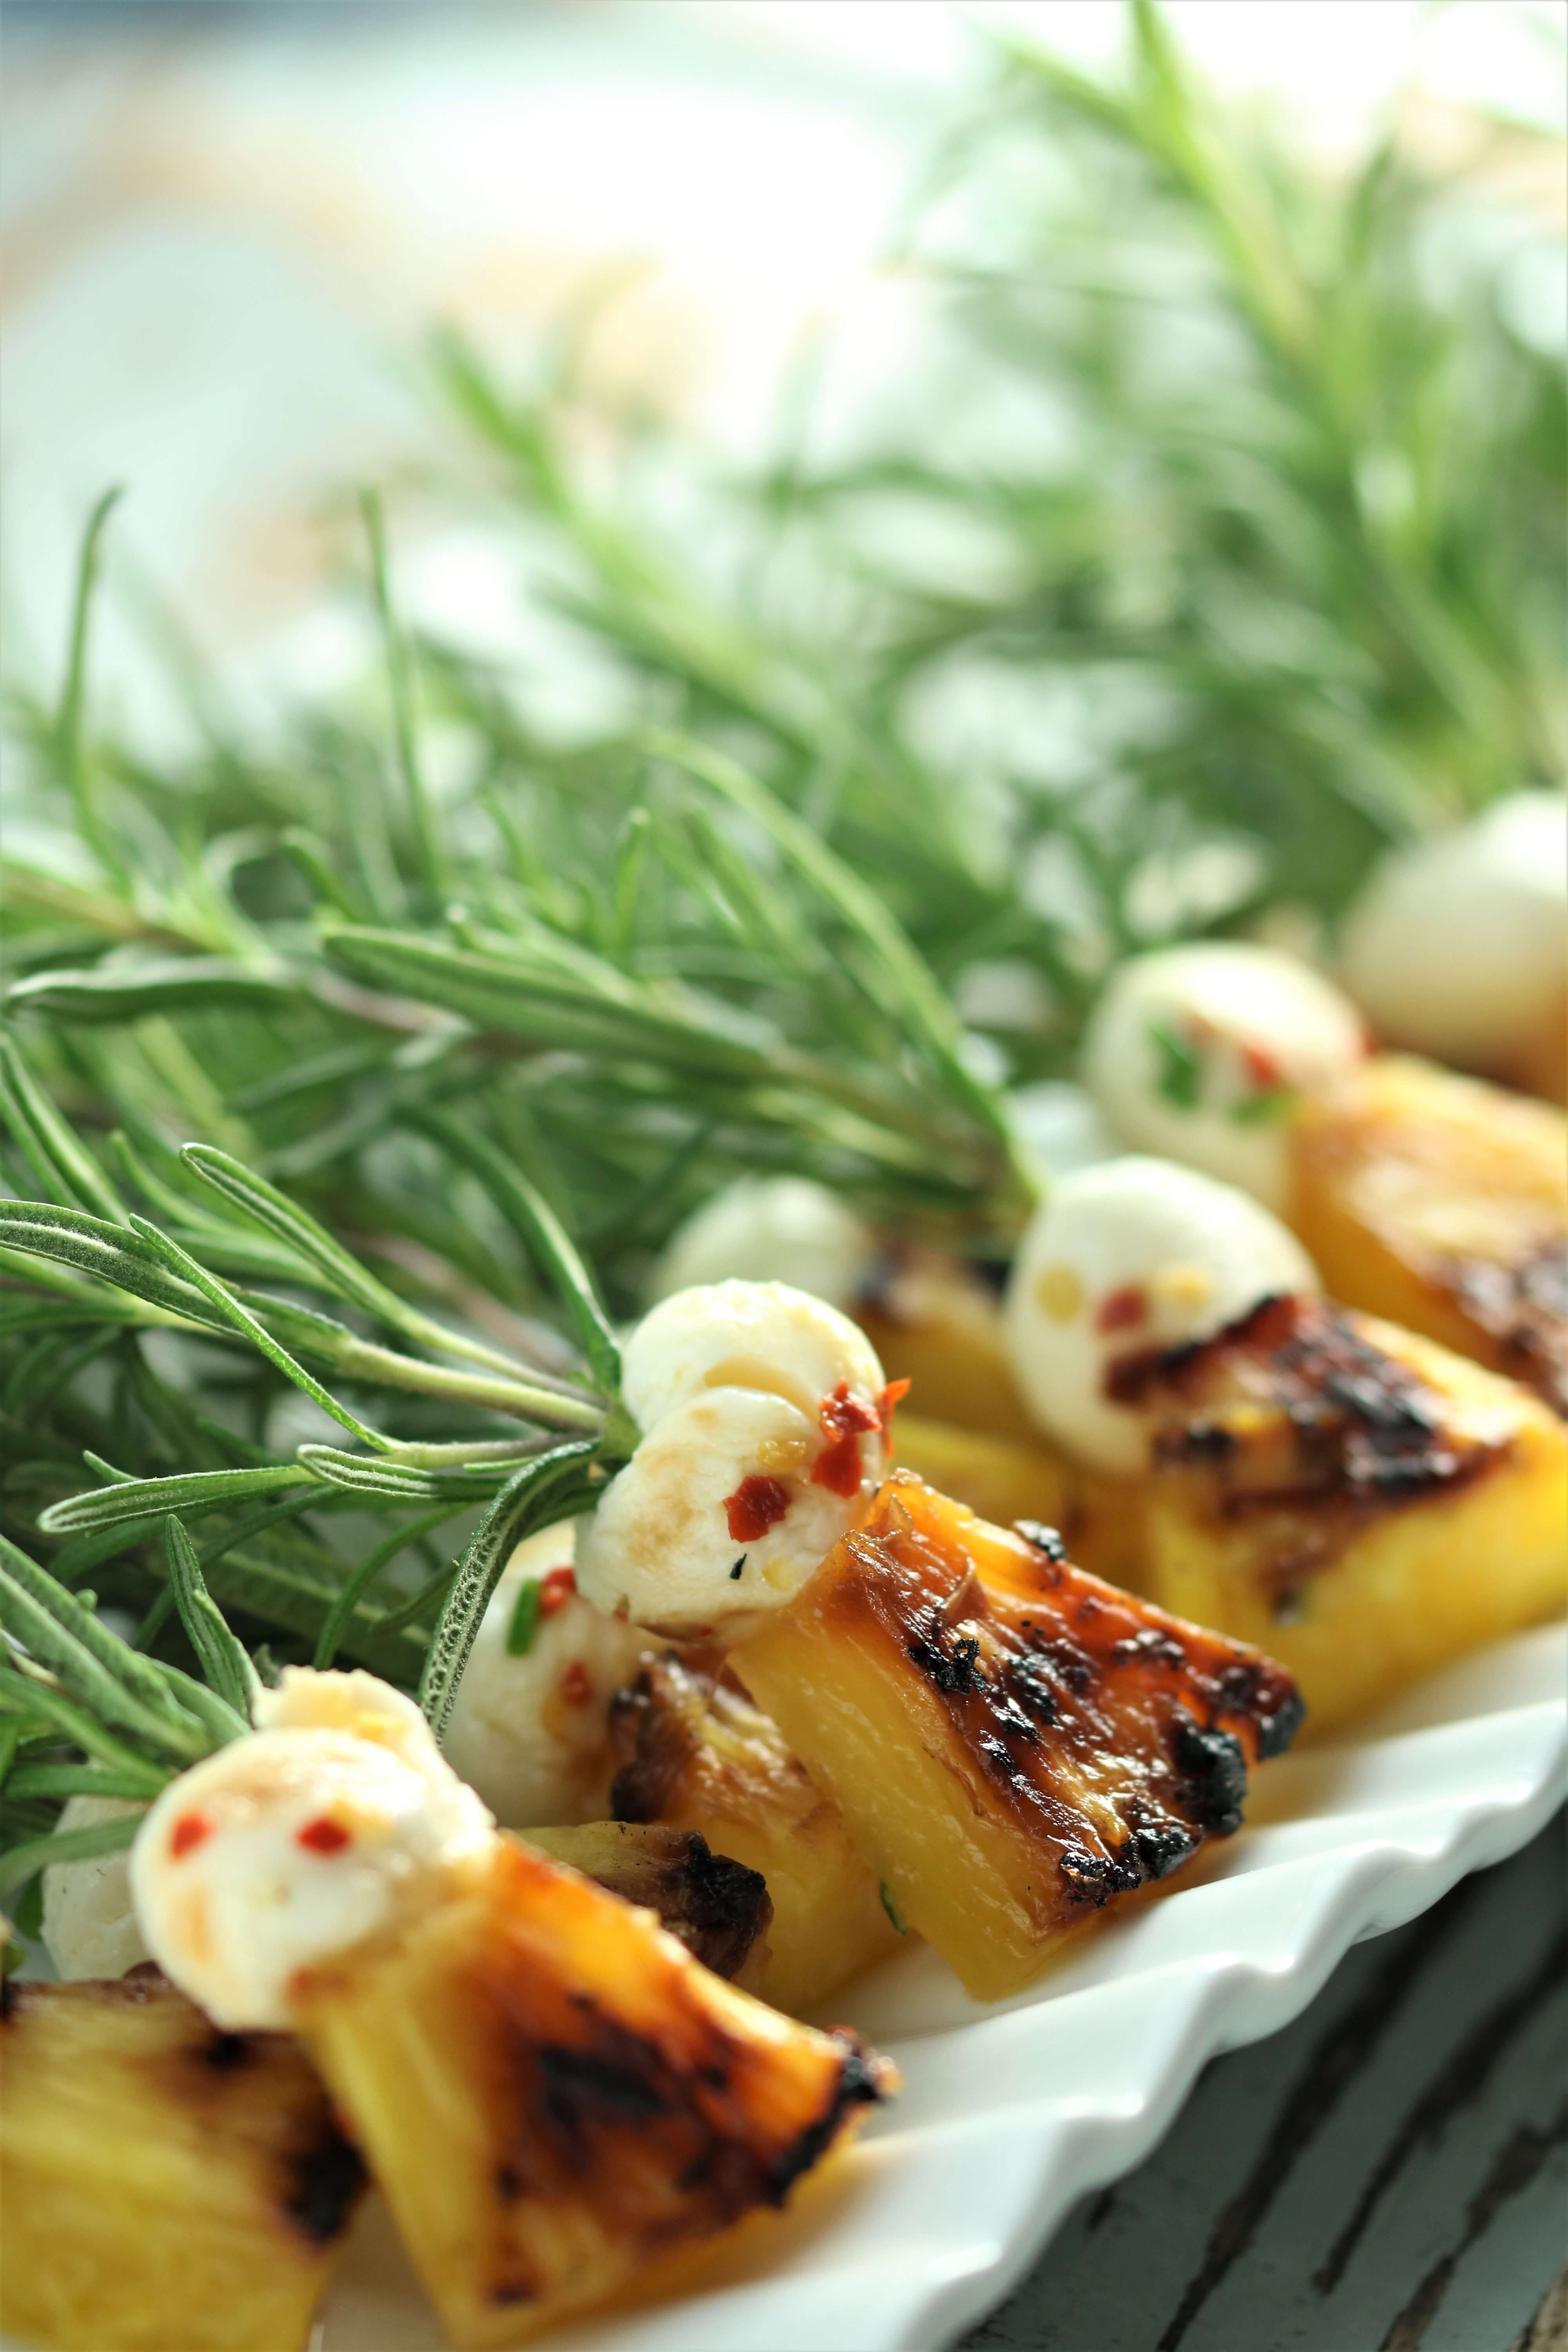
Fresh Mozzarella and Grilled Pineapple Skewers
For the last savory dish, I used rosemary sprigs in lieu of toothpicks – both flavorful and adorable. I marinated some mini mozzarella and grilled pineapple rings, then assembled. Very fresh tasting! Be sure to get the pot of rosemary at the nursery or garden center and plant what remains in your herb bed so it can regrow…because you ARE going to want to do this again. Cut the sprig with sharp scissors so you get a point and remove the bottom few leaves to create the “pick”.
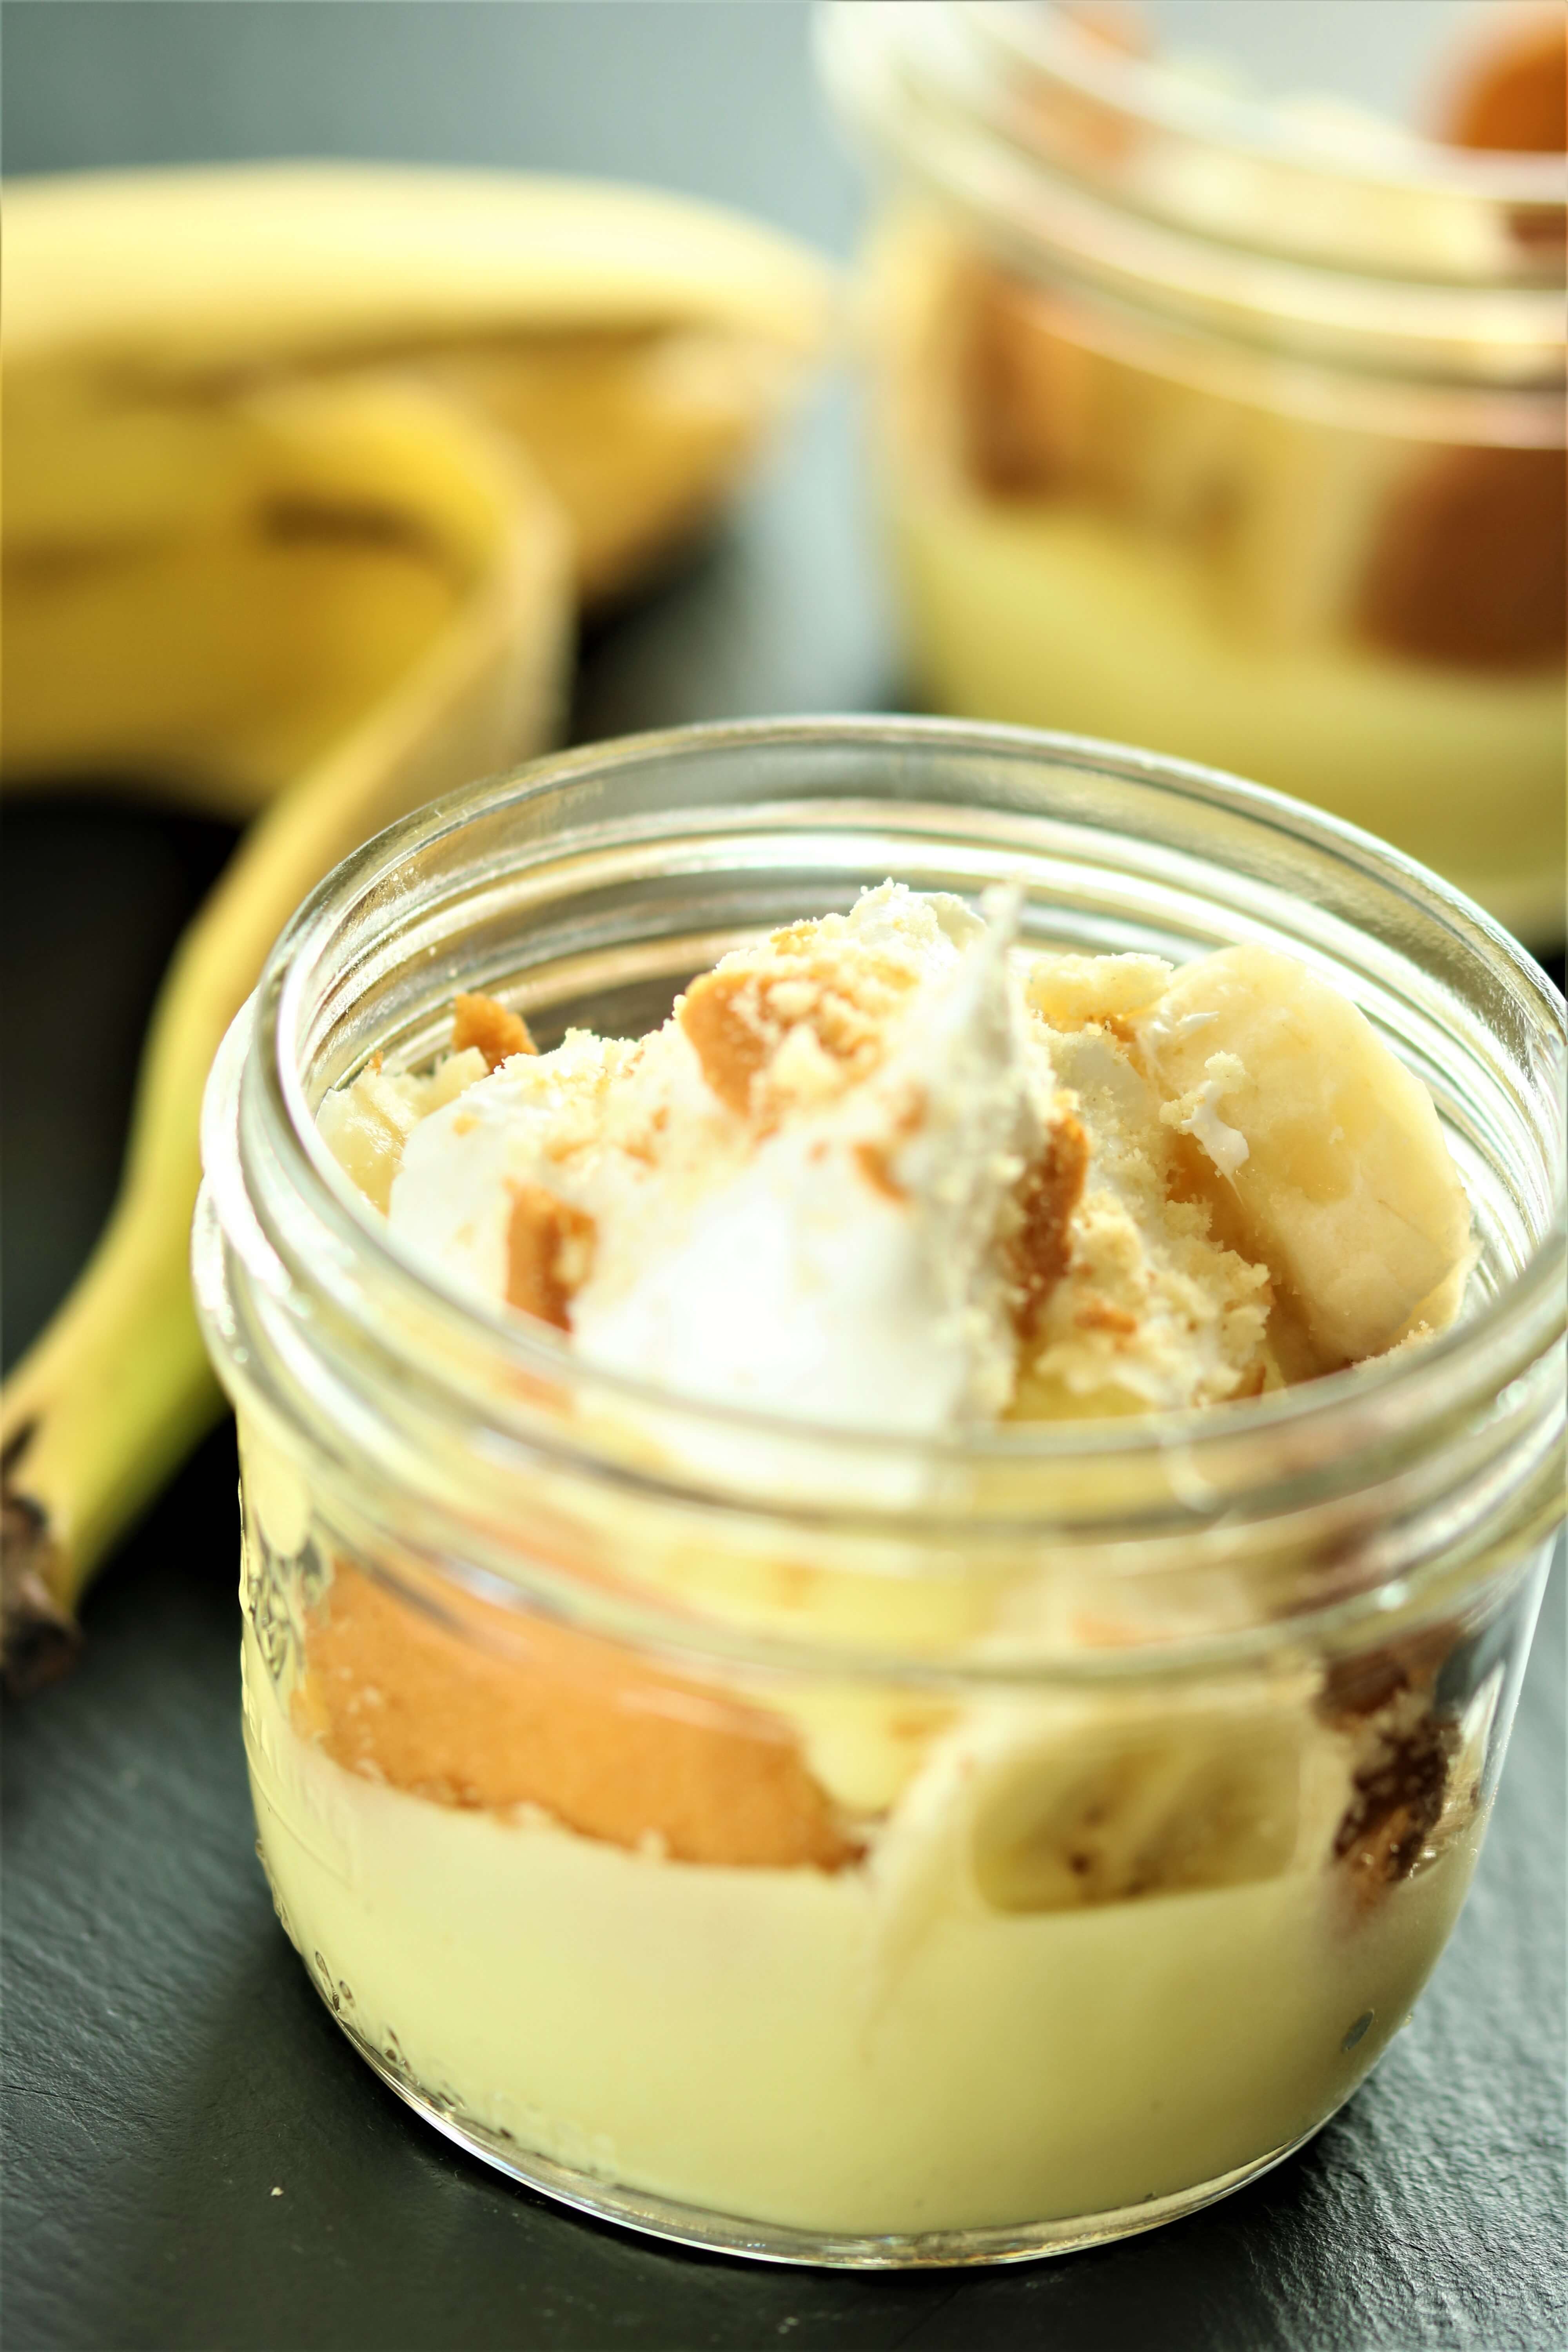
Mini Banana Cream Pies
For dessert and continuing with the portable idea – in this case pie – I used mason jars to create individual banana cream pies. This is a no-recipe recipe and takes good advantage of all basic supermarket items: vanilla wafers, banana pudding (2 minutes to mix with cold milk), sliced bananas and some whipped topping. Crush a few more wafers on top. Sometimes super cute goes a long way to mask shortcut cooking. Shhh don’t tell anyone. That’s a professional tip and I could get kicked out of my professional tip society. This dish lands squarely in the “People Love It!” category. A+!
Diploma Cookies
And then just because I could……diploma cookies – using packaged pirouette cookies, tied with a ribbon. Adorable. Easy. Win. Win.
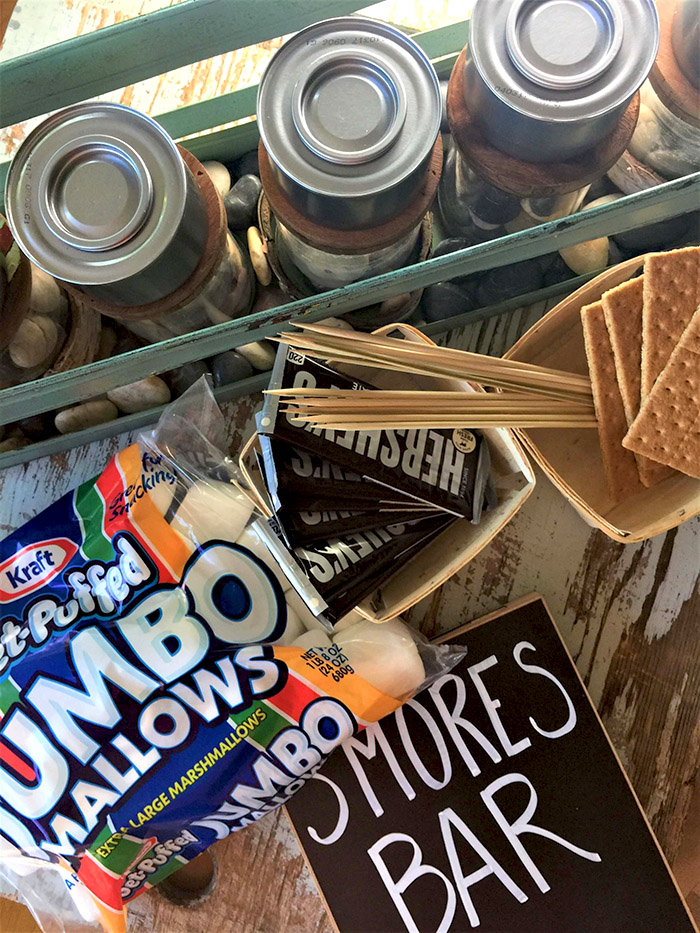
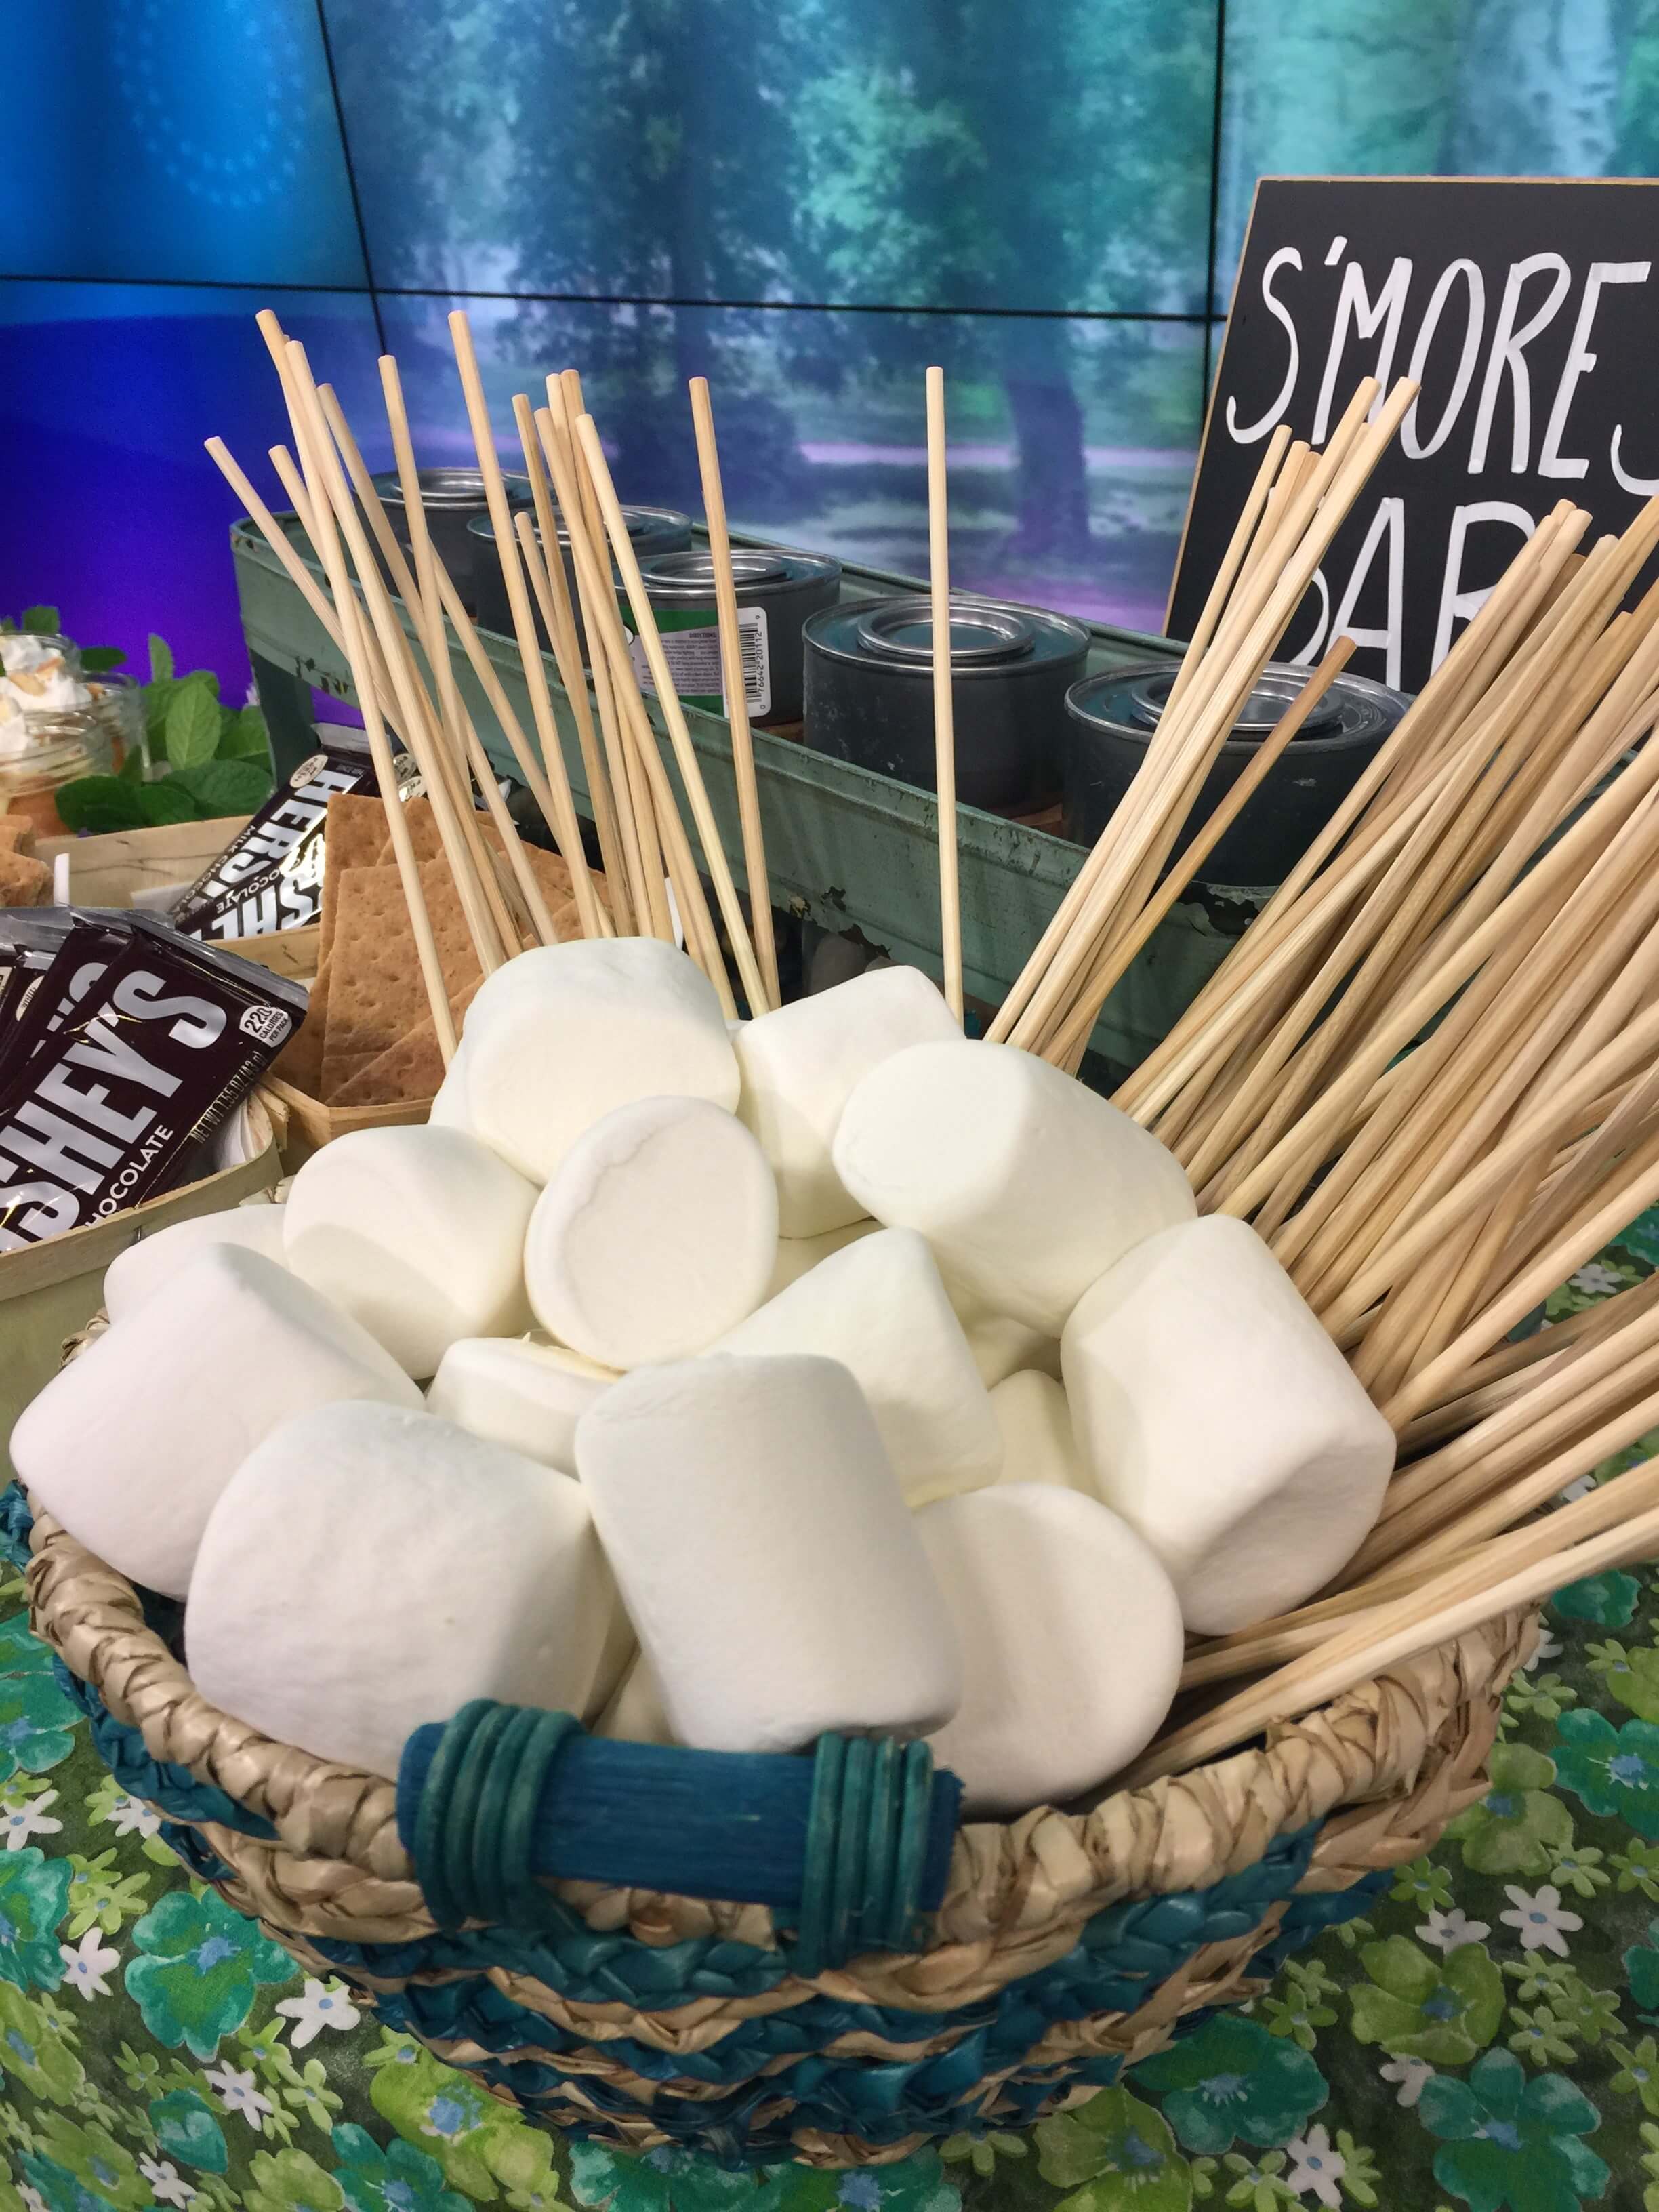
DIY S’mores
There is always a pride of ownership when you contribute to a meal, so let your guests help cook dessert with a DIY S’mores Bar – featuring GIANT Kraft Jet-Puffed marshmallows. (I’m personal friends with JP, the Jet-Puffed guy!)
There are a lot of ways to set up the fuel station – creating a bed of river rock – or even charcoal briquettes as a prop – to surround the fuel. Make sure to place this in a low wind area, with proper ventilation and pay attention to potential flammables, keeping them far away. (It wouldn’t hurt to have a fire extinguisher under the table, because like an umbrella, if you have it, you won’t need it). Now you can find Green Heat products that are environmentally friendly and bio-degradable, as well as safe for direct contact with food. They are plant-derived, and come from corn-based ethanol and are non-toxic. Look for those – good for you, good for the planet.
Making Memories
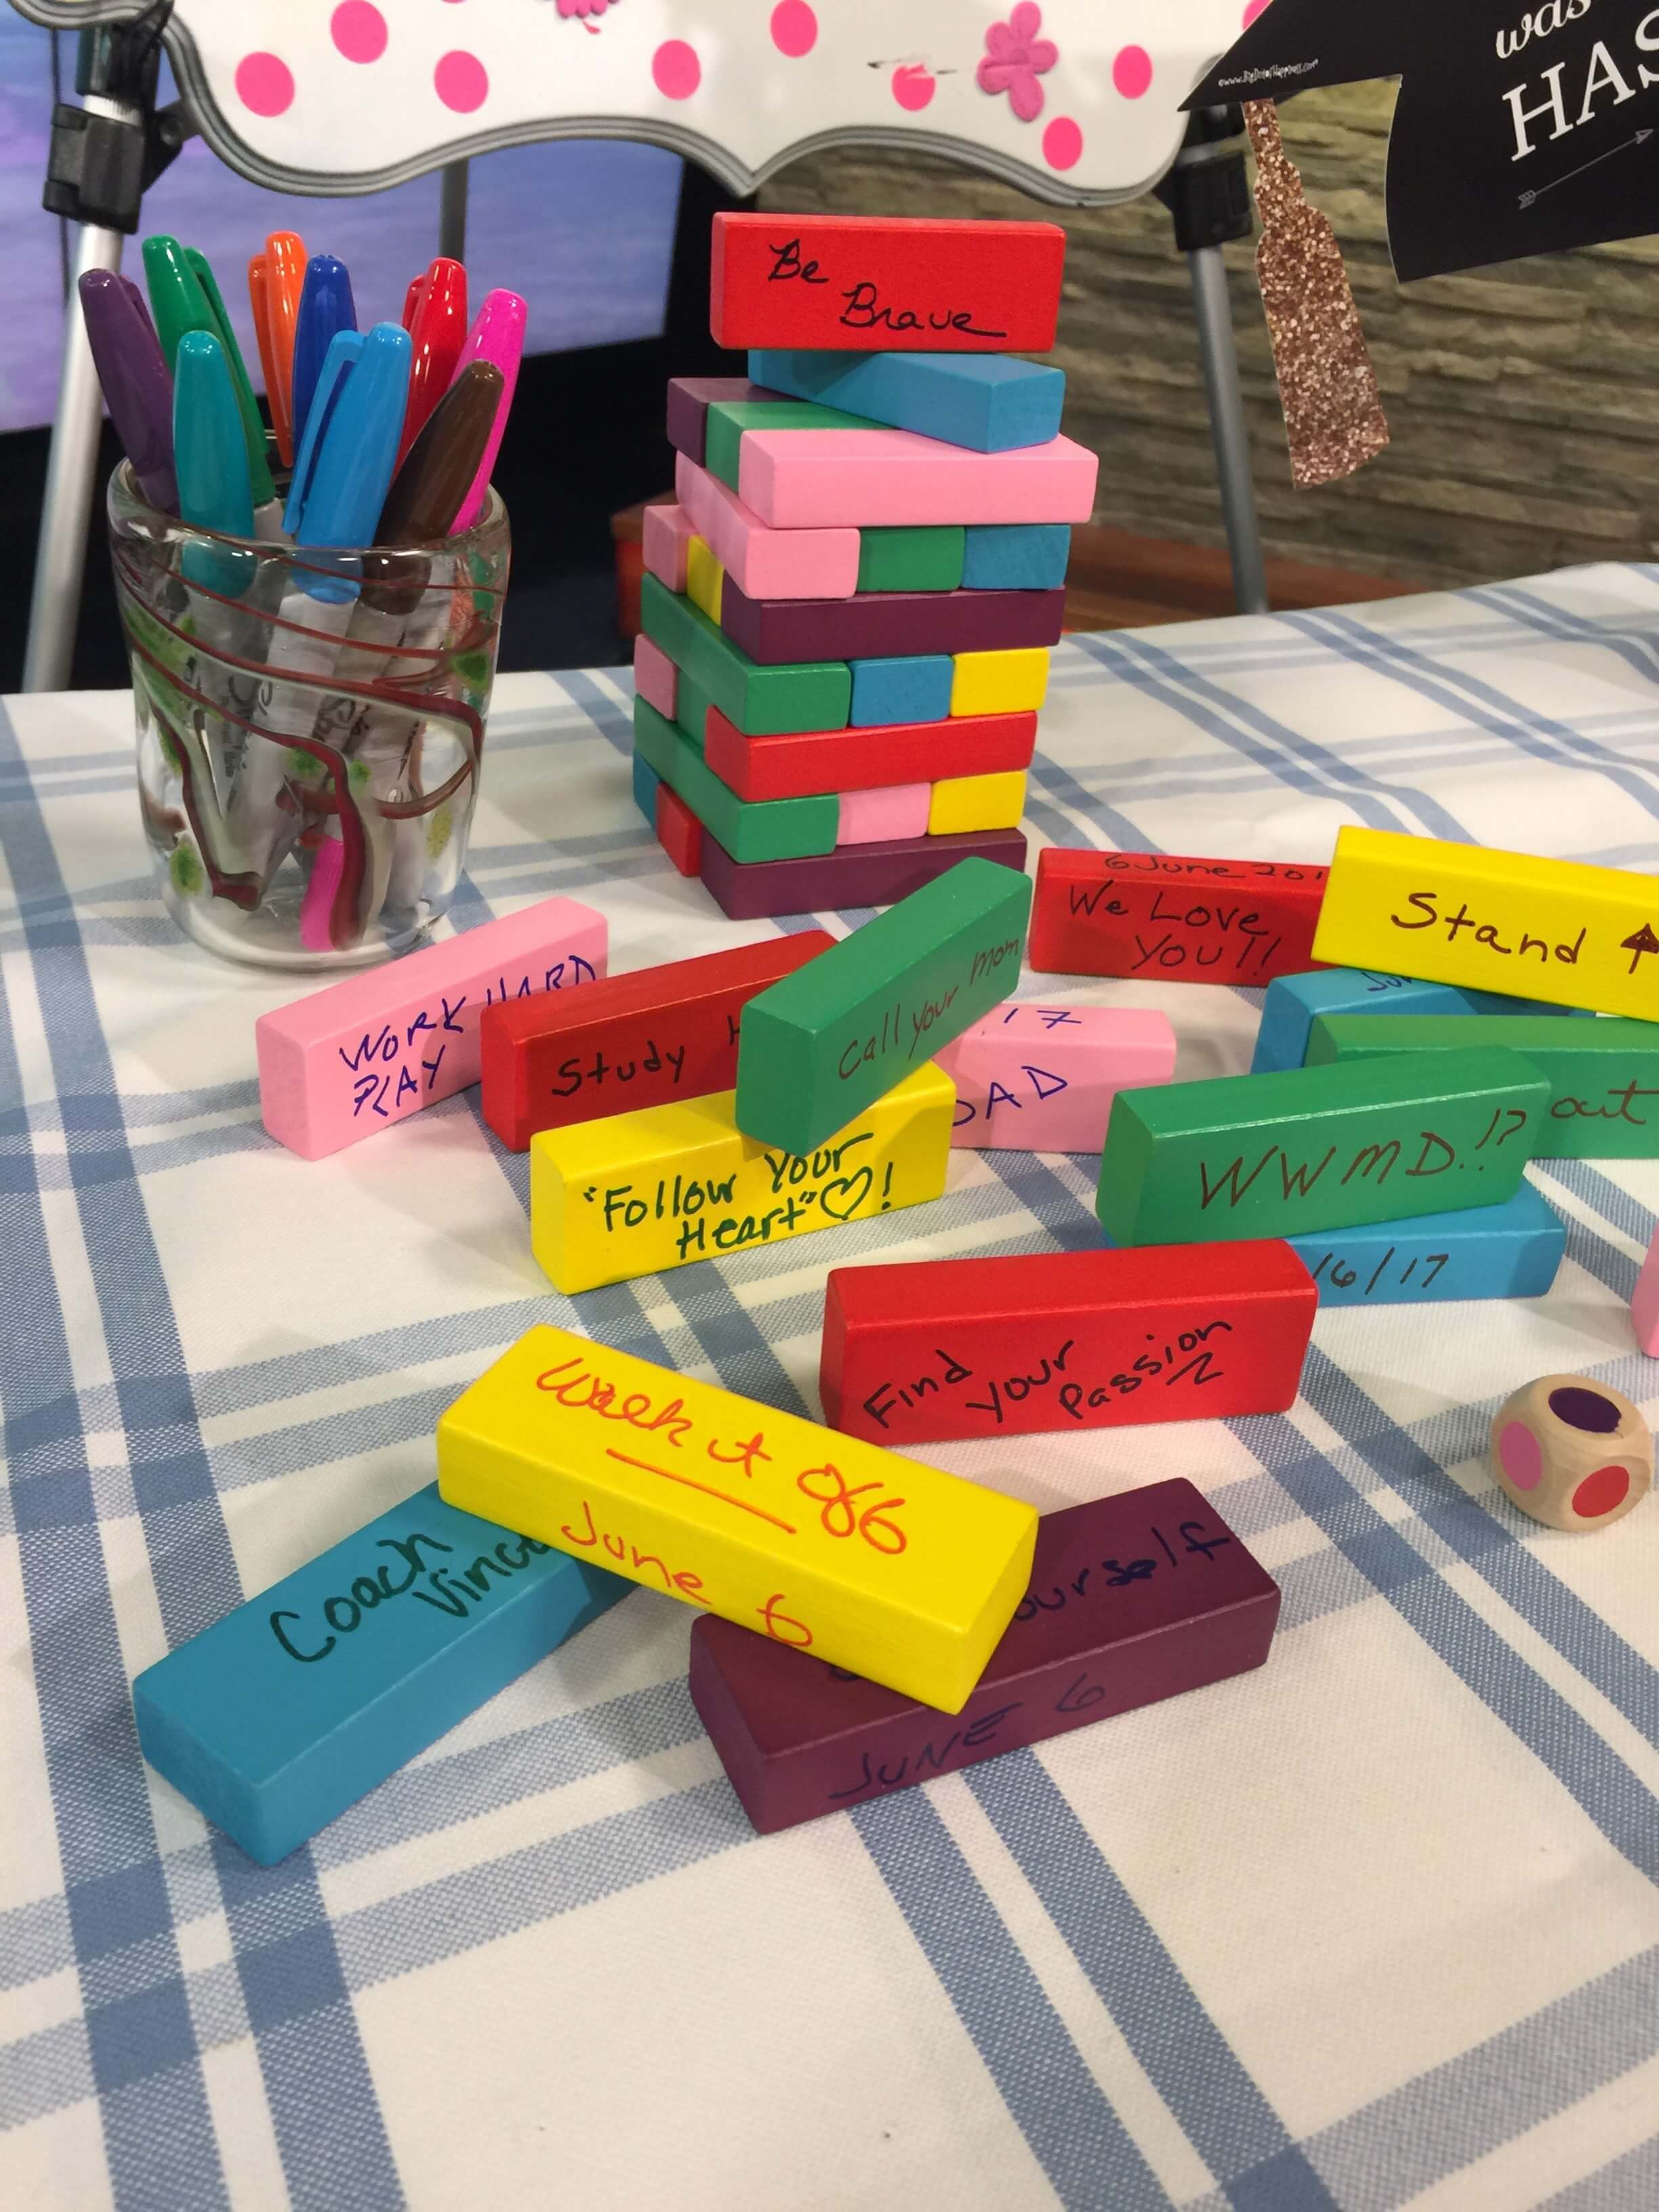
I ended the segment with a couple ways to make memories, something that is important for every celebration. Using a Jenga set – along with a bunch of markers – guests can add their wishes or advice, date and sign it – and the grad will have a keepsake to remember this day forever. Can you imagine the day when Bubba Junior will be playing Jenga with his grandchildren and a smile will cross his face thinking about this incredible party you hosted – back when?
And the final portable for the party: a photo booth. Along with a few photo booth-type props (mortarboards on a stick) and one giant frame, this show can go on the road….grabbing photos of the grad and guests throughout the party. The frame can be decorated for a princess, a sports career, or the college that lies ahead. Just screw a couple drawer pulls into the back so all those in the photograph can help hold it. By being hand-held, this has the added advantage of going from portrait to landscape orientation and from straight on to cockeyed. That variety of angles will inspire a lot of candid moments, making for a great souvenir photo book which you can give at Christmas when your grad comes home from college! And what a great chance to reinforce the idea of gratitude. He can print the photos and write the guests a note of thanks …for the support …for the gift… for being part of the day. Just slap a stamp on it and mail a photo of the guest and grad enjoying this wonderful celebration.
Have Fun! And that’s an order!!!
The most important thing to remember is to enjoy the day. You have worked hard for whatever it is you are celebrating – getting a child through school, walked down the aisle, or even your own significant anniversary – put your focus on planning and prepping, but the minute the doorbell rings, close the door on stress and open the front door with a big old smile to greet your guests. This day is as much about your achievements as those of your graduate. No matter how awry a plan may have gone, no one but you will know. In the business, we have a saying no matter how a dish turns out: “That’s the way we like it.” That might be the most important lesson I ever learned from Anna Teresa Callen, the great Italian cooking teacher. She’d just shake her head and smile and in her wonderful Italian lilt, whisper….”Ah! That’s the way I like it!”
Thank you Maranada for the kind invitation! And the rest of you, check out the segment on Maranda Where You Live!
It’s impossible for me to wrap my brain around the holidays without thinking about family and reflecting on memories from childhood. Especially when it comes to food. English toffee? Yaas!!! All those special meals and holiday traditions that started in the kitchen. Hells Yaas!!! I was lucky enough to have three amazing women (four, if you count Florence on whom they all relied) that each had their own special place in the kitchen. Mom read Gourmet magazine in the 60s and was the first of all my friend’s mothers to make spinach dip. In a bread bowl. Mic drop! She loved party-fied food and was always looking for that next something special that was sure to dazzle. Her mother – Gaga – was legend for fancy food. Crab bisque with a splash of sherry or Belgian waffles dusted with powdered sugar. To be fair, I mainly saw her at holidays and birthdays so my sampling may not be statistically valid and may show a bit of bias. But when it came to Christmas cooking, nobody beat Grandmother Keck (“don’t call me Gramma!!!”). She was well known in our small town and she shared her holiday baking with all. Her English toffee was the best in town. JMHO.
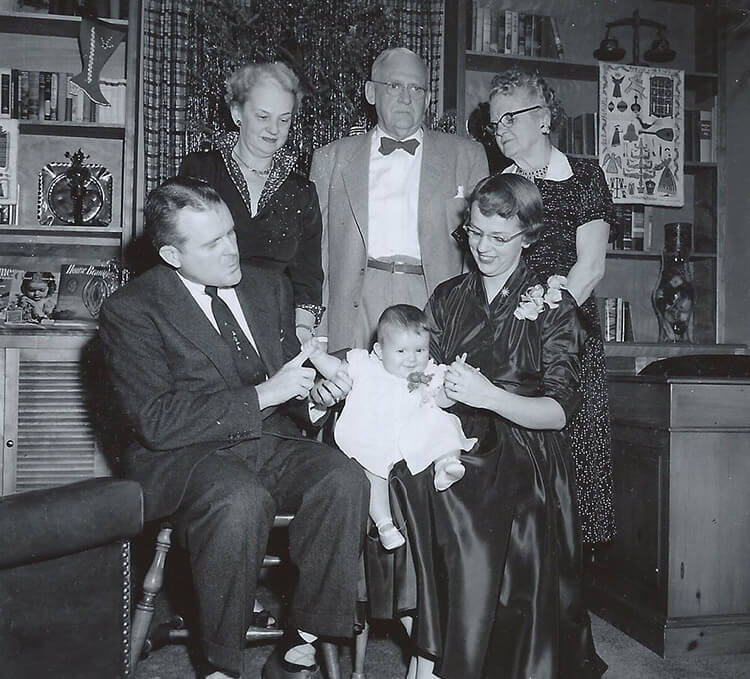
Actually, all her Christmas candy made her a rock star – date balls, divinity, chocolate salted-peanut clusters, apricot balls and what she called butterscotch. It was really toffee. The thing that stands out in my mind is that I don’t have a single written recipe of hers. I think she just really knew how to cook. I have recipes from the other three women, but not her. Yet I can trace many of the things I know how to make straight to her. She was nearly 70 when I was born (she’s the one on the right in this photo) and had had more than a few years to hone her kitchen skills. This photo is from my baptism which was on December 18….a few years ago. As the story goes, city water was out and the font was dry, so they sourced my eternal life spring from a church furnace. It really explains so much when you think about it.
I spent a good bit of time cooking with Grandmother and usually came home and wrote it all down. I have to smile when I see in my handwriting a note on chess pies: don’t remove the pie from the oven when you set it back. Even then my computational brain was worried that turning the oven down might result in a period when the temperature was between the high temperature and the more moderate one and that would not be correct. Should I wait til it reaches the new temp? I understand that little girl’s thinking so well. Her baking skills were not so great – removing a pie mid-bake would be disastrous – but she asked the right questions.
I had not made butterscotch in many decades when I made it three years ago. I didn’t even have to look for proportions because it was so clearly ingrained on my brain. I call for 14 Tablespoons of butter below but the way Grandmother told me: use two sticks of butter and take 1 Tablespoon off of each. Add 1 pound of brown sugar. Boom. Done. Never forgot it.
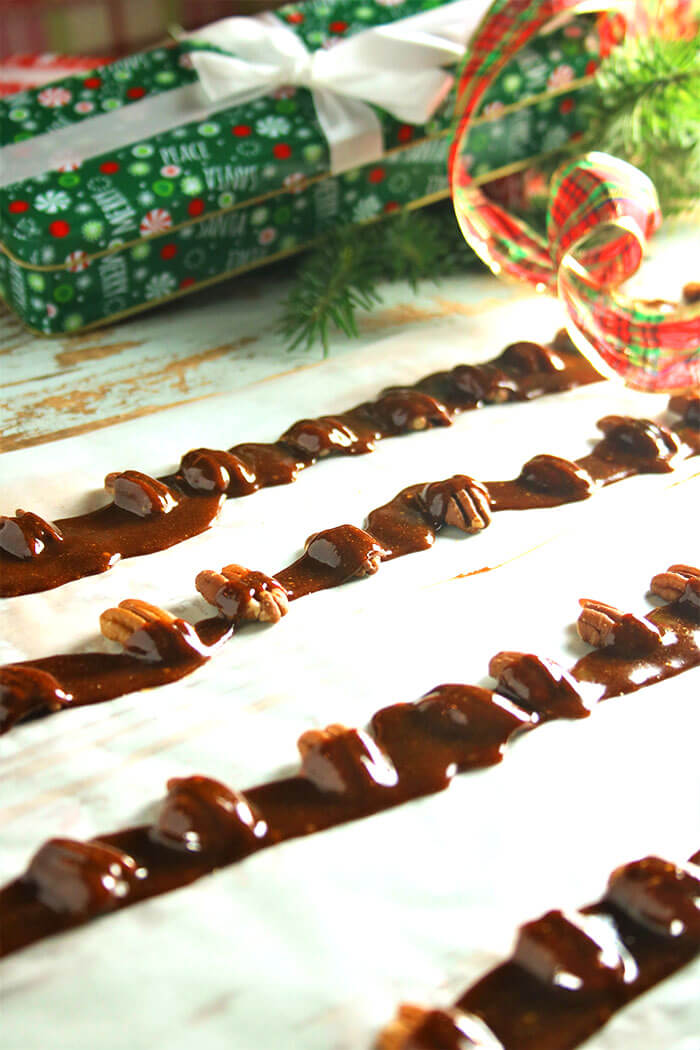
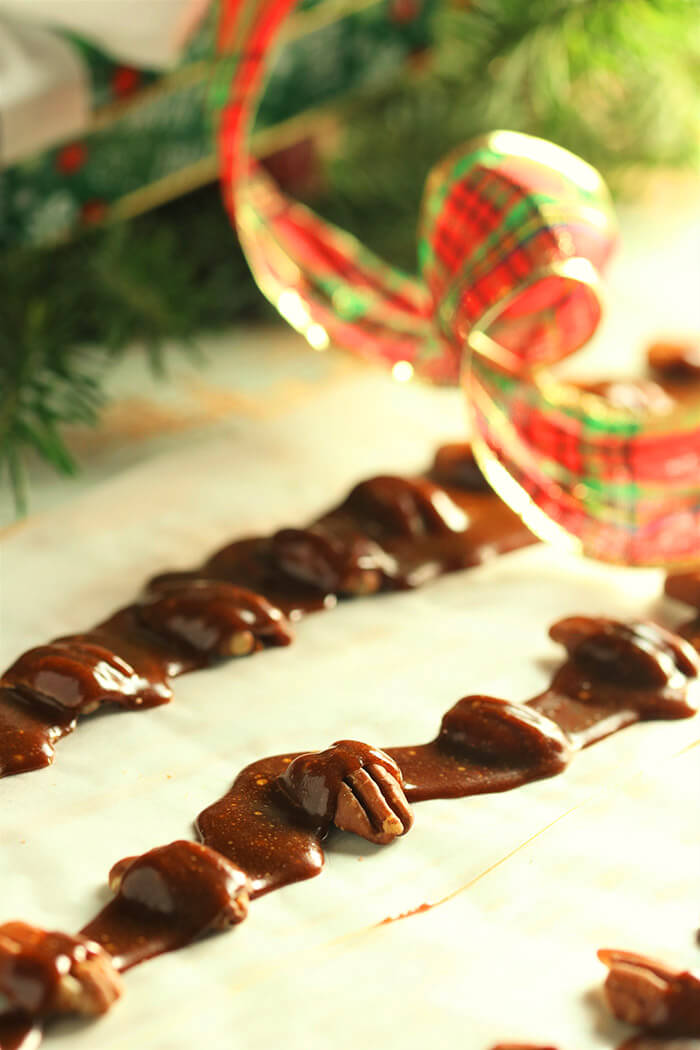
She too made it in long ribbons over rows of pecans. I have changed nothing. I also love that she taught me hard crack candy using a cold water test. She didn’t have or need a candy thermometer. Just a glass of ice water in which you drizzle the candy and then test to make sure it cracks and crunches when you bite into it. I remember going to others’ houses and having a gummy crumbly crystallized version of this. They had not taken the sugar far enough. At 10, I knew the difference and there was no comparison to butterscotch done right. Might have been a little judgy, was a little judgy. But come on people, make it right!
The cold water test is always good to know in case you don’t have a thermometer or it’s not working right and needs recalibration. As sugar cooks, the more the water is cooked out, the harder it will be. Drizzling a teaspoon of the candy into cold water will result in increasingly harder textures as the cooking time lengthens. Starting with “thread”, then passing through the “balls” (soft, firm, hard) and on to soft crack, a hard crack, the sixth stage, is reached at about 300oF.
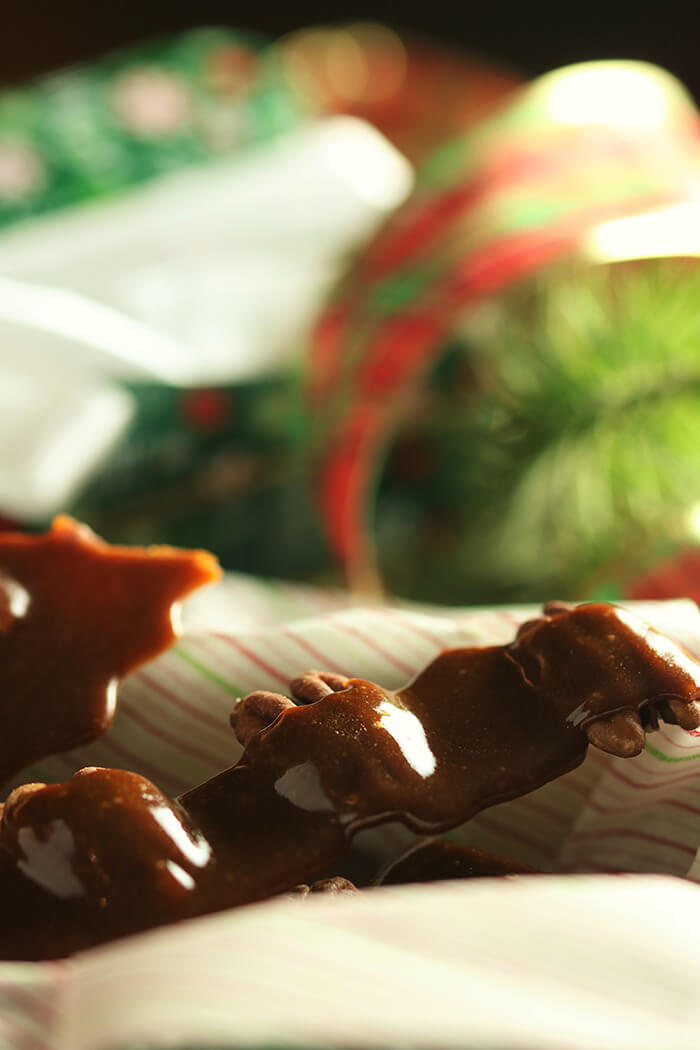
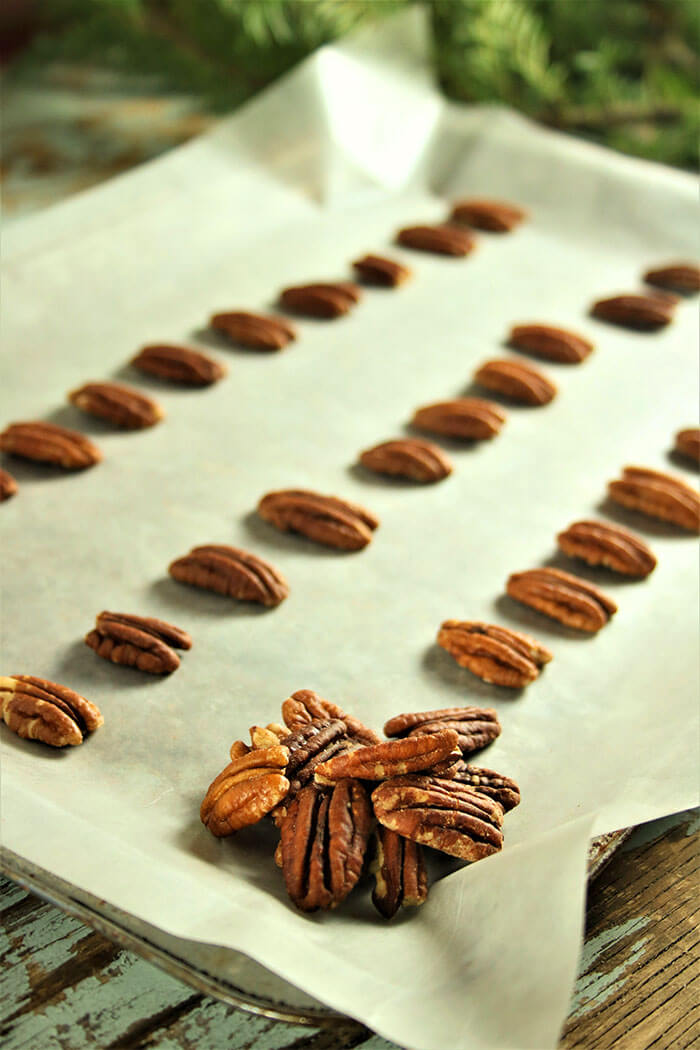
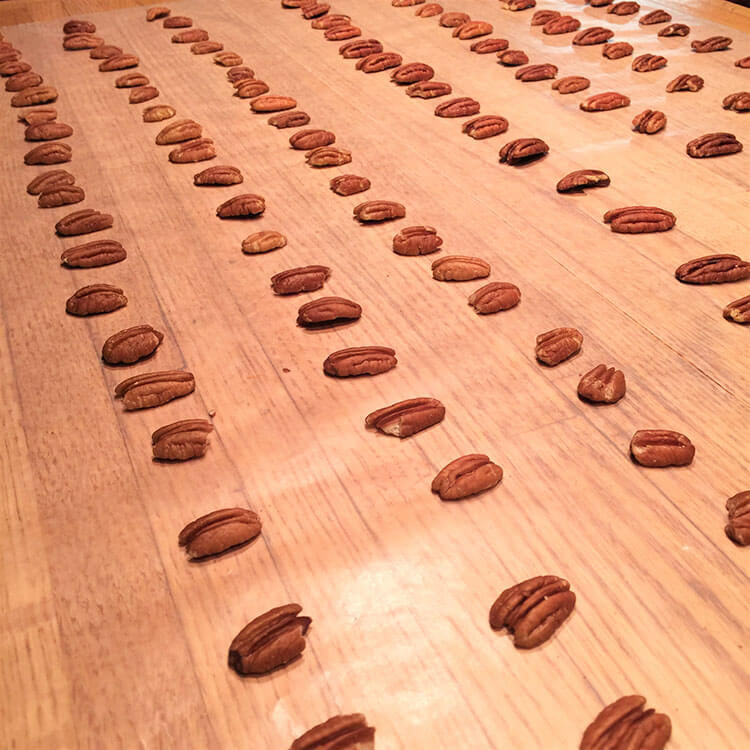
It is best to be ready to pour when that moment ………more like 1/2 or even 1/4 moment…..comes, so in advance I lay out rows of pecans on wax paper on the counter. The second the candy hits hard crack, the color reddens a bit, it becomes very pourable and there is a whiff of char in the air. Turn the heat off and move quickly. When I pour, I walk down the kitchen island pouring on the row farthest away within reach, then reversing the pour on the next row, etc. For this much toffee, I make 8 rows of pecans, each about 4 feet long. I start pouring on the fourth row back, then 3, 2, and 1. Then I walk around the island and repeat.
The toffee will set immediately. Because of the amount of butter, it will peel right off the wax paper, breaking naturally every few pecans. I like to try for 3-4 nuts per piece. Since the candy is in long strips, I was happy to pack my gifts in the cutest rectangular candy tins I found on Amazon. Rectangular works so much better than round tins.
English Toffee with Pecans
1 pound light brown sugar (you could also use dark brown, but the light brown is easier to track changes in color)
14 Tablespoons butter, cut into 1 Tablespoon pieces
4 cups of pecans, about 12 ounces
Cover your work surface with wax paper and lay out the pecans in rows, about one inch apart. I got 8 rows, each about 4 feet long.
In a large non-stick sauté pan, melt the butter with the brown sugar and stir until combined. This pan and your spoon (no plastic spoons or rubber scrapers) will be the next 30 minutes of your life. Relax. It’s kind of Zen. For the first 5 minutes over medium-high heat, stir casually as the butter and sugar melt. It will likely look like there is too much butter at that stage. The butter will not entirely incorporate.
Once combined, turn the heat down to medium and stir constantly. Assuming you are not at altitude* (you are on your own there, but you are probably used to compensations), practice your wax on/wax off stirring technique. Not much will happen for 20 minutes, but don’t walk away. Keep stirring. It will start to bubble and look kind of gritty, and it will be a bit stiff.
Do as I say, not as I do. This spoon didn’t make it any further because I realized the sugar was about to get way too hot. Only use metal or wooden spoons.
Stir on. Between 20 and 25 minutes, it will start to get much more liquid and very shiny. You are getting close. Start cold water testing (see above) after 15 minutes, just so you know what you are dealing with. I made this twice yesterday and both times the magic happened right at 28 minutes (not including that first 5 minutes). That is when it turned reddish, I got a cold water hard crack, it became very liquid and easy to pour, and it fell in ribbons off the spoon. Right then exactly, I also got a whiff of char. If you are using a candy thermometer this will be about 300oF. Here’s more info on temperatures and candy stages.
When you are getting toward a hard crack in your cold water test, it is time for diligence. And once you get a whiff of char, turn off the heat and move the pan ASAP. Remember the pan is hot so this is still cooking. Pour quickly using the technique I outlined above.
Even if you miss a few nuts or your pouring is uneven, no one will know once it is broken into pieces. I try to get every last bit, just pouring the last dribs and drabs in a puddle and perhaps studding with a few more nuts on top.
*Julia Child side bar note: Once I watched the grand lady make a caramel in Aspen at Food & Wine. She wasn’t prepared for high altitude, but quickly realized the liquid was cooking off too quickly and at a lower than expected temperature. It was a surprise, but she was unflappable. She grabbed a nearby bottle of rum – the nearest liquid – and muttered, “Well then, I have added some rum, probably not enough. But, I need some for me, too.”
Jingle Bells!
This post contains affiliate links. For more of my must-have faves, check out my shop.
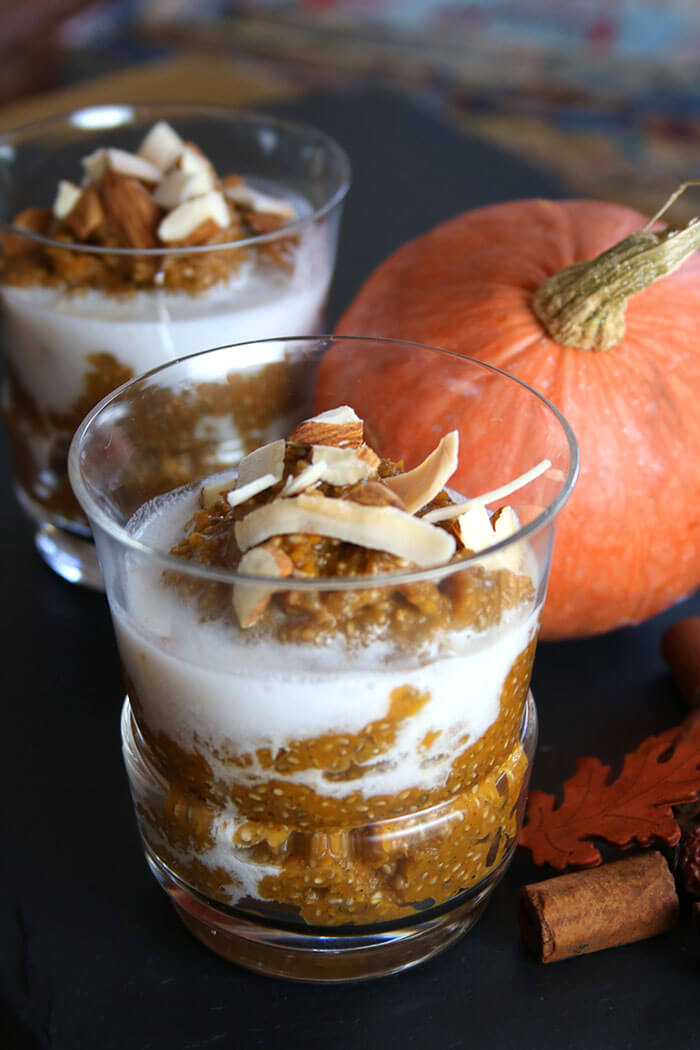
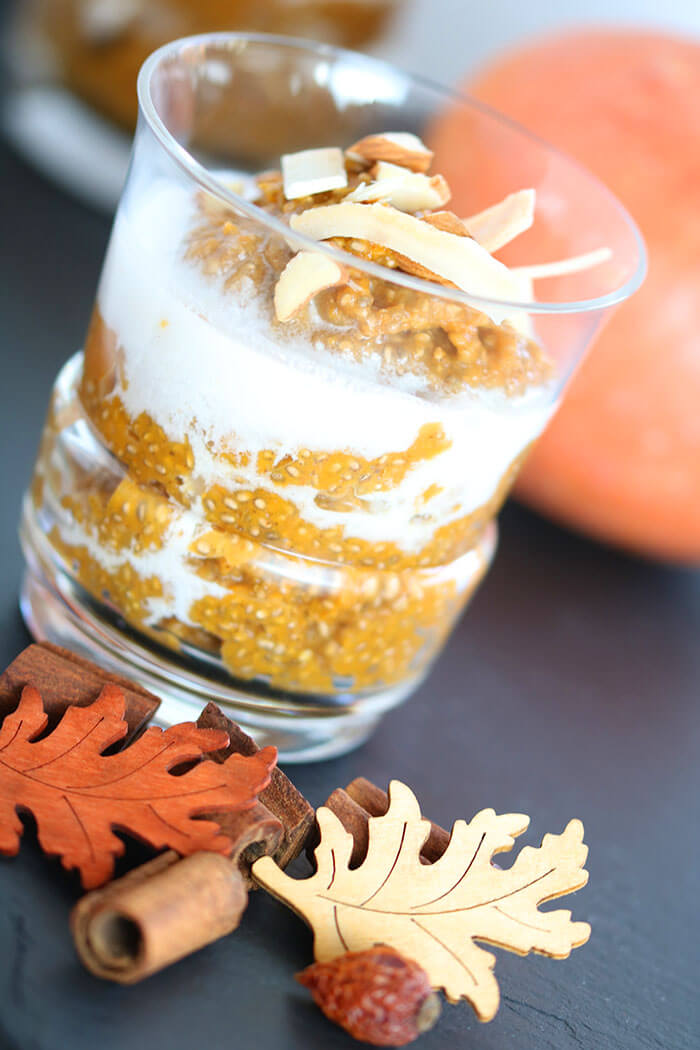
Well color me surprised! If you ever told me I would be writing about Pumpkin Chia Pudding, I would have called you a big fat liar. Not really my thang. But a couple weeks ago I ran across a post called Chia Seed Pudding Is Disgusting, and You Know It and
I also felt compelled to set the record straight. True, the commercially produced products that the author referenced can be “gelatinous, slimy, and look like frogspawn”, but I have the secret ingredient for a homemade version, and it’s probably already in your pantry. Pumpkin puree. The author of the post, Bailey Bennett, seems to be most horrified by the mouth-feel (“chewy mucous”………are you howling yet?? Come on!!! It’s a healthy seed, people, not the apocalypse). I propose that with the mere addition of pumpkin, it is neither slimy nor looks like tadpoles in training. This is not the first time I have let pumpkin do my heavy lifting. A client once had me try to sneak a secret healthy ingredient into a dessert bar. They wanted brownies, but I knew it would be too obvious – I went with pumpkin pie bars, figuring that pumpkin was already famous for making the leap from vegetable to dessert. I needed to merely ride her coattails.
Adding pumpkin to chia goo actually makes for a hearty breakfast pudding (or porridge, your call) that takes zero cooking and can be made ahead. To serve, I just zap it in the micro with a splash of coconut milk (the beverage in the refrigerated milk alternative section, not the canned full-fat Asian ingredient) and top with chopped almonds for added protein. It’s also great straight from the fridge – kind of like Siggi’s pumpkin yogurt, minus the dairy devil.
Mine is a creamy, full-flavor, dessert-like breakfast dish, ready on the fly. None of the “gelatinous mold that wiggles, jiggles and squelches with every touch of a spoon”. I can’t be sure, but I suspect Bailey’s brother stuffed chia pudding in her sneakers at some point. I had a similar experience with Vienna Sausages and I feel her pain.
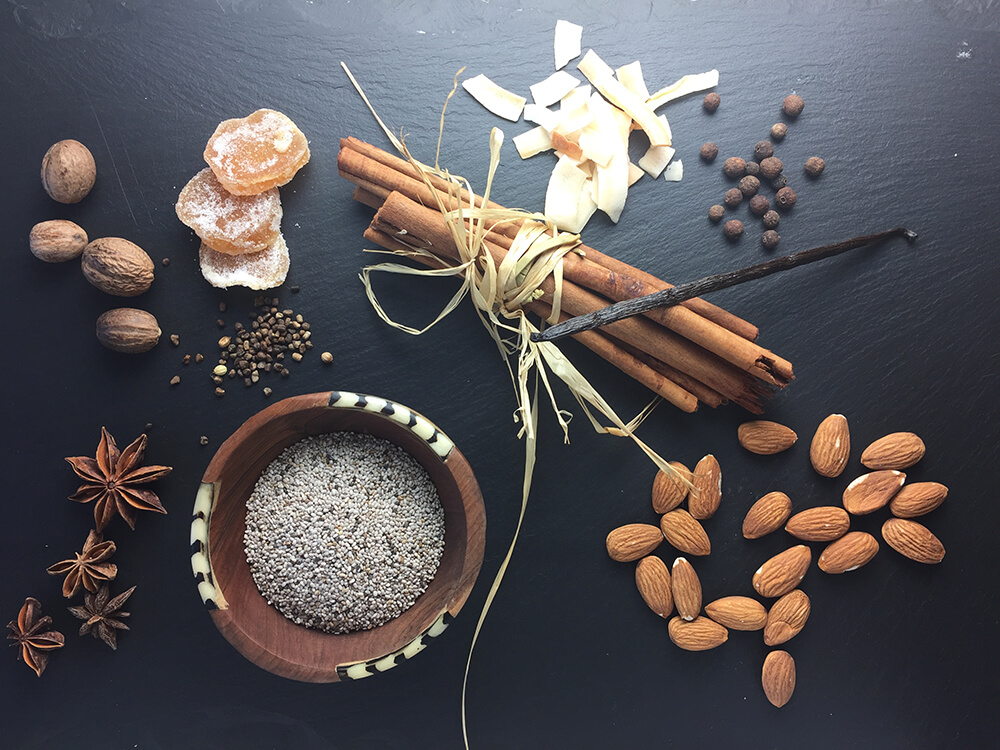
Chia is an herb in the mint family and a rich source of Omega 3, B Vitamins, Calcium, and Manganese. (For more on those nutritional benefits, check out Health Ambition). For me, the real rock star is its protein content. A life-long struggler with eating in the a.m. (I went to work in television at 4am way too often, sometimes after closing the restaurant at 2 am), breakfast was for me theeeeee meal to skip. And if I grabbed something in the studio, I can assure you it was not worthy. No doubt, it was carb-heavy and protein-free. Though I wanted to….I. Just. Could. Not. The elusive fantasy meal needed to be tasty, high protein (or sleepless me would sugar-crash soon), portable, and bonus points for being able to be sucked down. Fast. During my Bush’s Best Beans days, I concocted a smoothie secretly filled with Great Northerns. It worked really well for a long time, but then Greek Yogurt came on the scene and caught my eye. I am nothing if not a serial breakfast loyalist. More recently I have wanted to find several options of the perfect combo (delish, hi-protein, fast, portable) with less reliance on dairy. After devouring everything written by Lyn-Genet Recitas, creator of The Plan, I committed to 10 grams of protein for breakfast – non-dairy. Whaaaaaaaaaat? You’re scaring me!!!!!! How will YOU EVER do that?????? That’s when I started dabbling with spelt flakes, flax granola and chia pudding. And, we’re back. Chia Pudding! Pumpkin Chia Pudding!!
This recipe is made in 2 minutes – dump and stir – and packs 8-10 grams of protein (depending on how many almonds in your topping (shout out to pumpkin seeds – a small handful has 9 grams of protein and is a great source of zinc)). It’s very low in sugar (bonus in preventing late morning crashes) and is high in fiber – 45% of your RDA. And of course, all those spices are amazing for digestion and so much more. Cinnamon alone aids digestion, is helpful with controlling type 2 diabetes and cholesterol, and serves as an anti-inflammatory. It’s all good!
But most importantly, it’s tasty and easy to take to work or eat on the fly. And it does not, I’m quite sure, include, as Bailey suggests, the “tears of all the poor souls who’ve wasted their afternoon snack on a bowl of grayish goo.”
This rich and creamy pumpkin chia pudding is actually a healthy, high-protein, high-fiber, low-sugar breakfast-on-the-run kind of dish. It doubles as a dessert.
Ingredients
Scale
½ cup chia seeds
1 teaspoon ground cinnamon
½ teaspoon ground allspice
½ teaspoon ground ginger
¼ teaspoon ground cardamom
1/8 teaspoon ground nutmeg
1 ½ cups unsweetened coconut milk beverage (I like Silk, Trader Joe’s, or So Delicious – 45 calories per 8 ounce cup. The sweetened versions have another 40-50 calories of sugar).
1 Tablespoon maple syrup (or more to taste)
1 teaspoon vanilla extract
½ teaspoon almond extract
15-ounce can pumpkin puree
Instructions
This is basically a dump and stir recipe. But, I’ve listed the ingredients in the order I like to add them:
First – the chia and 5 dry spices. Dump. Stir.
Then the milk, maple syrup, and two extracts. Dump. Stir.
Once they are combined and the spices are dissolved, then I fold in the pumpkin.
Store, refrigerated, in an airtight container.
To serve, microwave with an additional splash of coconut milk until warmed through (or serve cold) and top with chopped almonds and coconut flakes.
Notes
Serving suggestions: chopped raw almonds and/or toasted coconut flakes
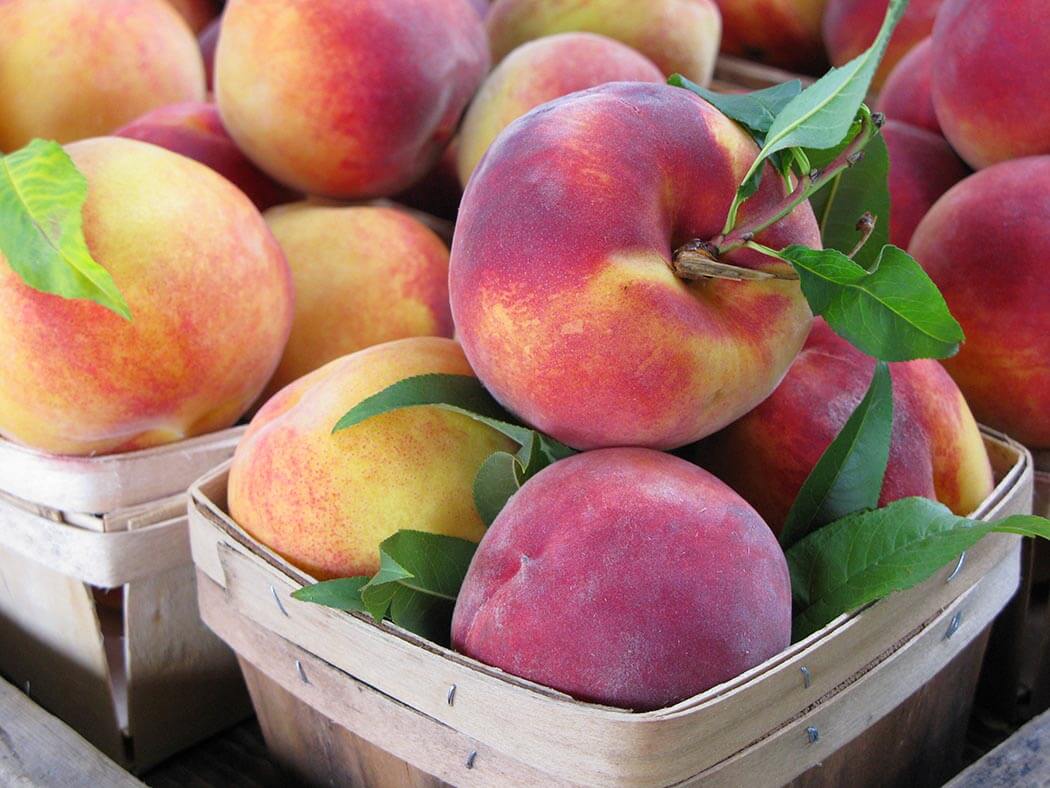
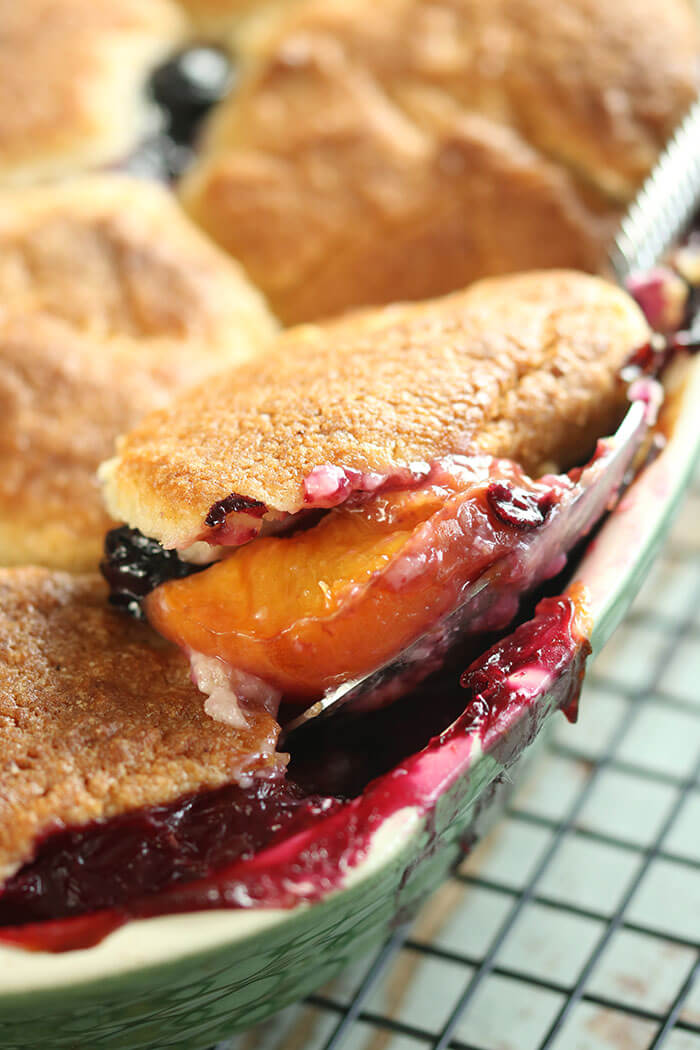
I can see the problem you are having. A giant mound of peach perfection and you are so tired of fruit pie and cobbler (Okay, we should probably admit that is NOT really a thing, being tired of pie and cobbler). But it’s a holiday weekend and you MUST use that beautiful bounty ASAP yet you would rather be on the beach, boat, SUP or _____(fill in the blank). So with that last hurrah of summer celebration hurtling toward you at ram speed, here’s a dessert that you can make in a flash, yet will look like you have been slaving away. Stone fruit –still abundantly available – is the perfect choice for this “cobbler, not-a-cobbler.” Cut into wedges, a peach or nectarine is sizable enough to hold its shape (ain’t nobody likin’ fruit mush) and comes with its own good dose of pectin. I throw in a few blueberries for a wee bit of flavor, color, and texture contrast, but warn against fruit with a high water content and thin skins (I got my eyes on you raspberries and blackberries.)
Normally a fruit cobbler comes with a streusel or pastry crumb topping, but I love this idea of biscuits. I would say it’s fresh and new, but since I created this dish at New World Grill some 20 years ago, I will settle on timeless. It’s hard to find a fruit pot pie at all, and the ones I have seen are made with a double pastry crust. This dish has no bottom – which means…..???? You got it!! No soggy bottoms!!! Pastry fraidies unite! You can do this!! Just cook the fruit with a little cornstarch stove-top then drop biscuit dough on top. Super easy to serve as well because everyone gets a heaping spoon of fruit topped with a biscuit topped with …Ice Cream? Whip Cream? Greek Yogurt? Yes. Yes. And Yes. Please. It’s dessert magic.
I have made this with peaches and nectarines (peel the peaches, but no need on the nectarines), but you might also try plums or apricots. And cherries could be a nice alternative to the blueberries I use. Just keep a sturdy skin in mind when improvising. And always let a fruit dessert cool to avoid the juice-bomb. This is best served same-day, an hour from the oven or reheated. Biscuits are a bit of a diva when it comes to humidity, so the longer it sits around the less flaky they will be.
I learned to make traditional biscuits from a woman who said “handle them like you are holding hot coals.” (It was a KFC shoot and we must have made 1000 biscuits). It was good advice – don’t touch them much at all. Biscuits are made by cutting little tiny bits of ice cold butter into the dry ingredients, so that each pea-sized bit is flour-coated. Then you gently add the liquid – buttermilk, perhaps – until it just holds together. If you hot-handle the dough, the butter will start to melt. The butter should melt only once – in your honking hot 425oF oven – because that creates steam and that, my friends, provides lift. Voilà! Flaky!!
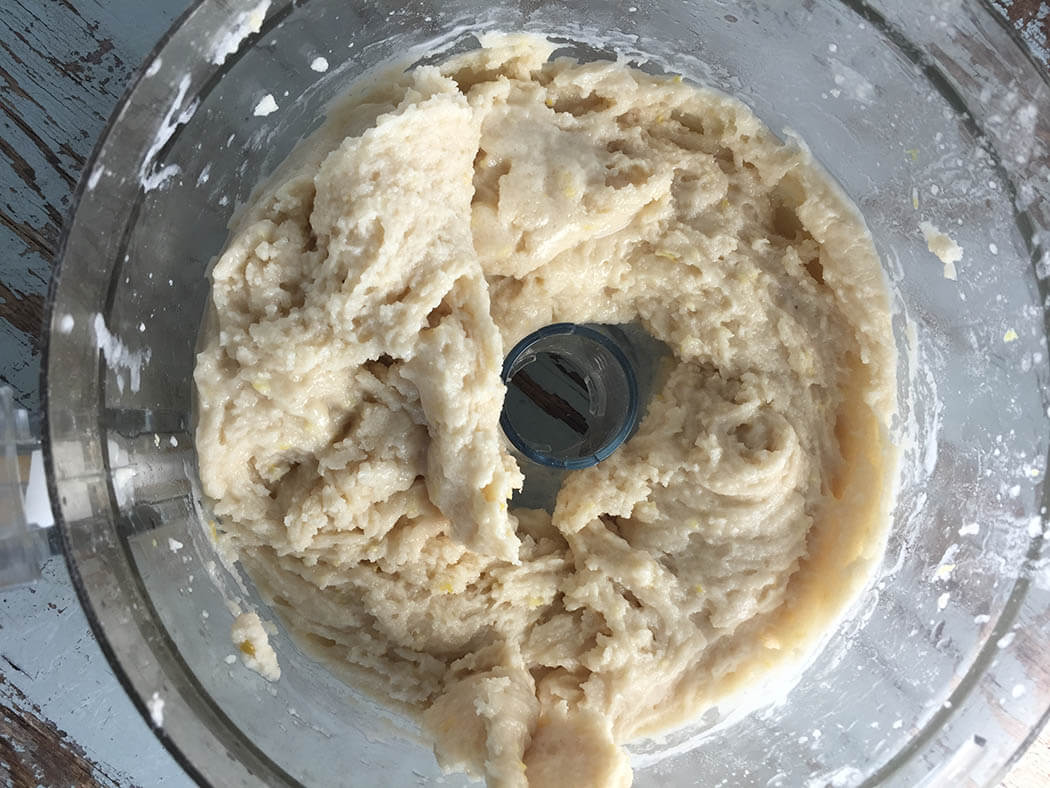
The other reason to lightly handle the dough is to avoid overworking the glutens which will make a tough and sometimes shrunken biscuit. (That joke just wrote itself. I don’t even have to put it in words.) I got you covered here, this dough is NOT fussy and is made in the processor and uses a small amount of boiling water to pull the dough together. It’s a bit of the opposite of everything I have just said – no hot coals. This makes it super simple and you can get away with it in part because it is going atop hot fruit which will also create some steam.
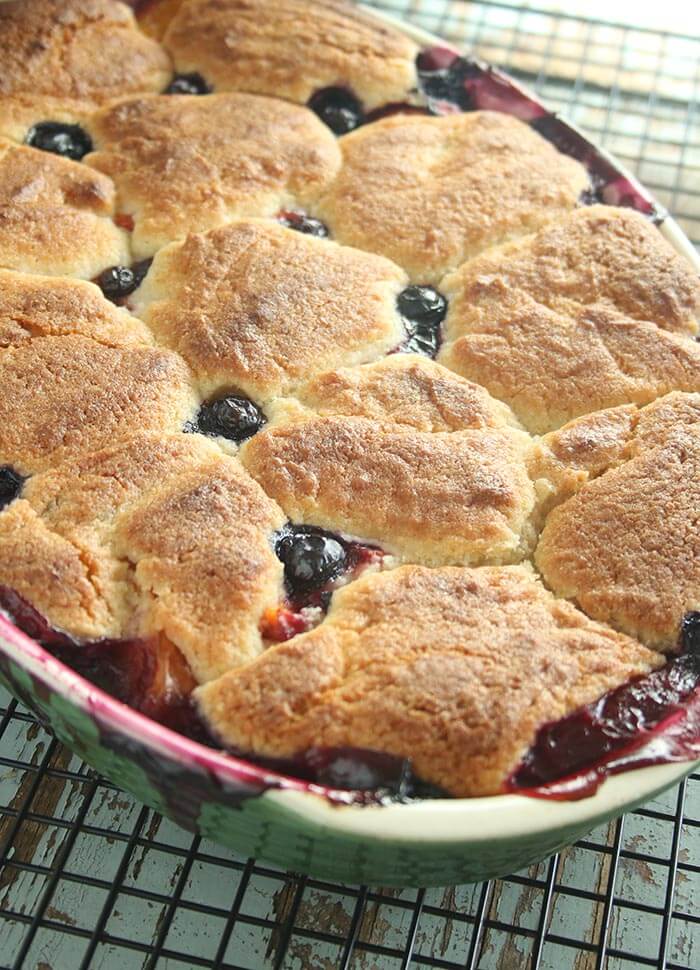
Summer Fruit Pot Pie
Fruit Filling
8 cups pitted and sliced nectarines, about 8 pieces or 4 pounds
Juice of one lemon, about 3 Tablespoons (please zest it first and save the zest for the biscuit)
1/2 cup sugar
3 Tablespoons corn starch
1/2 cup cold water
2 cups blueberries
Biscuit Topping:
2 cups all-purpose flour
1 cup sugar
2 teaspoons baking powder
1 teaspoon salt
Zest of one lemon
6 ounces ice-cold butter, cut into bits
¼ cup + 2-3 Tablespoons boiling water
Preheat oven to 425oF. Butter a 9x13x2-inch 3-quart casserole.
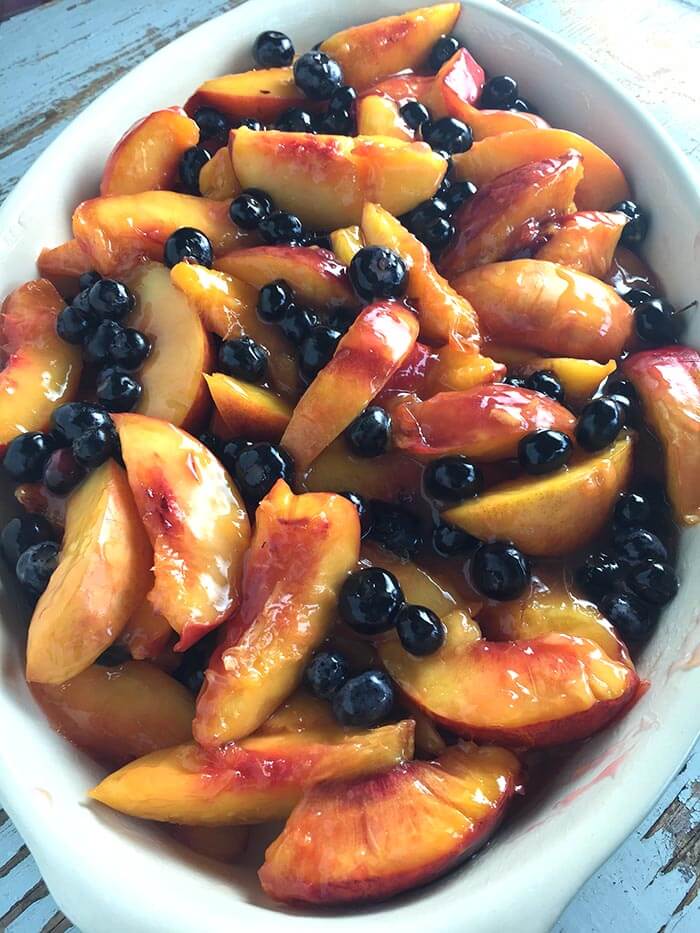
Start the Fruit: Combine the nectarines with the lemon juice and sugar. Set aside. Dissolve the cornstarch in the cold water and set aside for 5 minutes.
Start the Biscuits: Combine flour, sugar, baking powder, salt, and lemon zest in the work bowl of a food processor. Pulse to combine. Cut in the butter with the food processor, by pulsing 8-10 times, until the mixture resembles coarse meal. (You can also use a pastry cutter).
Back to the Fruit: Combine the nectarines with the cornstarch in a saucepan. Bring the cornstarch-nectarine mixture to a boil, and cook for 1 minute. Remove from heat and gently fold in the blueberries. Transfer fruit mixture to the casserole.
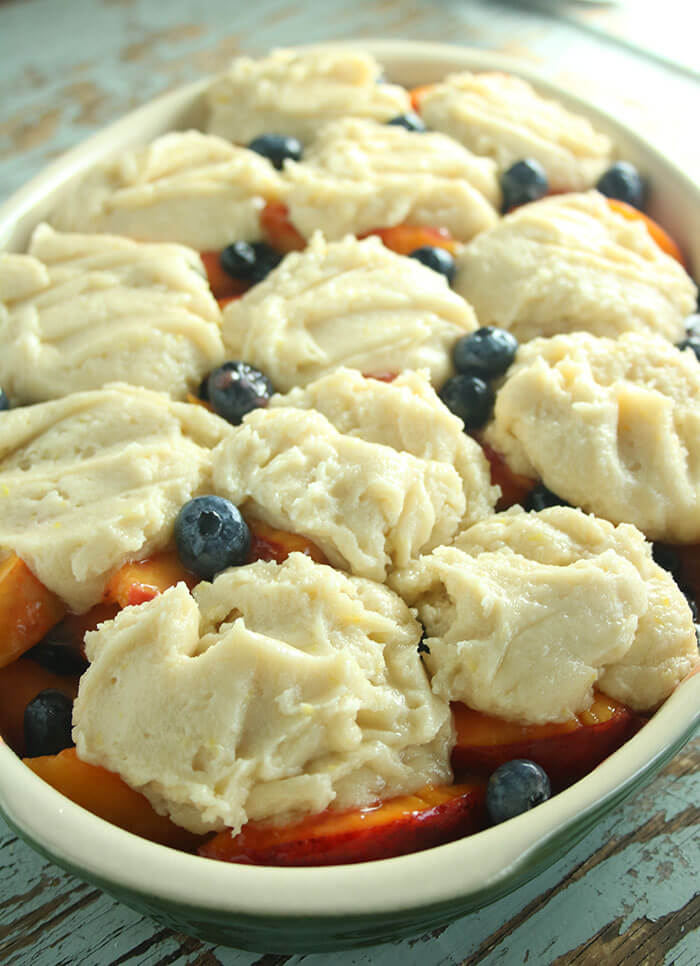
Finish the biscuits: Slowly pour in ¼ cup boiling water and pulse a couple times until just combined. Scrape down sides. Add additional water one Tablespoon at a time, up to 3 additional Tablespoons. Pulse with each addition until dough just comes together and becomes spoon-able. It should remain a bit stiff and not turn gooey. If you add the water all at once, you run the risk of adding too much liquid and melting the butter. Add it gradually and it will just slightly soften it. Drop the dough by scant 1/4 cups onto the fruit to form 12 biscuits. Use a spoon or small spatula to ease the dough out of the cup. All that butter will let it slide out quite easily.
Bake in bottom third of preheated, foil-lined oven for 35 – 40 minutes until fruit is set, biscuits are golden, and a toothpick inserted in a biscuit comes out clean. If the biscuits are getting too brown, cover loosely with foil for the last 10 minutes or so. Transfer to a wire rack to cool slightly. Cool for about an hour, to let the juices set. Serve while still warm or reheat if it has cooled. Top with ice cream, whipped cream, or plain Greek yogurt.
To provide the best experiences, we use technologies like cookies to store and/or access device information. Consenting to these technologies will allow us to process data such as browsing behavior or unique IDs on this site. Not consenting or withdrawing consent, may adversely affect certain features and functions.
Functional
Always active
The technical storage or access is strictly necessary for the legitimate purpose of enabling the use of a specific service explicitly requested by the subscriber or user, or for the sole purpose of carrying out the transmission of a communication over an electronic communications network.
Preferences
The technical storage or access is necessary for the legitimate purpose of storing preferences that are not requested by the subscriber or user.
Statistics
The technical storage or access that is used exclusively for statistical purposes.The technical storage or access that is used exclusively for anonymous statistical purposes. Without a subpoena, voluntary compliance on the part of your Internet Service Provider, or additional records from a third party, information stored or retrieved for this purpose alone cannot usually be used to identify you.
Marketing
The technical storage or access is required to create user profiles to send advertising, or to track the user on a website or across several websites for similar marketing purposes.