Aug 13, 2016 | Dressings & Sauces, Recipes, Salads, Sides

How is it exactly that “Salad Days” has gone from meaning green and naïve (Shakespeare’s Antony and Cleopatra) to the more current American connotation of being at one’s heyday or pinnacle? So American, right? Wait long enough and it can mean whatever you want. And what I want is green – as in green salad with green (and yellow) summer squash. It’s reparation for making you go to that 425o kitchen last week, chasing a cherry pie. This one is perfect for these oppressive muggy days. You won’t have to turn on a thing.
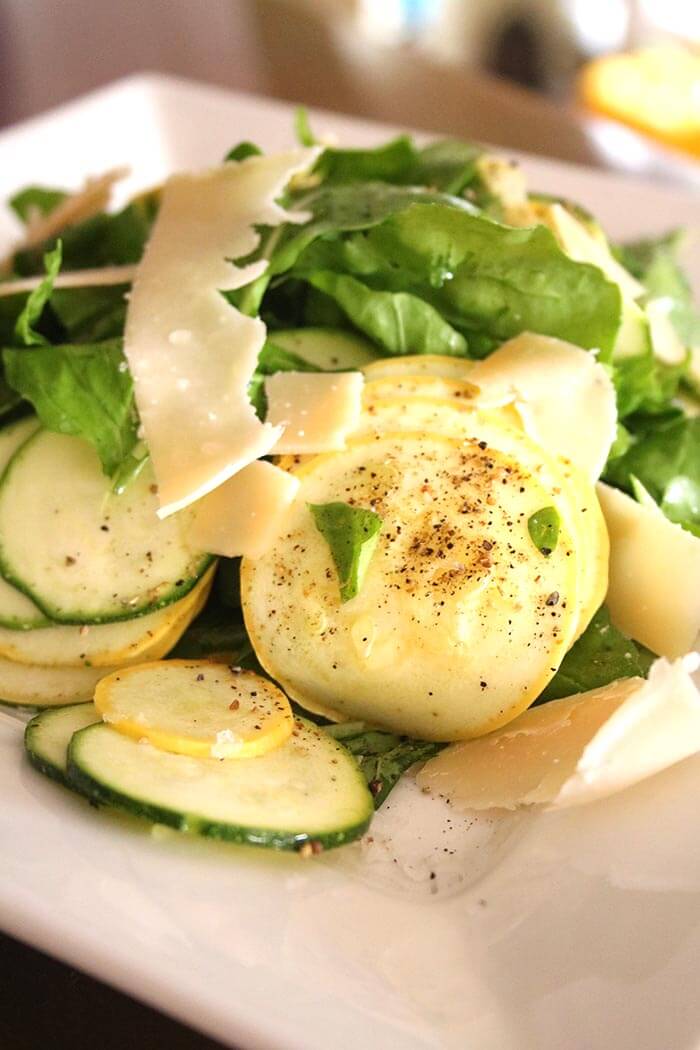
I have to admit, I never really thought about raw squash as a tasty treat, finding it a bit pithy and bland. However a couple summers ago I was on a media tour for a client and met a journalist at a farm to table restaurant in NYC where I promptly fell in love with a version of this salad. The trick is to thinly slice the squash – as paper thin as possible. I like using a mandoline and particularly like the Matfer Mandoline .
.

I once styled a cooking segment on the Today Show for the best chef in the Army, and he turned me on to this fine piece of equipment. I have had it for 15+ years and it is still in great shape. It’s got good safety features, so it’s not scary like some mandolines, and it doesn’t pit or corrode like the one I got in France a zillion years ago and need to toss. Chef arrived on some kind of Army transport so he didn’t have to worry about blades at TSA. However his most important travel companion was an 8 1/2 x 11” flat piece of striped genoise sponge cake that was created by piping razor thin lines of alternating chocolate and vanilla batter. He used it to line a tall glass trifle bowl for an elegant presentation. And he carried it in a manila file folder. Filed under P for pastry? I was pretty much speechless. Given the turn of world events, I often wonder if our military still carry pastry in their file folders.
After first tasting that salad in NYC, I have tweaked it pretty much every time I make it and this is how it rolls this summer. A dear friend recently delivered a spice jar filled with a pepper blend which I found I couldn’t live without. I burned through that jar in short order and have now made my own. Mine seems a lot darker than hers so I suspect mine has more black pepper. She even recommends adding green peppercorns to the mix, but so far I have not tried that. I love the KitchenAid coffee grinder to grind all my spices – and now they have an even better model that comes with an additional bowl fitted with a blade optimized for spices, in addition to the primary bowl specifically tooled for coffee – two gadgets in one – KitchenAid Blade Coffee and Spice Grinder Combo .
.

Zesty Pepper Blend
- 1 cup ground black pepper
- 1/2 cup cardamom seeds
- 1/2 cup coriander seeds
Grind each seed separately in a spice grinder or mini chopper. Mix all spices together and store in an airtight container.

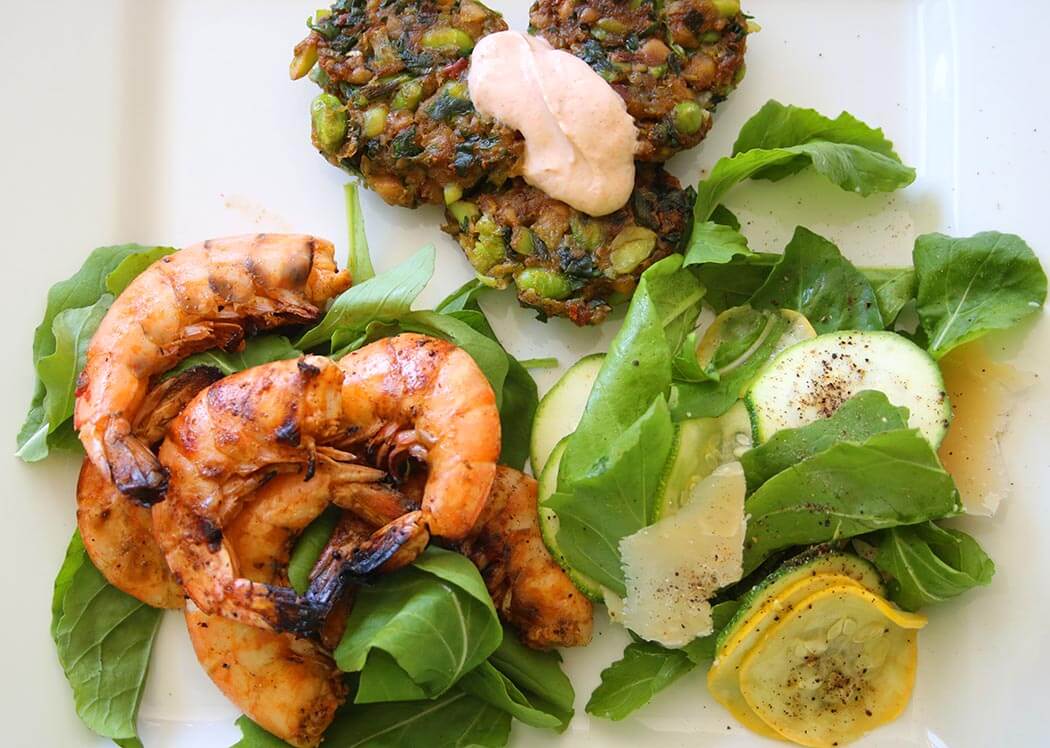
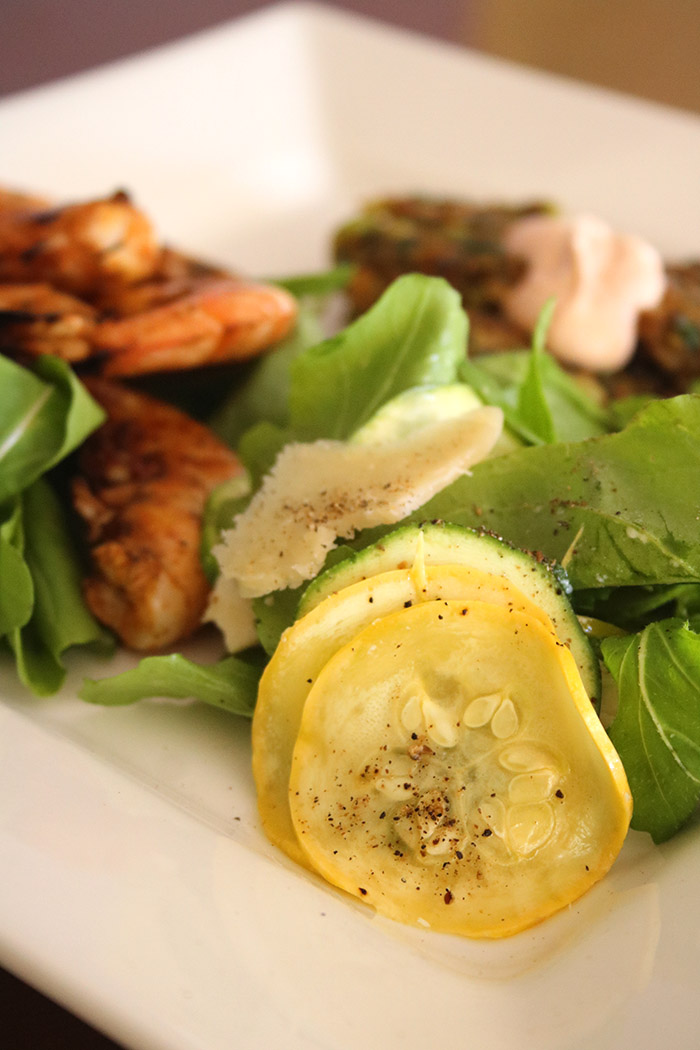
Summer Squash and Arugula Salad
- 1 zucchini
- 1 yellow squash
- 3 cups arugula
- ¼ pound sheep’s milk cheese, such as Ewephoria, cut in shards or with a cheese planer
- Seasoning: flaky sea salt like Maldon Sea Salt Flakes
 and zesty pepper blend
- Dressing: equal parts fresh lemon juice and EVOO, whisked together
Trim the zucchini and yellow squash and slice thinly by hand or using a mandoline.
Arrange the summer squash and arugula on four salad plates. Grate the sheep’s milk cheese on top and season with salt and zesty pepper blend.
Drizzle with lemon vinaigrette.
Serves 4.

This post contains affiliate links. For more of my must-have faves, check out my shop.
© Copyright: KatyKeck.com 2016. All rights reserved.
Hey, we want to hear from you!
Don’t forget to Comment, Share & Subscribe to our blog.

Aug 3, 2016 | Baked Treats, Desserts & Sweets, Recipes, Savvy Kitchen Tips
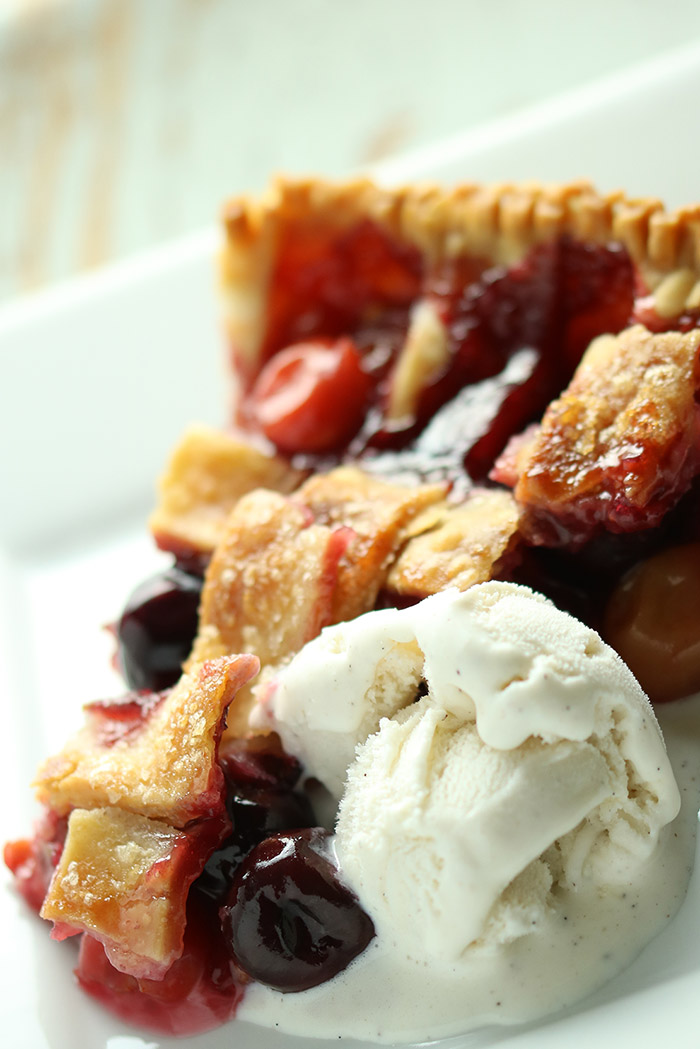
Nothing says summer like a fruit pie, especially cherry pie, warm with a generous scoop of vanilla ice cream. But for me there is one not so tiny problem. The 425oF oven. It’s impossible to get around that aspect of summer pies, biscuits and shortcakes. But what you can do is get in and out as quickly as possible and I have a couple secret weapons that let you trick out store bought dough, pass it off as your own, and get back to the beach. Who doesn’t love that? Face it – while home-made crust is a fabulous nod to bygone days and an awesome salute to Gramma, with our 2016 lifestyle and in the dog days of summer, it’s a crime against the calendar. I hereby give you my permission to do this fast fix.
While the crust hacks are my own, this pie recipe is inspired by one of the late Richard Sax’s Classic Home Desserts . This book is one of my very few must haves and has to be one of the best baking reference books ever written… at least for home-style desserts which are not only my personal favorites, but also the style at New World Grill where I did most of the baking. I am super excited to find out that it is no longer out of print! For years it was only available used, but it has been reprinted and is here for the taking! Not just pies, but cobblers, puddings, dumplings, cakes, tarts, custards, frozen treats and more. Run! Run! Run!
One of the tricky things about fruit pies is how much thickening – usually cornstarch or tapioca – is enough but not too much. There are no easy answers here. It depends on the water content of the fruit, the ripeness, pectin etc. This generally is not a problem with fall fruits like apples, quince, figs, or pears. Food52 had a recent post on “the fickle mistress” of the pie world – fresh fruit. Their suggestions are a lot more time consuming than what I suggest here, but they are also more predictable. I would NOT follow my recipe if you were trying to use super high water-content fruit like raspberries or blackberries. They are …..like 87% water, 12% seeds and 1% fruit. (Source: my vivid imagination). Not good contenders. But this would work super well with peaches and a sprinkling of blueberries. Or cherries as I suggest here. Keep it to fruit with sturdy flesh and you will be fine.

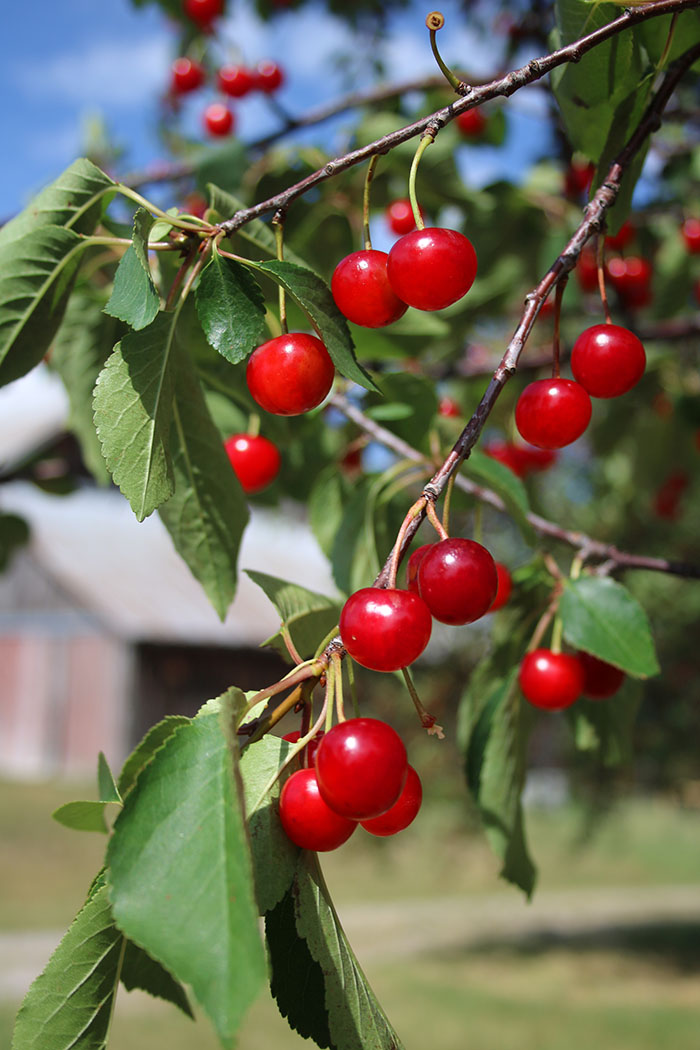
I can’t think of cherry pie without thinking of my Grandmother who was often perched on the piano bench belting out a round of Can She Make a Cherry Pie, Billy Boy Billy Boy. No?? Nobody?? We didn’t actually grow up on cherry pies as a summer staple, but my Dad loved him some bings and spending time in Michigan during the summers, they were and are plentiful. Traverse City has an annual festival dedicated to cherries with races through the orchards, pie eating and pit spitting. The airport is Cherry Capital Airport. Fly right over the Leelanau Peninsula mid-summer and you will be amazed by the vision in bright red. For this pie, I used a combo of those pretty bright red tarts, along with sweet dark cherries and whites. Whenever I get them, I pit them immediately and freeze by color in ziplocks.

Now on to the inside secrets on how to trick out a ready-made crust and pass it as your own. These tricks work best for the pre-made dough that comes rolled up and is found in the dairy case, possibly sporting a chubby white guy with a chef toque. Some of these tips will help you jazz it up and some will help rid you of a soggy bottom. Nobody likes that!
Secrets for success:
- Oven should be hot; pastry should be cold. Always 425oF for crusts.
- Heat a pizza stone while you preheat.
- Use a glass pie plate and butter it well.
- Brush egg white on the inside of the raw bottom crust once you’ve laid it in the pie plate. Back to the fridge til its time to use this.
- Brush the top crust with cream or half & half. Sprinkle with sugar
- Lay a sheet of foil loosely on the top for the first 15 minutes of baking to help the fruit temperature rise more quickly.
- Use a foil-lined (for the mess) sheet pan (to protect the glass on the pizza stone) under the pie.
- Get the best vanilla ice cream – no point in cutting corners here!

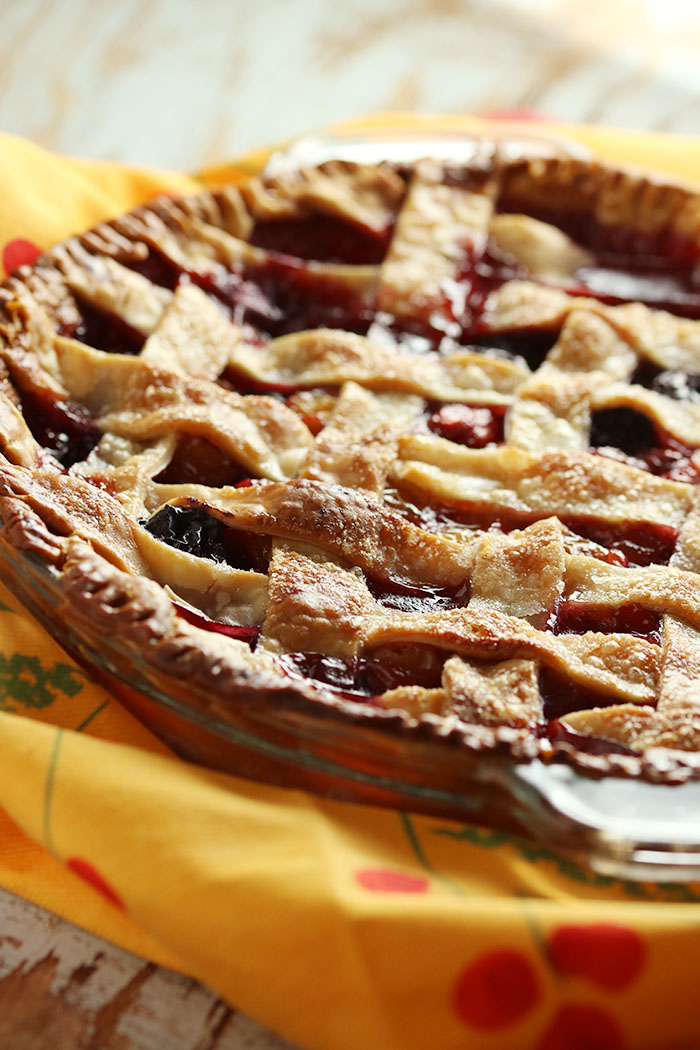
Double Crust Three Cherry Pie
- Dough for a double crust pie
- 6-7 cups of cherries, pitted (I like a combo of sweet and tart. If frozen, do not thaw)
- 1/2 cup sugar
- 3 Tablespoons cornstarch
- 1 Tablespoon lemon juice
- 1 teaspoon almond extract (wonderful flavor for both cherries and peaches)

Secret Weapons:
- Butter
- 1 egg white
- Splash of half & half or cream
- 1 Tablespoon sugar
- Glass pie plate, Pizza Stone
 & sheet pan
- Foil
Preheat the oven to 425oF with a pizza stone placed on a rack in the bottom third of the oven. Butter a 9 1/2” deep dish glass pie plate.
Rollout (or unfold) dough for the bottom crust. Fit into the pie plate, leaving any overhang. Brush the inside of the crust with enough egg white to coat. Roll out the top crust. Refrigerate both crusts until you are ready to use them.
Combine the cherries with the sugar, cornstarch, lemon juice and almond extract.
Remove the top crust from the refrigerator and cut into 3/4” wide strips.
Remove the bottom crust from the refrigerator and fill with the cherries. If any sugar mixture has settled in the bowl, sprinkle evenly on top of the cherries. Brush the outside edge of the crust with the remaining egg white and lay half the strips evenly across the top in one direction. Weave the remaining strips cross-wise ”pot-holder style”. Press the ends into the bottom crust around the outer edge and trim excess. Flute or crimp the edges.
Dot the top of the pie with butter, brush the lattice with cream and sprinkle with 1 Tablespoon sugar.
Lay a piece of foil on top of the pie (not tightly wrapped and not tented). This will help the fruit heat up faster and keep the crust from starting to brown too quickly. Place the pie on a foil-lined sheet pan and set on the pizza stone. After 15 minutes, remove the top foil. Continue baking until the crust is golden and the fruit is thickened and bubbly. Keep an eye on the crust color and cover outside edge with foil cut into a ring or entirely, as needed to slow down the crust color while the fruit thickens. This will take about an additional 45 -50 minutes.
Remove the pie from the oven and let it cool thoroughly on a wire rack to thicken up completely. Cut it too early and you have a juice bomb. If you want to serve it warm, reheat it at serving time.
Serves 8 – 10

This post contains affiliate links. For more of my must-have faves, check out my shop.
© Copyright: KatyKeck.com 2016. All rights reserved.
Hey, we want to hear from you!
Don’t forget to Comment below, Share & Subscribe to our blog.
Save
Save
Save
Save
Save
Save
Save
Save
Save
Save
Save
Save
Save
Save
Save
Save
Save
Save
Save
Save
Save
Save
Save
Save
Save
Save
Save
Save
Save
Save
Save
Save
Save
Save
Save
Save
Save
Save
Save
Save
Save
Save
Save
Save
Save
Save
Save
Save
Save
Save
Save
Save
Save
Save
Save
Save
Save
Save
Save
Save
Save
Save
Save
Save
Save
Save
Save
Save
Save
Save
Save
Save
Save
Save
Save
Save
Save
Save
Save
Save
Save
Save
Save
Save
Save
Save
Save
Save
Save
Save
Save
Save
Save
Save
Save
Save
Save
Save
Save
Save
Save
Save
Save
Save
Save
Save
Save
Save
Save
Save
Save

Jul 27, 2016 | Dressings & Sauces, Recipes, Salads, Sides
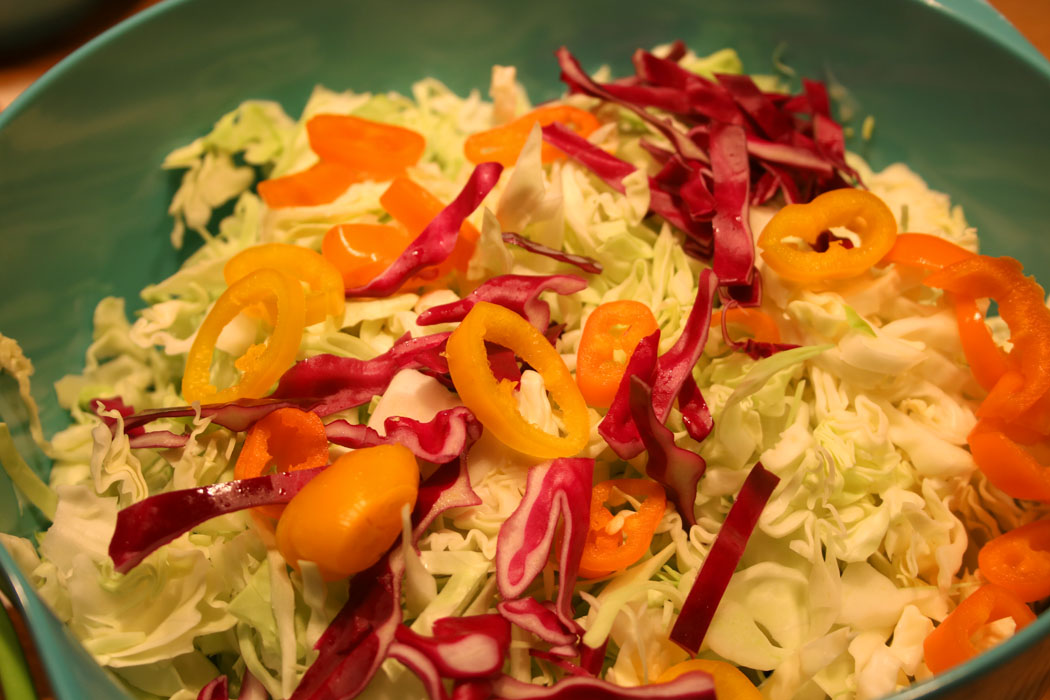
Okay, Okay, Okay!! I heard you already. I have been getting a lot of requests for the Firecracker Cole Slaw that got a fleeting mention at the end of the burger pot lucky post. I guess it’s time.
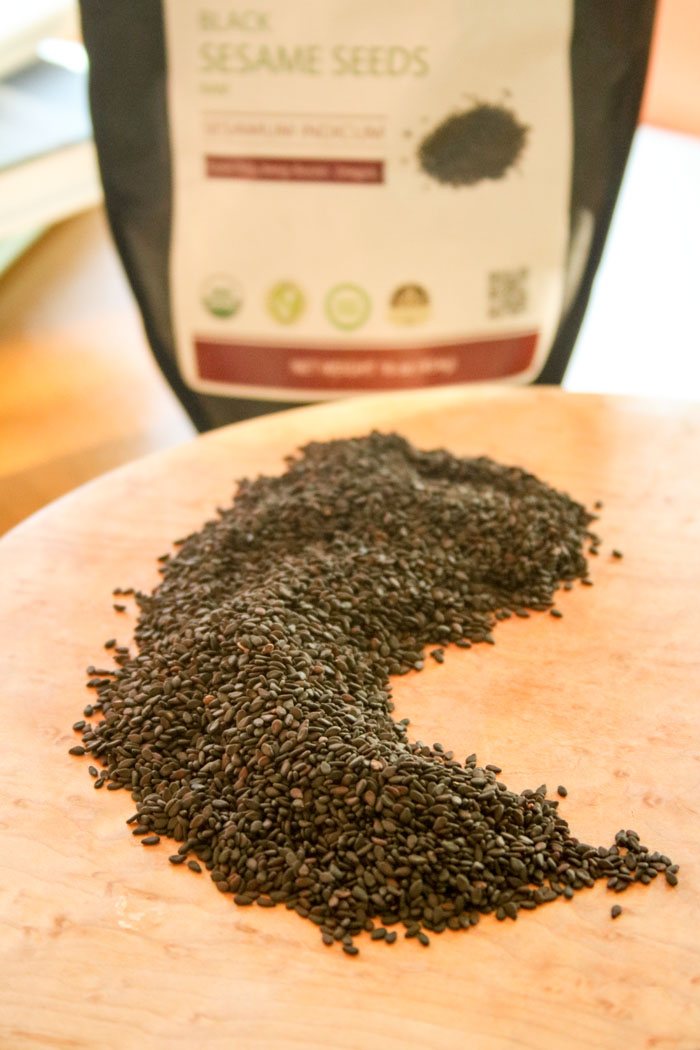
This is a recipe adapted from my very first menu at New World Grill. We served it with a delicious steak sandwich with a horseradish aioli on toasted sourdough (I know you can do that on your own). The tang of the cole slaw with the richness of the beef was a match made in heaven. But for reals…cole slaw?? What doesn’t it go with?? It’s fantastic on pulled pork. Wait, did I say fantastic? No, sir. It is mandatory! Reubens? Pa-lease. I’m a New Yawker! And required with a fish sandwich. Bien sur. And because at New World we always took the “less-traveled” route and never made anything in classic style, Firecracker Cole Slaw had Black Sesame Seeds (the cracker) and a splash of chili oil (the fire). And for added fire, this version has both chili oil AND sriracha. If you are a minimalist you can go with one or the other and double down (Sriracha gets my vote).

It’s a well-documented fact that I am a hater when it comes to mayo. I won’t go so far as to say I never use it but I won’t slather it on my turkey sandwich with white bread. I like the sass of Dijon. And speaking of sass, let me introduce you to my bestie buttermilk. Buttermilk feels rich and creamy, but it’s really low fat (1 cup has 2 grams of fat) and it adds the acid hit I am always desperately seeking. I have another favorite slaw I will bring you soon that gets its juice from white miso paste. Forever seeking rich and single…er, creamy without the fat or mayo.
You can absolutely use bell peppers of any color, but here I am using mini sweet peppers. They happen to be on hand, but I also like the contrast of the mini bell rings to the cabbage shreds. Go with your heart on this one. No wrong choices. And #nojudgement.

This is a super simple dish to whip up if you put your food processor and blender to work. And a little bit of cabbage goes oh so far. I last made a double batch of this, but had a crowd. It holds well for a couple days. If you are making it ahead, add the seeds at serving time.
Firecracker Cole Slaw
Cole Slaw Dressing:
- 1 cup sour cream
- 1 cup buttermilk
- 3 Tablespoons lemon juice
- 1 Tablespoon rice vinegar
- 1 Tablespoon Sriracha
- 2 teaspoons chili oil
- 1 teaspoon ground cumin
- 1 teaspoon salt
- ½ teaspoon red pepper flakes
Place all ingredients in a blender and mix until well combined.
Makes 2+ cups

Firecracker Cole Slaw
- ½ head red cabbage, finely shredded
- ½ head green cabbage, finely shredded
- ½ pound mini sweet peppers, cut into rings (or 1 red and 1 yellow pepper, diced or slivered)
- ¼ cup Black Sesame Seeds
Toss cabbages and peppers in a large mixing bowl and pour on dressing, stirring to combine. Depending on your cabbage size, you may have some dressing left over. (Refrigerate for future use in an airtight container).
Taste and adjust seasonings, as needed.
Stir in black sesame seeds before serving.
Makes 1 ½ quarts.

Some other great salads perfect for summer…


This post contains affiliate links. For more of my must-have faves, check out my shop.
© Copyright: KatyKeck.com 2016. All rights reserved.
Hey, we want to hear from you!
Don’t forget to Comment below, Share & Subscribe to our blog.
Save
Save
Save
Save
Save
Save
Save
Save
Save
Save
Save
Save
Save
Save
Save
Save
Save
Save
Save
Save
Save
Save
Save
Save
Save
Save
Save
Save
Save
Save
Save
Save
Save
Save
Save
Save
Save
Save
Save
Save
Save
Save
Save
Save
Save
Save
Save
Save
Save
Save
Save
Save
Save
Save
Save
Save
Save
Save
Save
Save
Save
Save
Save
Save
Save
Save
Save
Save
Save
Save
Save
Save
Save
Save
Save
Save
Save
Save
Save
Save

Jul 23, 2016 | Appetizers & Bar Bites, Passionate Producers, Recipes, Savvy Kitchen Tips
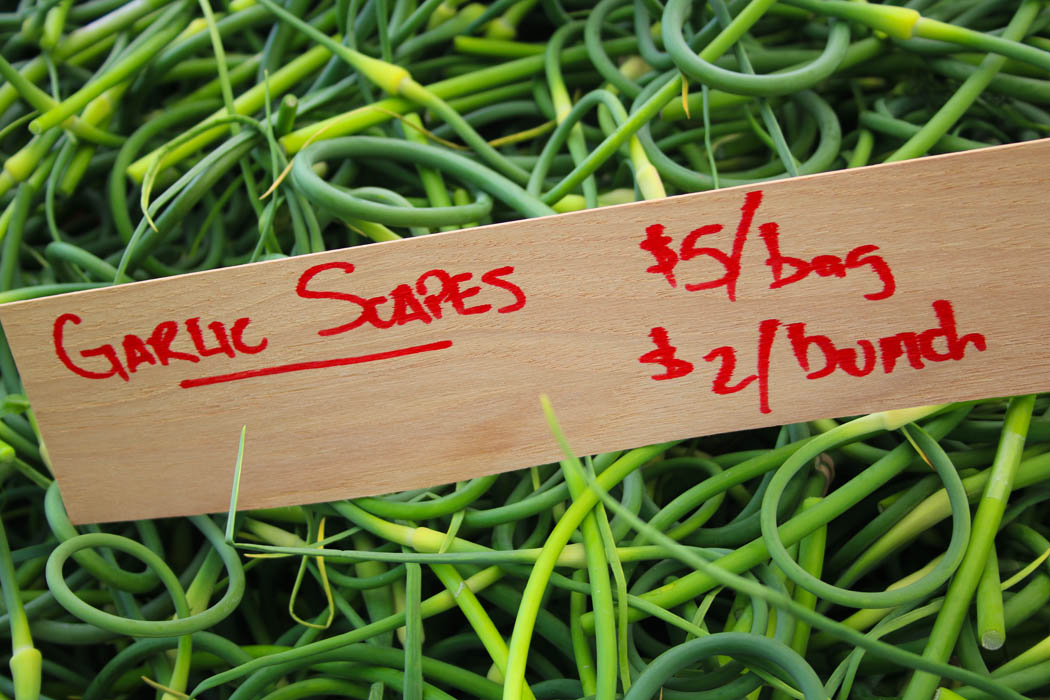
So here’s the full disclosure on Garlic Scapes – you are either going to have to run right now or bookmark this page for next year. I’ve kind of being keeping this secret recipe under wraps so there would be more for me (sorry, not sorry). Depending on your location, you may still be able to get this magical ingredient. #fingerscrossed

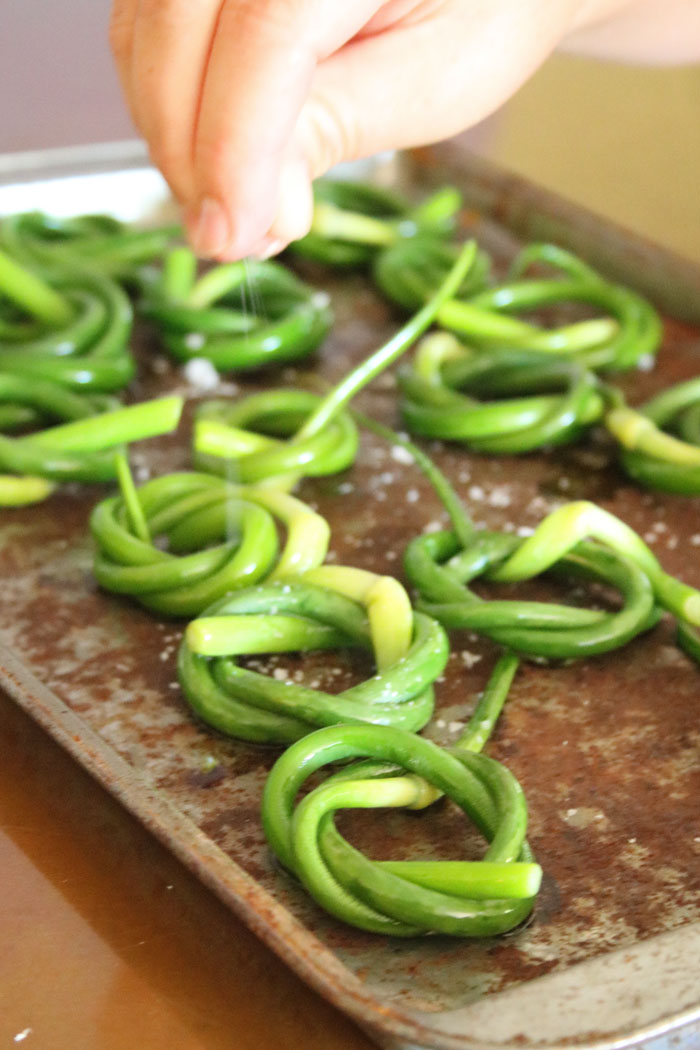
Garlic Scapes. While it’s not new to me – I have been going mano a mano with it for years to get the twisty, curly scapes straight enough to chop – it was only last year that I learned about making bundles and roasting them. Scapes are the bud of the garlic plant and are a milder, slightly sweeter version of the bulb. For years, I chopped it – best I could – and threw it raw in salads, especially hearty ones like potato salad. Or sautéed it in brown butter and tossed it with pasta, wilted greens, and some good parm. For a full FAQ on this magical shoot, check out Just Crumbs.

Source (right photo above and below): Maple Achers
It is no coincidence that I fell in love with this recipe at exactly the same time I met the amazing Russ and Linda Hepler-Beaty of Maple Achers Farm. Who doesn’t love a couple that come to farming a bit later in life and change the spelling of acres to better describe the pain of toiling away in their fields. I met them in Leland, Michigan (Thursday markets during season) with their super festive spread of interesting and often heirloom vegetables stylishly presented from their Veggie-mobile – a tricked out vintage (1965) Airstream with a brightly striped yellow canopy. Years of catering, food styling and a more recent foray into photography make me a sucker for a gorgeous spread. Too often farmers line the wooden baskets with plastic bags for grab and go service, which in my mind not only ruins the aesthetic but also the compostable nature of fresh produce.

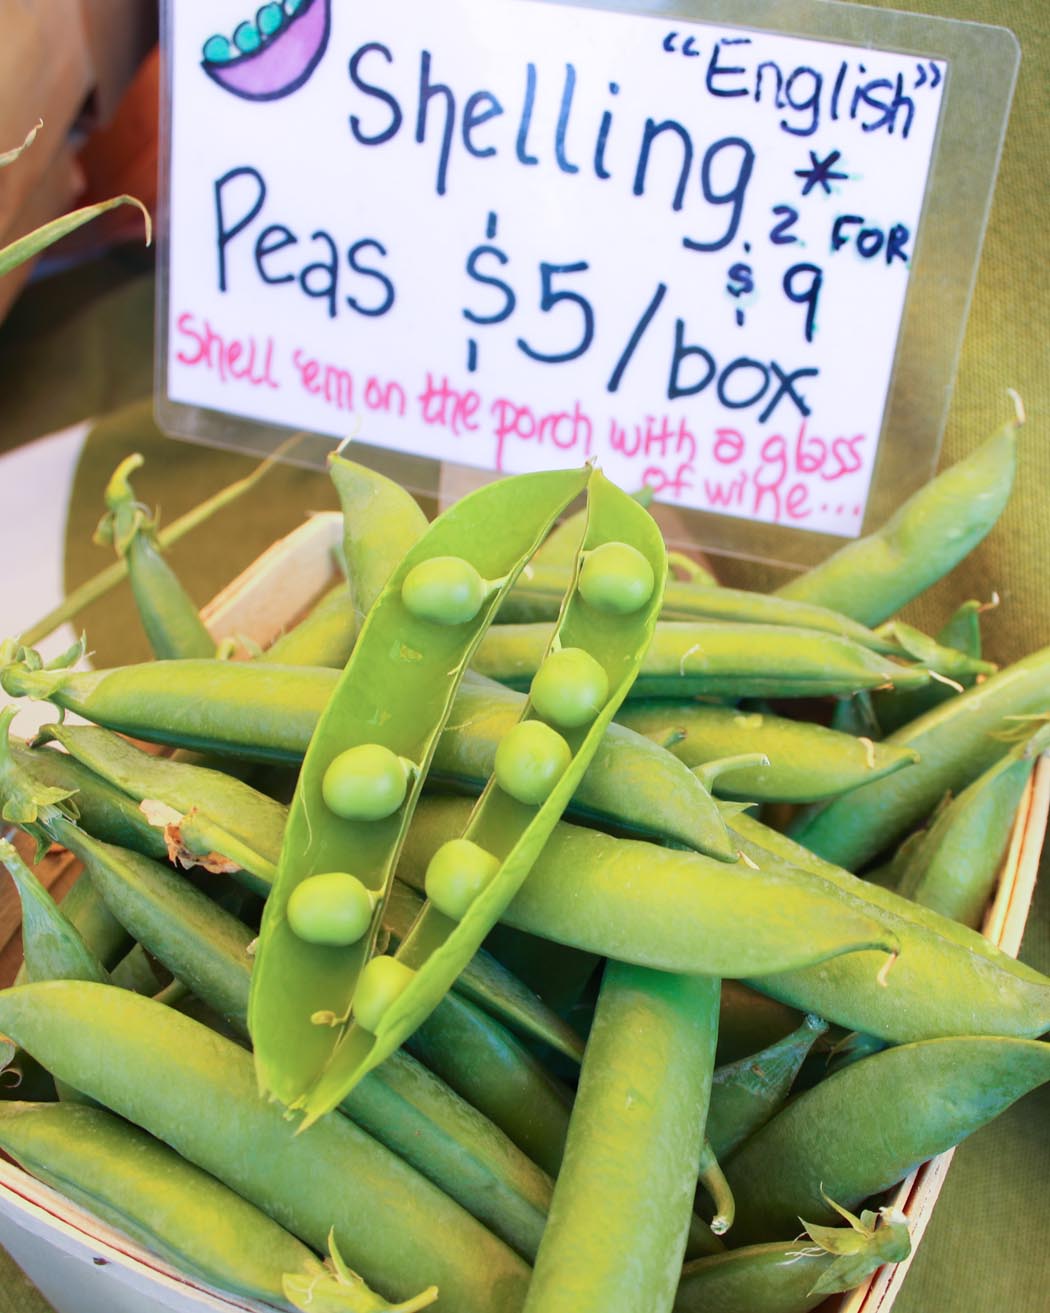
Linda is a genius at using props that scream FARMLAND – maple sap buckets filled to overflowing with Portuguese kale bunches, a 3-tiered galvanized cake stand with bundles of herbs, wooden baskets and colorful fabrics. She and Russ are quick to offer a cooking suggestion – cook the fava beans like edamame – and general advice – drink wine while shelling peas. Hell, yes.

The 10 acre farm in the heart of Leelanau County (Maple City, Michigan) is Certified Naturally Grown. Using plot rotation, nourishing fallow ground with cover crops, along with a strategic release of 300,000 lady bugs over the summer – you CAN get them on Amazon. I checked – they plant about 3+ acres and as foodies-first offer a more unique and interesting veggie line up than most farm stands.
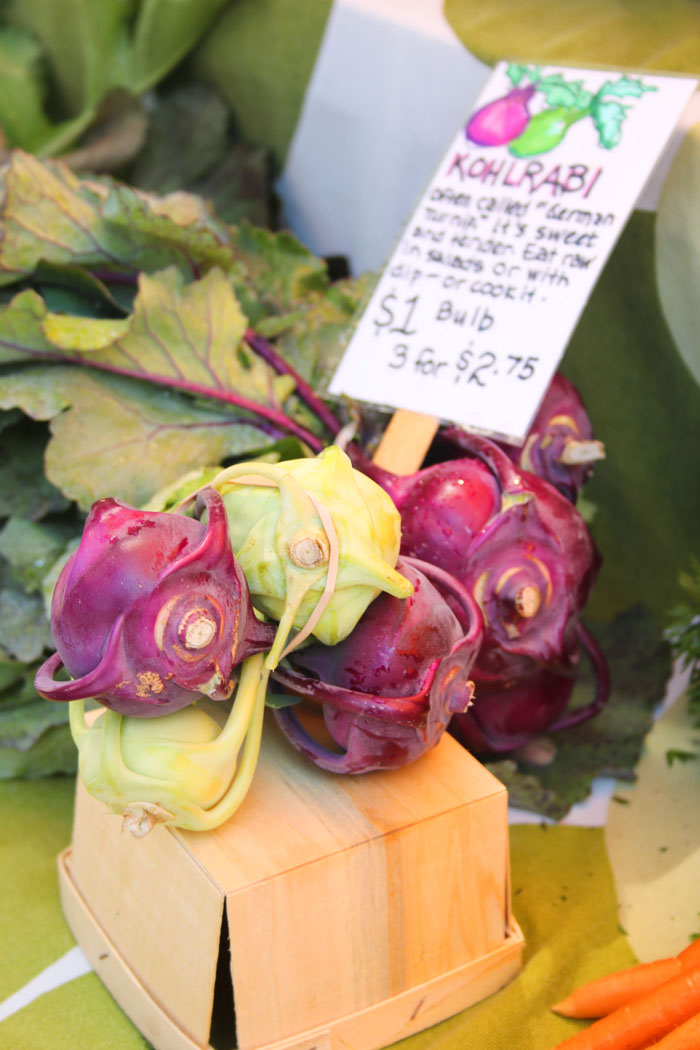
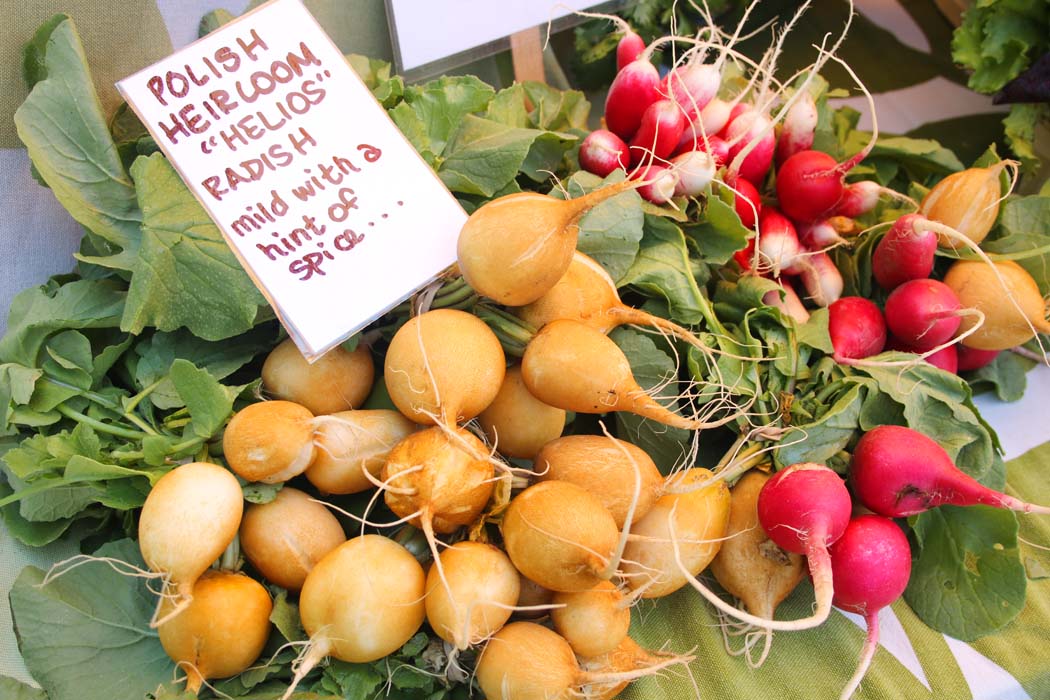
 Almost all vegetables come in a variety of colors – beets are garnet, orange and white; potatoes – red, white & blue; cauliflower is lime, white, orange and lavender; even currants are red and pink champagne. Radishes range from yellow Polish Helios to lavender Asian Daikons, with about 6 stops in between. Russ suggested grilling the Bravo daikon, and Linda chimed in with the idea to add grilled escarole, and top with feta and a drizzle of vinaigrette.

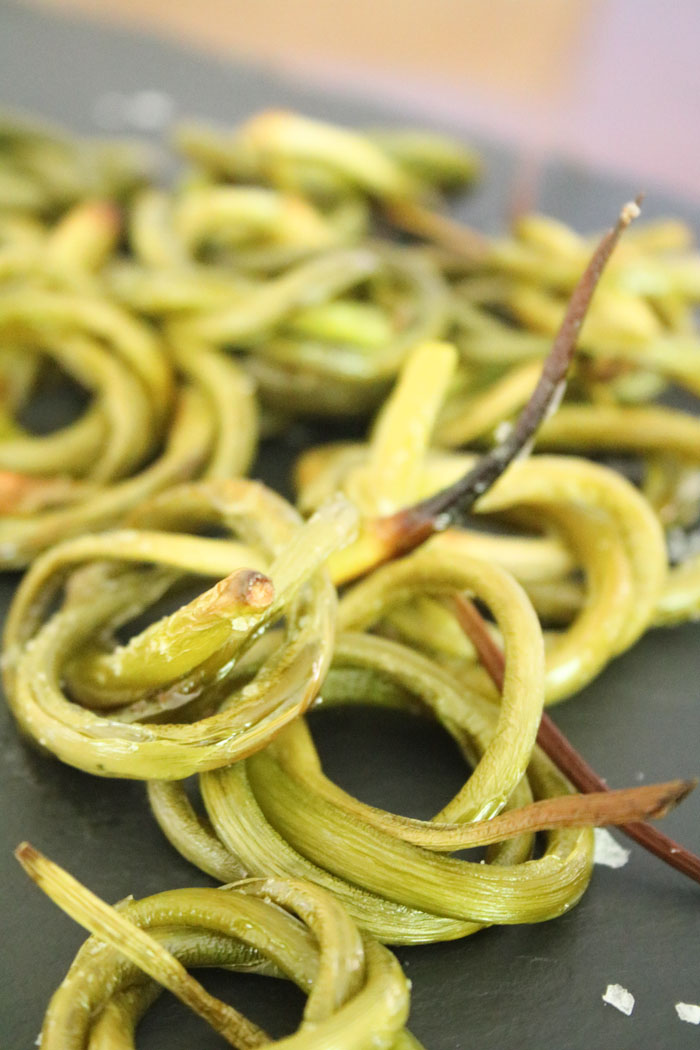
Having only a few scapes to test their roasted garlic scapes recipe last year, I waited all winter for the first sign this spring. Apparently used to selling them one by one, I surprised the Grand Haven farmers by scooping up their entire stash. I have since made them a few times and they have that mouth-pop-ability of edamame. Olive oil and salt – what could be bad?
If you are in Leland on a Thursday, check out Maple Achers and try a new veggie. Otherwise, run, run, run to gather up a handful of garlic scapes while you still can! And yes, I’m still holding, so let me know if you are desperate.
Roasted Garlic Scapes
Preheat Oven to 425oF.
Bring a large pot of salted water to a boil. Drop the garlic scapes in the boiling water and cook for about a minute until bright green. Rinse with cold water to stop the cooking.

Coil each scape into a circle, following the natural shape, and tucking in the ends in to hold it.
Transfer to a bowl and drizzle with olive oil, tossing to coat.
Arrange on a sheet pan, sprinkle with salt, and bake for 12-15 minutes until the ends start to crisp up. Feel free to use a hot grill instead – equally delicious.

Transfer to a serving plate and sprinkle with additional salt, if needed. Best served with a glass o’ vino!

This post contains affiliate links. For more of my must-have faves, check out my shop.
© Copyright: KatyKeck.com 2016. All rights reserved.
Hey, we want to hear from you!
Don’t forget to Comment below, Share & Subscribe to our blog.
Save
Save
Save
Save
Save
Save
Save
Save
Save
Save
Save
Save
Save
Save
Save
Save
Save
Save
Save
Save
Save
Save
Save
Save
Save
Save
Save
Save
Save
Save
Save
Save
Save
Save
Save
Save
Save
Save
Save
Save
Save
Save
Save
Save
Save
Save
Save
Save
Save
Save
Save
Save
Save
Save

Jul 15, 2016 | Dressings & Sauces, Recipes, Salads, Sides
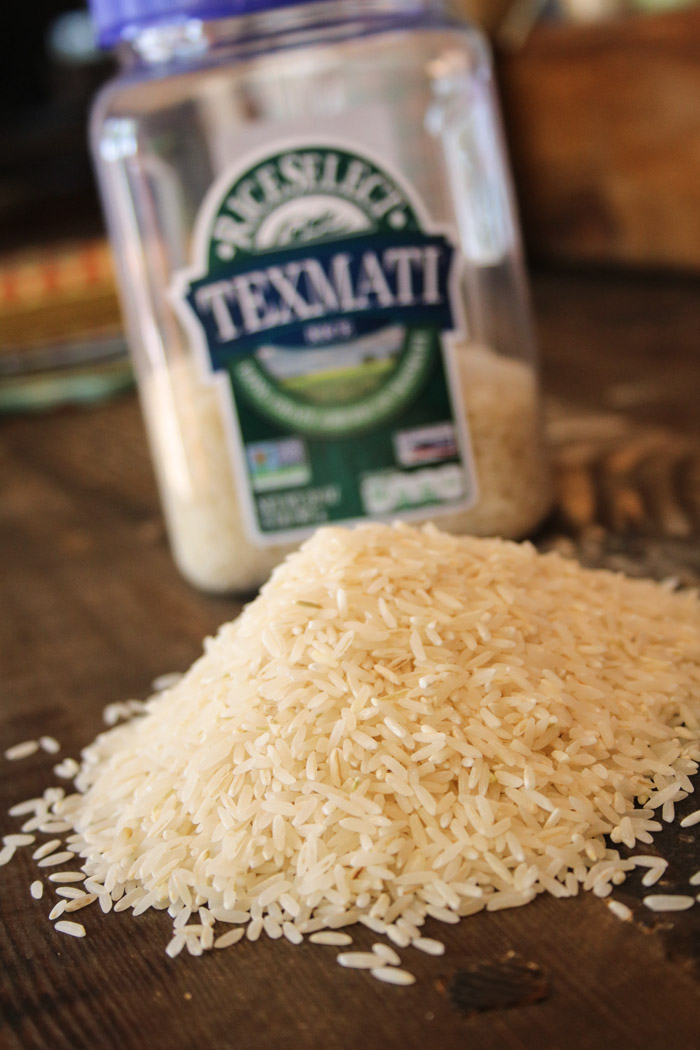
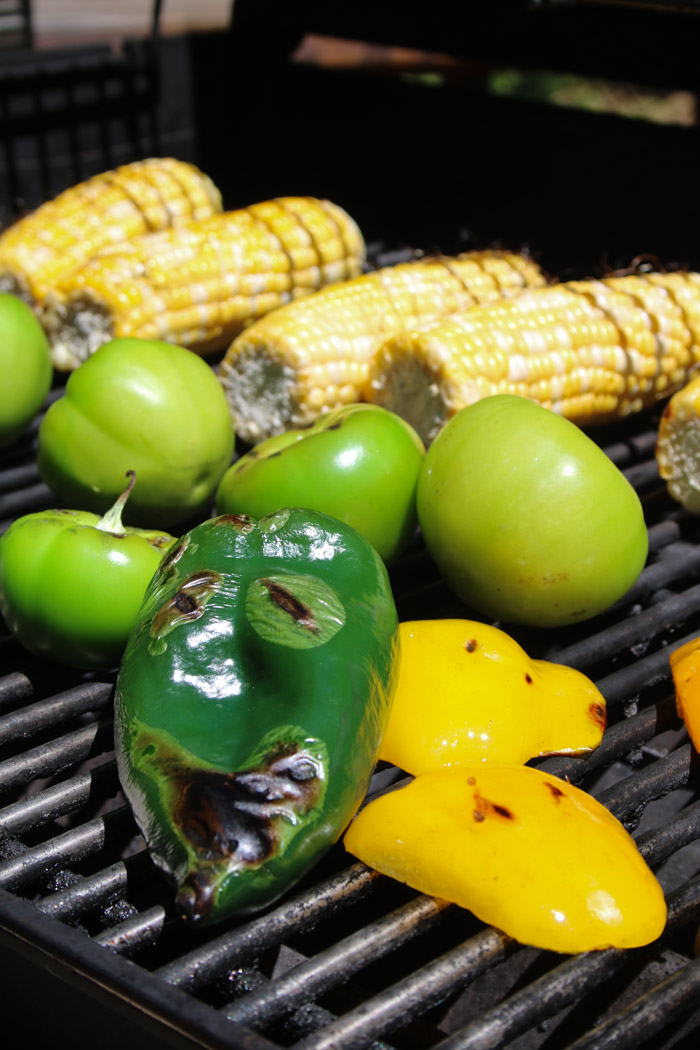
It was a perfect confluence of events. I was invited to a dedication at a local yacht club, complete with naval officers and Girl Scouts, and asked to bring a side to share. I had just loaded up with fresh corn, heirloom tomatoes, peppers and tomatillos (it’s true, I have been to five farmers market in six days – it’s that time of year – and no, I don’t have a problem, but thanks for your concern)! And then a fabulous box filled with RiceSelect Texmati Rice appeared on my doorstep awaiting a review (two thumbs up), courtesy of culinary friends at Mambo Sprouts. The wheels were already turning. Rice. Grilled Veggies. Salad Bowl. Rice & Grilled Veggie Salad Bowl. Voila! A summer salad jammed packed with flavor was born.

RiceSelect Texmati, in case you don’t know, combines the best qualities of basmati and American long-grain rice and has a popcorn-y aroma and nutty taste. Because the grains cook up dry, separate and fluffy, it is the ideal choice for a rice salad. Flavor + Texture. Win. Win. I was off and running to whip up a big batch of South of the Border Texmati Rice & Grilled Vegetable Salad. With Lime Cilantro Dressing!! Oh, yeah!
As my mind was spinning around southwestern flavors, I remembered a vinaigrette that was a fan-favorite in my earliest catering days. Lots of cumin. It was pretty basic – a bit of a one note samba by today’s palate’s cries for layers of flavor – so I dosed it with Sriracha, a serious hit of lime (juice and zest) and cilantro. Yum. I can’t be sure, though there are rumors of hoarding and hiding the leftovers, but I do believe this dish got better the next day. Even the grilled romaine held up. Especially with starch based dishes, it’s always important to re-taste for seasonings and acid both before you serve it and again the next day. To my palate, it was still well-seasoned the next day, but it’s your kitchen, you be the judge.
Couple of quick notes to keep in mind as you are cooking:
- Once the rice sits off the heat to absorb the final liquid, remove the lid, fluff it with a fork. Since we are making a cold salad, drizzle a couple tablespoons of olive oil to coat and seal each grain. This will keep the rice from over-absorbing dressing later. And that friends, will let you serve it again over the next couple days.
- The dressing recipe below makes a double batch and is a good one to keep on hand in the fridge. However if you want to store it for longer than a few days, add the cilantro to the salad, not the dressing. The cilantro-free dressing will keep refrigerated for a couple weeks.
- When chopping the grilled tomatillos, be sure to catch and add the juices to the salad. These liquids are a great way to add depth of flavor to your salad. Single-handedly they add a rare combo – smoke AND acid
- And zesting: if you aren’t fully stocked with a Microplane Zester/Grater
 , why are we even friends? For real. These zesters put the joy in zesting. No chance of getting too much bitter white pith in the zest. No more scraped knuckles. Perfect every time. And they are awesome for grating hard cheeses or spices like nutmeg. Run. Now.
Let’s get busy. This flavorful salad pairs perfectly with grilled meats or fish, or is a stand out as a vegetarian entrée. Add toasted pepitas for a dose of protein if serving as a main.

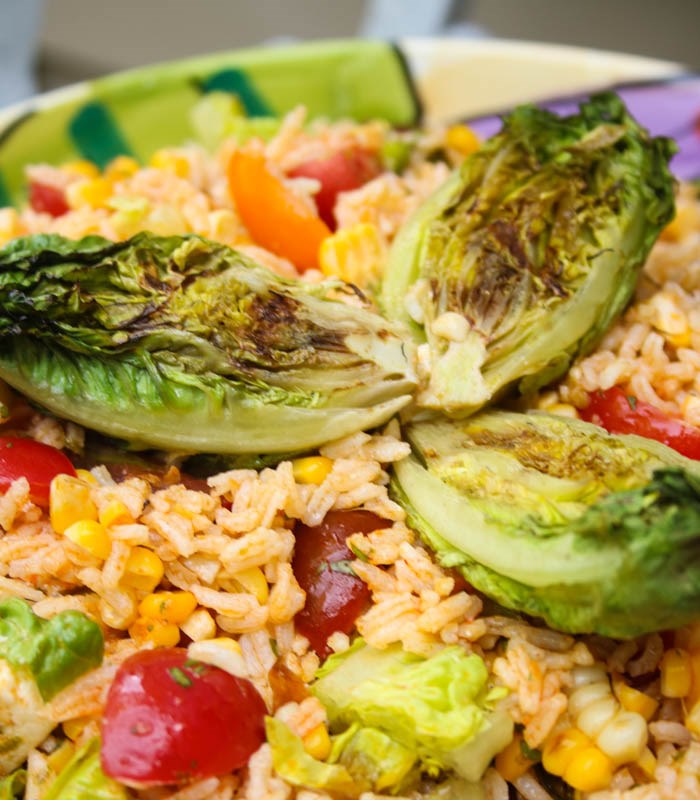
South of the Border Texmati Rice & Grilled Veggie Salad Bowl
- 1 cup RiceSelect Texmati White Rice
- 1 1/2 Tablespoons olive oil, plus more to drizzle on Little Gems
- 3 tomatillos, husks removed
- 3 ears corn, husks and silk removed
- 1 poblano pepper
- 1 yellow bell pepper, trimmed and seeded and cut into 4 sides and tossed in olive oil
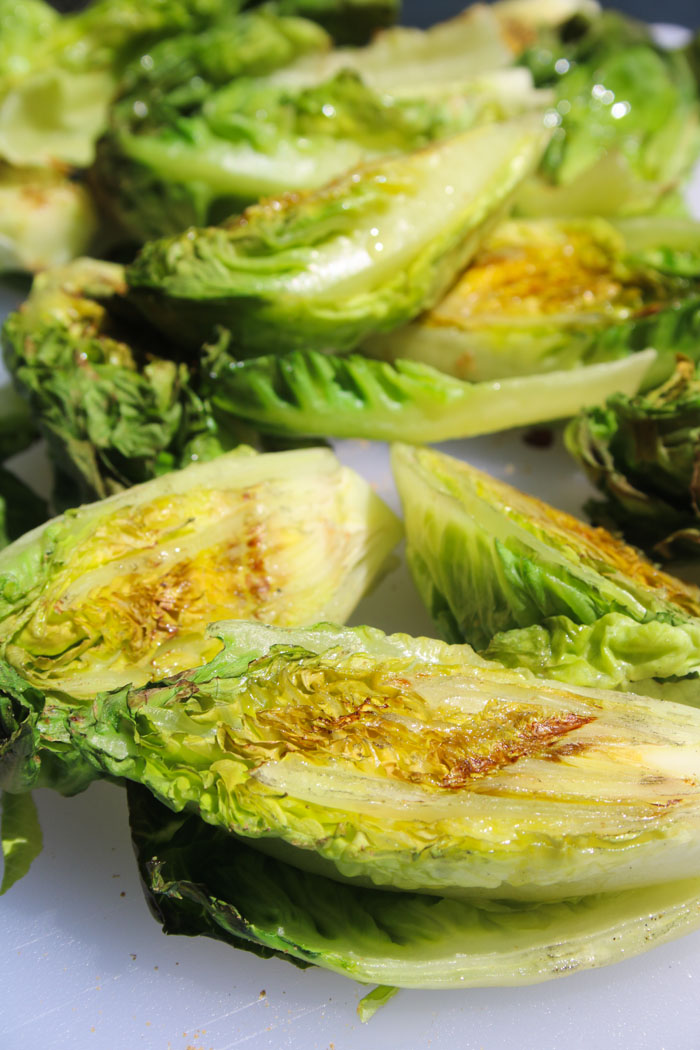
- ½ 6-pack Little Gems baby romaine (3 heads), trimmed and cut in half lengthwise
- Ground coriander
- 6 ounces heirloom cherry and/or grape tomatoes cut in quarter wedges
- 4 ounces queso fresco, crumbled
- 1 Avocado, chopped
Cook RiceSelect Texmati rice according to package directions. After you remove the pan from the heat and let it stand 5-10 minutes, transfer the rice to a mixing bowl and drizzle with 1 ½ Tablespoons olive oil, fluffing with a fork. Set aside.

Grill the vegetables over a hot grill: tomatillos, corn, poblano pepper and yellow bell pepper. Let the poblano char completely and transfer to a plastic bag to sweat. When cool enough to handle, pull off the char under running water and remove stem and seeds.
Coarsely chop the tomatillos, poblano and bell pepper and cut corn from cob. Add to the rice, along with any juices that release from the tomatillos.
Drizzle the Little Gems with olive oil and sprinkle with coriander. Grill cut side down until the lettuce just starts to wilt and gets grill marks. Chop coarsely and add to the salad.

Add tomatoes, queso fresco and avocado, and dress the salad with the Cumin Lime Cilantro Dressing.
Adjust seasonings before serving.
Makes about 3 quarts and is a fabulous leftover.
Cumin Lime Cilantro Dressing:
- 1/3 cup EVOO
- ¼ cup chopped cilantro (see note)
- 2 Tablespoons rice vinegar
- 2 Tablespoons Sriracha
- Zest and Juice of 2 limes
- ½ Tablespoon ground cumin
- ½ Tablespoon salt
Combine all ingredients in a mixing bowl and whisk to combine.
Note: This will make twice the dressing needed for this salad and it will keep for several weeks refrigerated if you add the cilantro to the salad instead of the dressing itself. Or make a double batch of the salad and use it all!
This post contains affiliate links. For more of my must-have faves, check out my shop.
© Copyright: KatyKeck.com 2016. All rights reserved.
Hey, we want to hear from you!
Don’t forget to Comment below, Share & Subscribe to our blog.
Save
Save
Save
Save
Save
Save
Save
Save
Save
Save
Save
Save
Save
Save
Save
Save
Save
Save
Save
Save
Save
Save
Save
Save
Save
Save
Save
Save
Save
Save
Save
Save
Save
Save
Save
Save
Save