Okay, Okay, Okay!! I heard you already. I have been getting a lot of requests for the Firecracker Cole Slaw that got a fleeting mention at the end of the burger pot lucky post. I guess it’s time.
This is a recipe adapted from my very first menu at New World Grill. We served it with a delicious steak sandwich with a horseradish aioli on toasted sourdough (I know you can do that on your own). The tang of the cole slaw with the richness of the beef was a match made in heaven. But for reals…cole slaw?? What doesn’t it go with?? It’s fantastic on pulled pork. Wait, did I say fantastic? No, sir. It is mandatory! Reubens? Pa-lease. I’m a New Yawker! And required with a fish sandwich. Bien sur. And because at New World we always took the “less-traveled” route and never made anything in classic style, Firecracker Cole Slaw had Black Sesame Seeds (the cracker) and a splash of chili oil (the fire). And for added fire, this version has both chili oil AND sriracha. If you are a minimalist you can go with one or the other and double down (Sriracha gets my vote).
It’s a well-documented fact that I am a hater when it comes to mayo. I won’t go so far as to say I never use it but I won’t slather it on my turkey sandwich with white bread. I like the sass of Dijon. And speaking of sass, let me introduce you to my bestie buttermilk. Buttermilk feels rich and creamy, but it’s really low fat (1 cup has 2 grams of fat) and it adds the acid hit I am always desperately seeking. I have another favorite slaw I will bring you soon that gets its juice from white miso paste. Forever seeking rich and single…er, creamy without the fat or mayo.
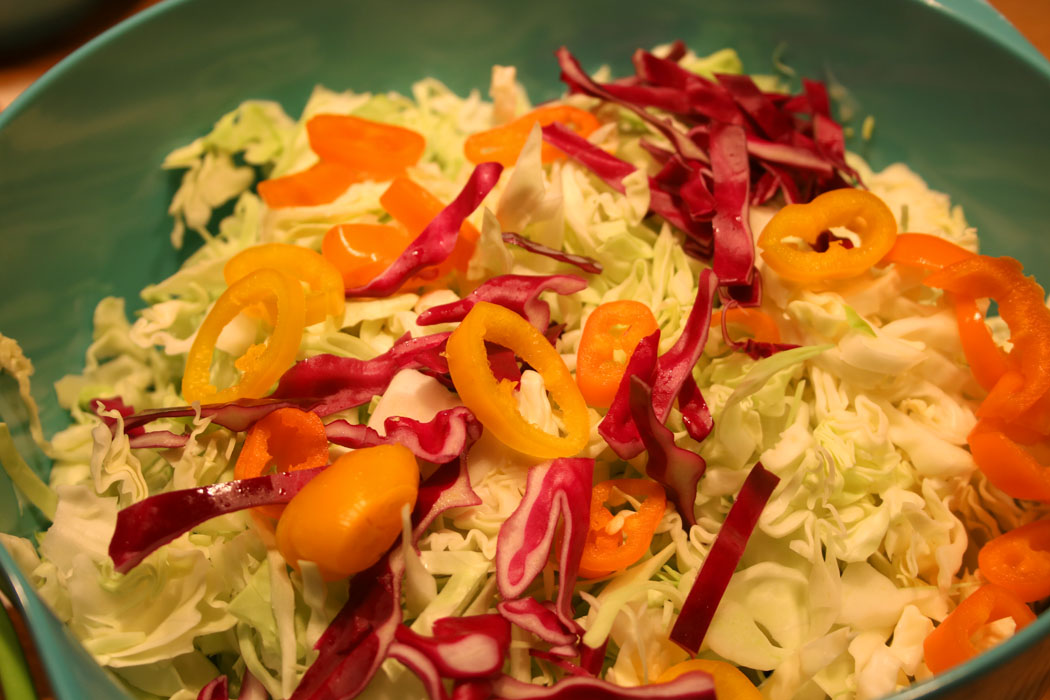
You can absolutely use bell peppers of any color, but here I am using mini sweet peppers. They happen to be on hand, but I also like the contrast of the mini bell rings to the cabbage shreds. Go with your heart on this one. No wrong choices. And #nojudgement.
This is a super simple dish to whip up if you put your food processor and blender to work. And a little bit of cabbage goes oh so far. I last made a double batch of this, but had a crowd. It holds well for a couple days. If you are making it ahead, add the seeds at serving time.
Firecracker Cole Slaw
Cole Slaw Dressing:
1 cup sour cream
1 cup buttermilk
3 Tablespoons lemon juice
1 Tablespoon rice vinegar
1 Tablespoon Sriracha
2 teaspoons chili oil
1 teaspoon ground cumin
1 teaspoon salt
½ teaspoon red pepper flakes
Place all ingredients in a blender and mix until well combined.
Makes 2+ cups
Firecracker Cole Slaw
½ head red cabbage, finely shredded
½ head green cabbage, finely shredded
½ pound mini sweet peppers, cut into rings (or 1 red and 1 yellow pepper, diced or slivered)
Toss cabbages and peppers in a large mixing bowl and pour on dressing, stirring to combine. Depending on your cabbage size, you may have some dressing left over. (Refrigerate for future use in an airtight container).
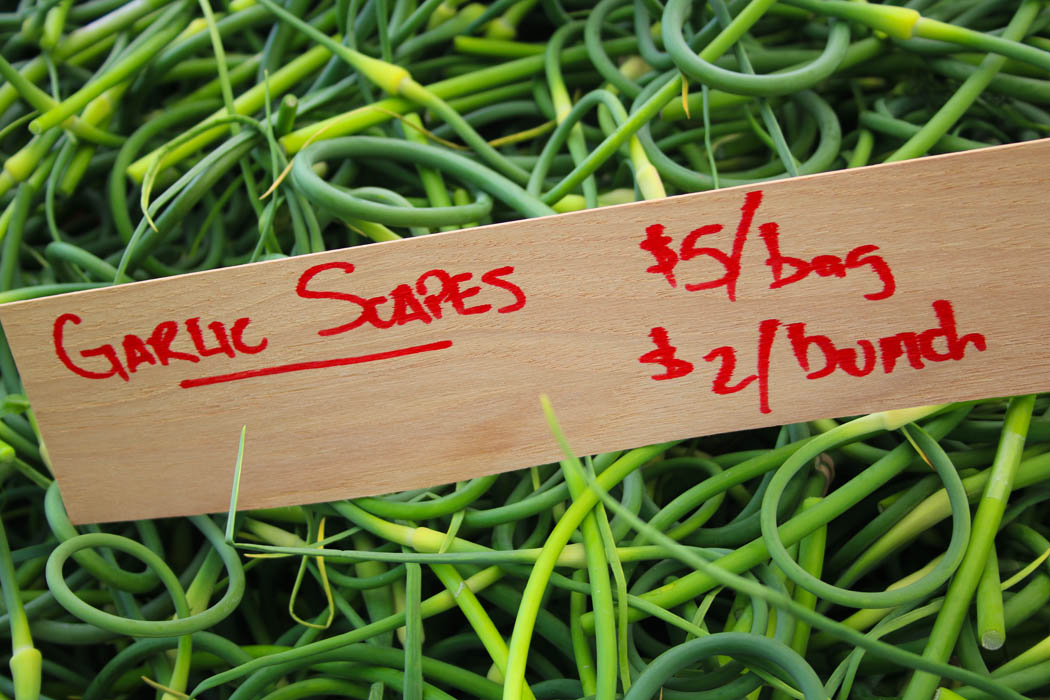
So here’s the full disclosure on Garlic Scapes – you are either going to have to run right now or bookmark this page for next year. I’ve kind of being keeping this secret recipe under wraps so there would be more for me (sorry, not sorry). Depending on your location, you may still be able to get this magical ingredient. #fingerscrossed
Garlic Scapes. While it’s not new to me – I have been going mano a mano with it for years to get the twisty, curly scapes straight enough to chop – it was only last year that I learned about making bundles and roasting them. Scapes are the bud of the garlic plant and are a milder, slightly sweeter version of the bulb. For years, I chopped it – best I could – and threw it raw in salads, especially hearty ones like potato salad. Or sautéed it in brown butter and tossed it with pasta, wilted greens, and some good parm. For a full FAQ on this magical shoot, check out Just Crumbs.
Source (right photo above and below): Maple Achers
It is no coincidence that I fell in love with this recipe at exactly the same time I met the amazing Russ and Linda Hepler-Beaty of Maple Achers Farm. Who doesn’t love a couple that come to farming a bit later in life and change the spelling of acres to better describe the pain of toiling away in their fields. I met them in Leland, Michigan (Thursday markets during season) with their super festive spread of interesting and often heirloom vegetables stylishly presented from their Veggie-mobile – a tricked out vintage (1965) Airstream with a brightly striped yellow canopy. Years of catering, food styling and a more recent foray into photography make me a sucker for a gorgeous spread. Too often farmers line the wooden baskets with plastic bags for grab and go service, which in my mind not only ruins the aesthetic but also the compostable nature of fresh produce.
Linda is a genius at using props that scream FARMLAND – maple sap buckets filled to overflowing with Portuguese kale bunches, a 3-tiered galvanized cake stand with bundles of herbs, wooden baskets and colorful fabrics. She and Russ are quick to offer a cooking suggestion – cook the fava beans like edamame – and general advice – drink wine while shelling peas. Hell, yes.
The 10 acre farm in the heart of Leelanau County (Maple City, Michigan) is Certified Naturally Grown. Using plot rotation, nourishing fallow ground with cover crops, along with a strategic release of 300,000 lady bugs over the summer – you CAN get them on Amazon. I checked – they plant about 3+ acres and as foodies-first offer a more unique and interesting veggie line up than most farm stands.
Almost all vegetables come in a variety of colors – beets are garnet, orange and white; potatoes – red, white & blue; cauliflower is lime, white, orange and lavender; even currants are red and pink champagne. Radishes range from yellow Polish Helios to lavender Asian Daikons, with about 6 stops in between. Russ suggested grilling the Bravo daikon, and Linda chimed in with the idea to add grilled escarole, and top with feta and a drizzle of vinaigrette.
Having only a few scapes to test their roasted garlic scapes recipe last year, I waited all winter for the first sign this spring. Apparently used to selling them one by one, I surprised the Grand Haven farmers by scooping up their entire stash. I have since made them a few times and they have that mouth-pop-ability of edamame. Olive oil and salt – what could be bad?
If you are in Leland on a Thursday, check out Maple Achers and try a new veggie. Otherwise, run, run, run to gather up a handful of garlic scapes while you still can! And yes, I’m still holding, so let me know if you are desperate.
Bring a large pot of salted water to a boil. Drop the garlic scapes in the boiling water and cook for about a minute until bright green. Rinse with cold water to stop the cooking.
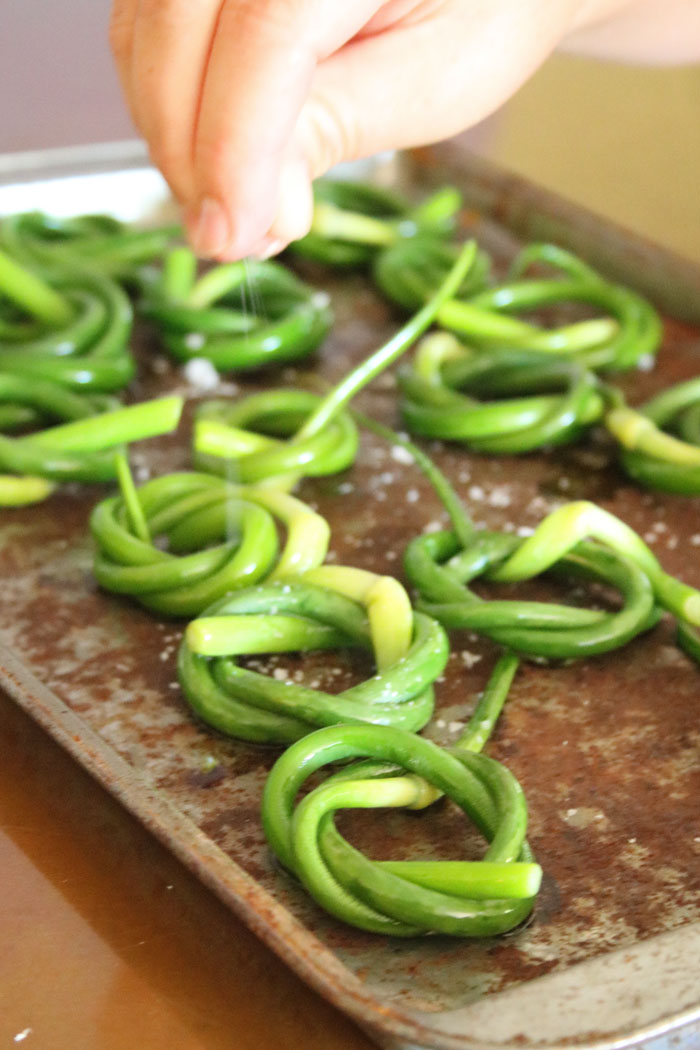
Coil each scape into a circle, following the natural shape, and tucking in the ends in to hold it.
Transfer to a bowl and drizzle with olive oil, tossing to coat.
Arrange on a sheet pan, sprinkle with salt, and bake for 12-15 minutes until the ends start to crisp up. Feel free to use a hot grill instead – equally delicious.
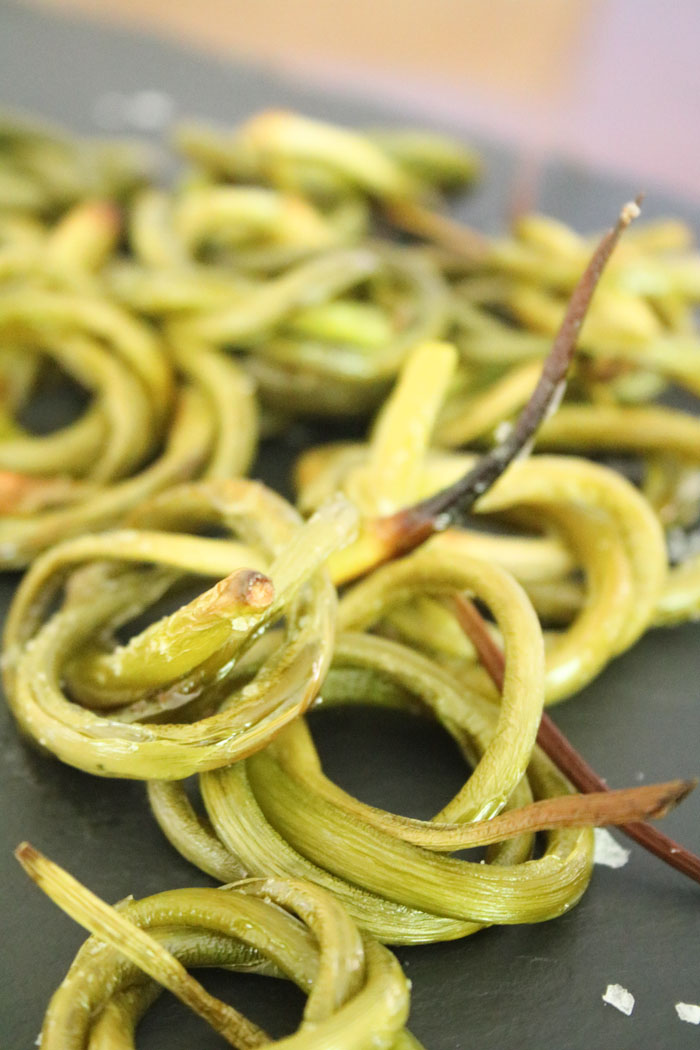
Transfer to a serving plate and sprinkle with additional salt, if needed. Best served with a glass o’ vino!
This post contains affiliate links. For more of my must-have faves, check out my shop.
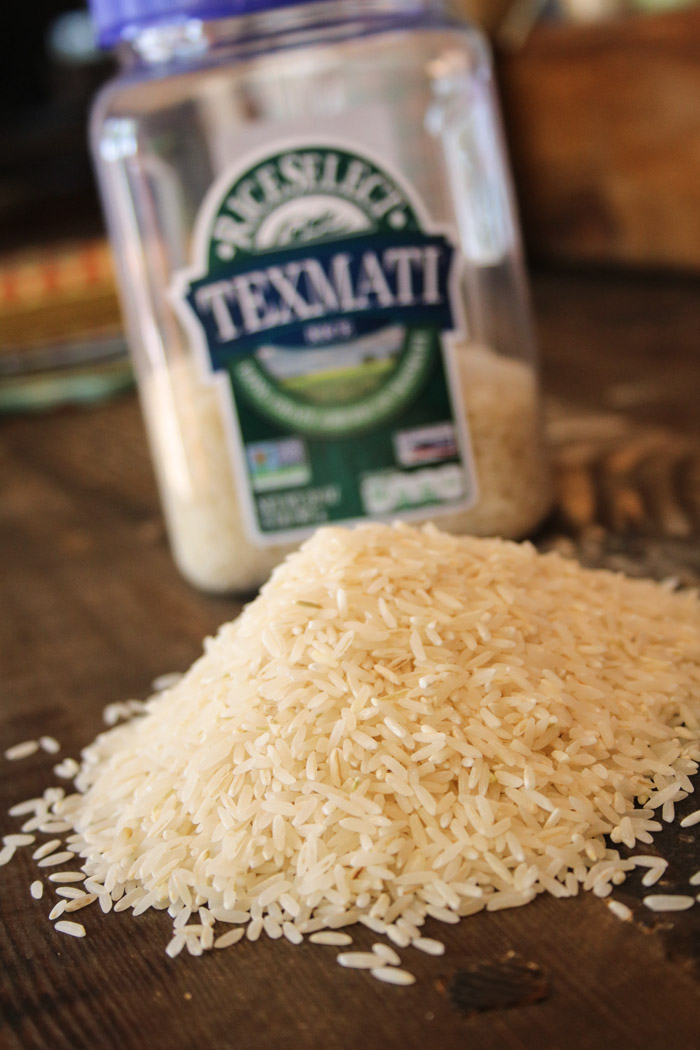
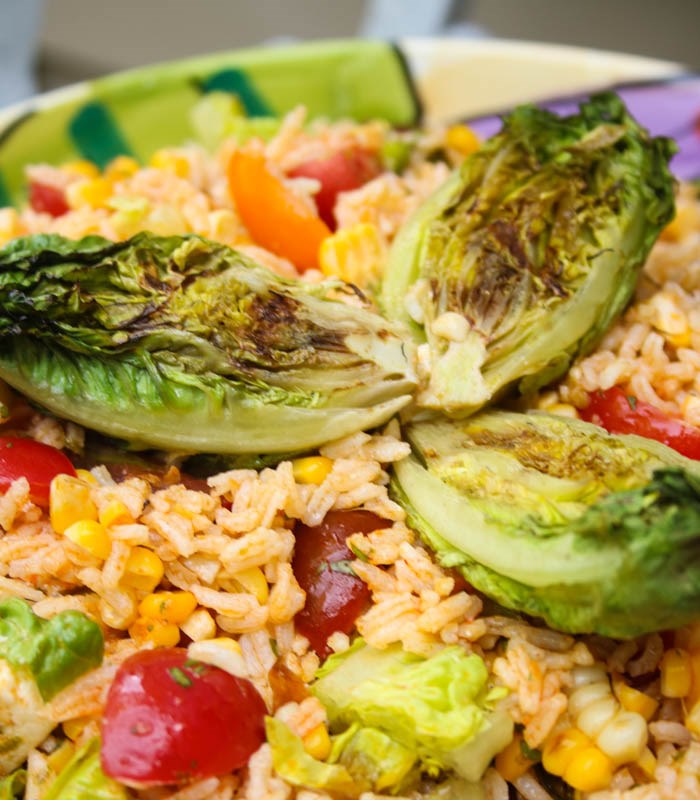
It was a perfect confluence of events. I was invited to a dedication at a local yacht club, complete with naval officers and Girl Scouts, and asked to bring a side to share. I had just loaded up with fresh corn, heirloom tomatoes, peppers and tomatillos (it’s true, I have been to five farmers market in six days – it’s that time of year – and no, I don’t have a problem, but thanks for your concern)! And then a fabulous box filled with RiceSelect Texmati Rice appeared on my doorstep awaiting a review (two thumbs up), courtesy of culinary friends at Mambo Sprouts. The wheels were already turning. Rice. Grilled Veggies. Salad Bowl. Rice & Grilled Veggie Salad Bowl. Voila! A summer salad jammed packed with flavor was born.
RiceSelect Texmati, in case you don’t know, combines the best qualities of basmati and American long-grain rice and has a popcorn-y aroma and nutty taste. Because the grains cook up dry, separate and fluffy, it is the ideal choice for a rice salad. Flavor + Texture. Win. Win. I was off and running to whip up a big batch of South of the Border Texmati Rice & Grilled Vegetable Salad. With Lime Cilantro Dressing!! Oh, yeah!
As my mind was spinning around southwestern flavors, I remembered a vinaigrette that was a fan-favorite in my earliest catering days. Lots of cumin. It was pretty basic – a bit of a one note samba by today’s palate’s cries for layers of flavor – so I dosed it with Sriracha, a serious hit of lime (juice and zest) and cilantro. Yum. I can’t be sure, though there are rumors of hoarding and hiding the leftovers, but I do believe this dish got better the next day. Even the grilled romaine held up. Especially with starch based dishes, it’s always important to re-taste for seasonings and acid both before you serve it and again the next day. To my palate, it was still well-seasoned the next day, but it’s your kitchen, you be the judge.
Couple of quick notes to keep in mind as you are cooking:
Once the rice sits off the heat to absorb the final liquid, remove the lid, fluff it with a fork. Since we are making a cold salad, drizzle a couple tablespoons of olive oil to coat and seal each grain. This will keep the rice from over-absorbing dressing later. And that friends, will let you serve it again over the next couple days.
The dressing recipe below makes a double batch and is a good one to keep on hand in the fridge. However if you want to store it for longer than a few days, add the cilantro to the salad, not the dressing. The cilantro-free dressing will keep refrigerated for a couple weeks.
When chopping the grilled tomatillos, be sure to catch and add the juices to the salad. These liquids are a great way to add depth of flavor to your salad. Single-handedly they add a rare combo – smoke AND acid
And zesting: if you aren’t fully stocked with a Microplane Zester/Grater, why are we even friends? For real. These zesters put the joy in zesting. No chance of getting too much bitter white pith in the zest. No more scraped knuckles. Perfect every time. And they are awesome for grating hard cheeses or spices like nutmeg. Run. Now.
Let’s get busy. This flavorful salad pairs perfectly with grilled meats or fish, or is a stand out as a vegetarian entrée. Add toasted pepitas for a dose of protein if serving as a main.
South of the Border Texmati Rice & Grilled Veggie Salad Bowl
Cook RiceSelect Texmati rice according to package directions. After you remove the pan from the heat and let it stand 5-10 minutes, transfer the rice to a mixing bowl and drizzle with 1 ½ Tablespoons olive oil, fluffing with a fork. Set aside.
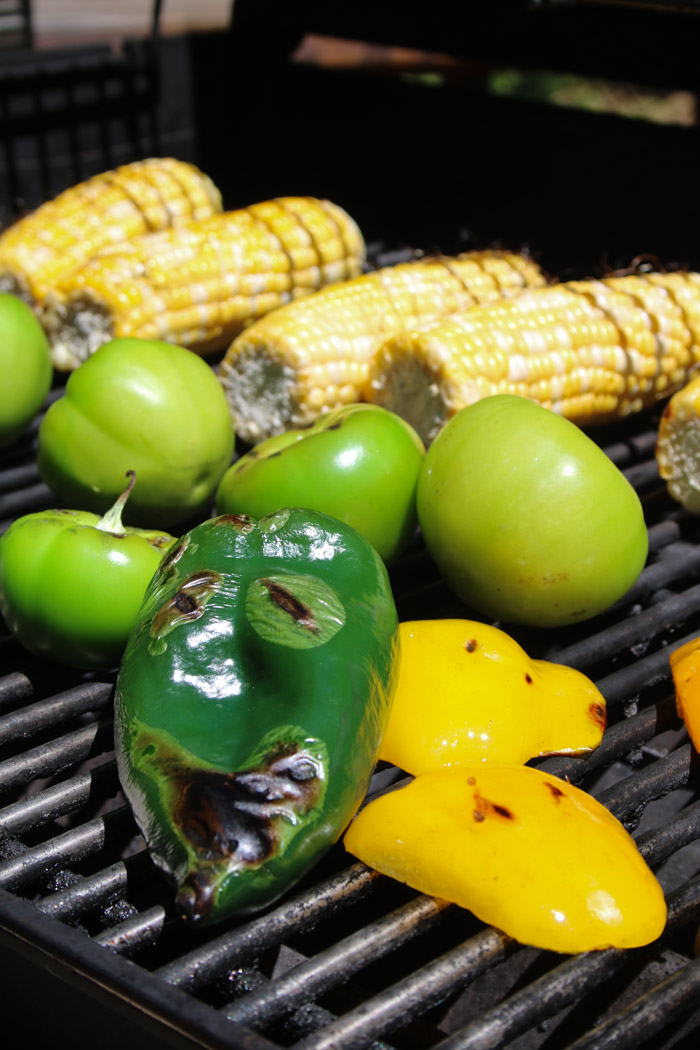
Grill the vegetables over a hot grill: tomatillos, corn, poblano pepper and yellow bell pepper. Let the poblano char completely and transfer to a plastic bag to sweat. When cool enough to handle, pull off the char under running water and remove stem and seeds.
Coarsely chop the tomatillos, poblano and bell pepper and cut corn from cob. Add to the rice, along with any juices that release from the tomatillos.
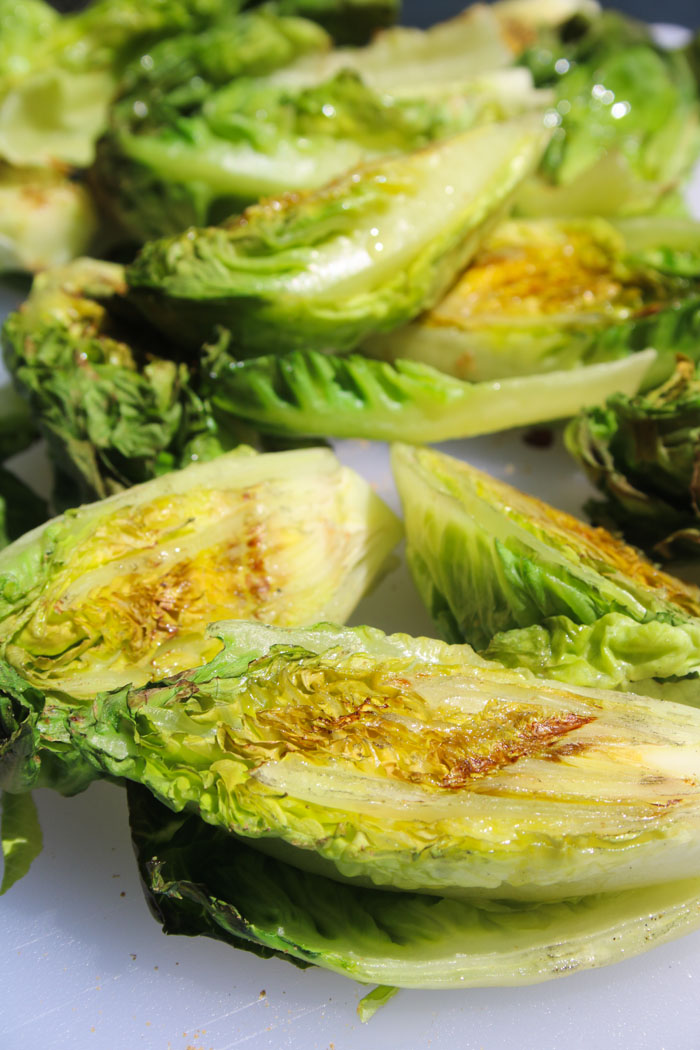
Drizzle the Little Gems with olive oil and sprinkle with coriander. Grill cut side down until the lettuce just starts to wilt and gets grill marks. Chop coarsely and add to the salad.
Add tomatoes, queso fresco and avocado, and dress the salad with the Cumin Lime Cilantro Dressing.
Adjust seasonings before serving.
Makes about 3 quarts and is a fabulous leftover.
Cumin Lime Cilantro Dressing:
1/3 cup EVOO
¼ cup chopped cilantro (see note)
2 Tablespoons rice vinegar
2 Tablespoons Sriracha
Zest and Juice of 2 limes
½ Tablespoon ground cumin
½ Tablespoon salt
Combine all ingredients in a mixing bowl and whisk to combine.
Note: This will make twice the dressing needed for this salad and it will keep for several weeks refrigerated if you add the cilantro to the salad instead of the dressing itself. Or make a double batch of the salad and use it all!
This post contains affiliate links. For more of my must-have faves, check out my shop.
I have seriously gone down the Pot Lucky rabbit hole, or as I have recently taken to calling it – the Curated Pot Luck. It was only a matter of time after sausage making, soup swapping, and pizza topping, that I would dive head first into a burger blast. No doubt I have mentioned that I rarely get dinner invites, despite my dear friend Cindy running ahead and telling people they’ll have me at hambur…. (hint, hint, hint – I’m a gracious guest, really I am). If this party didn’t crystallize that concept, I’m destined to dine at home. Burgers, burgers, burgers and more burgers.
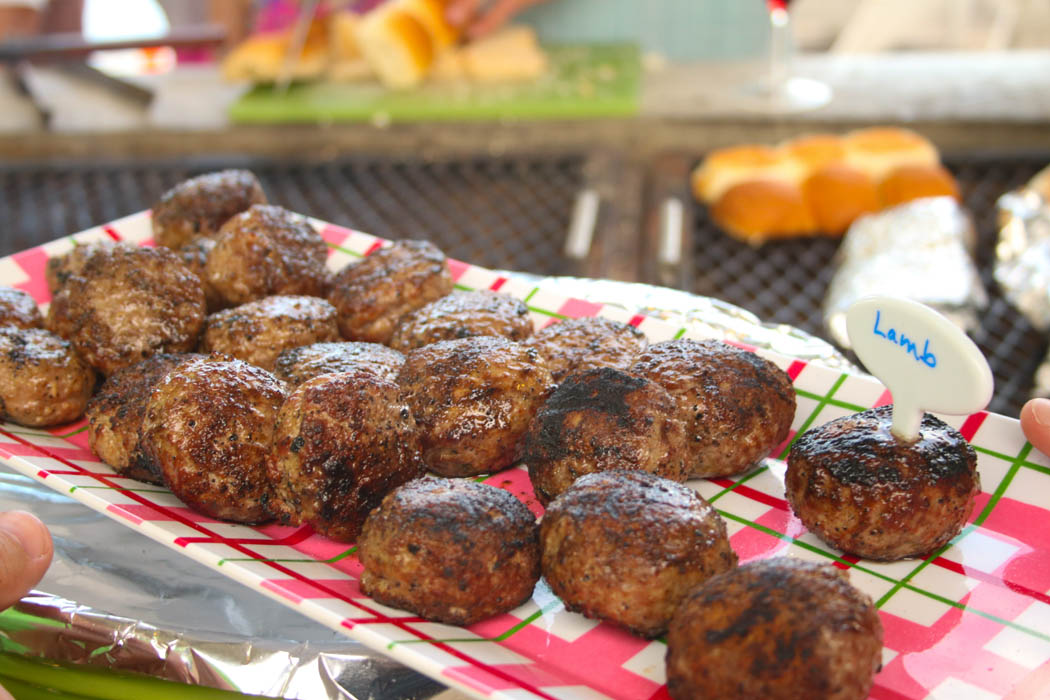
The gang has started to embrace (or run for the hills) the idea of bringing together a culinary creation around a theme. This time I first lined up six people as the Patty People. The call went out for each to bring a different flavor, 3 pounds divvied up into 2-dozen sliders. Yup! That’s 12 dozen sliders. Plenty to share for any one that wandered our way. We ended up with turkey burgers – one of my go-to recipes – a three-cut beef blend, lamb, bison, shrimp and a beef raised locally by the pattier himself. (Note to Dan: standing invite).
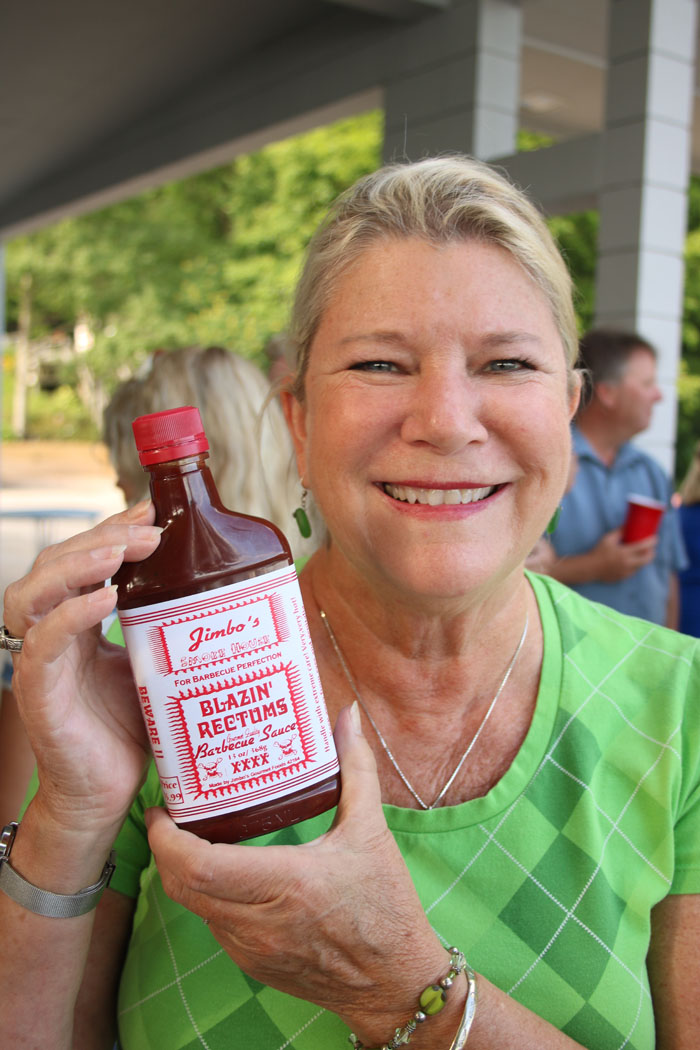
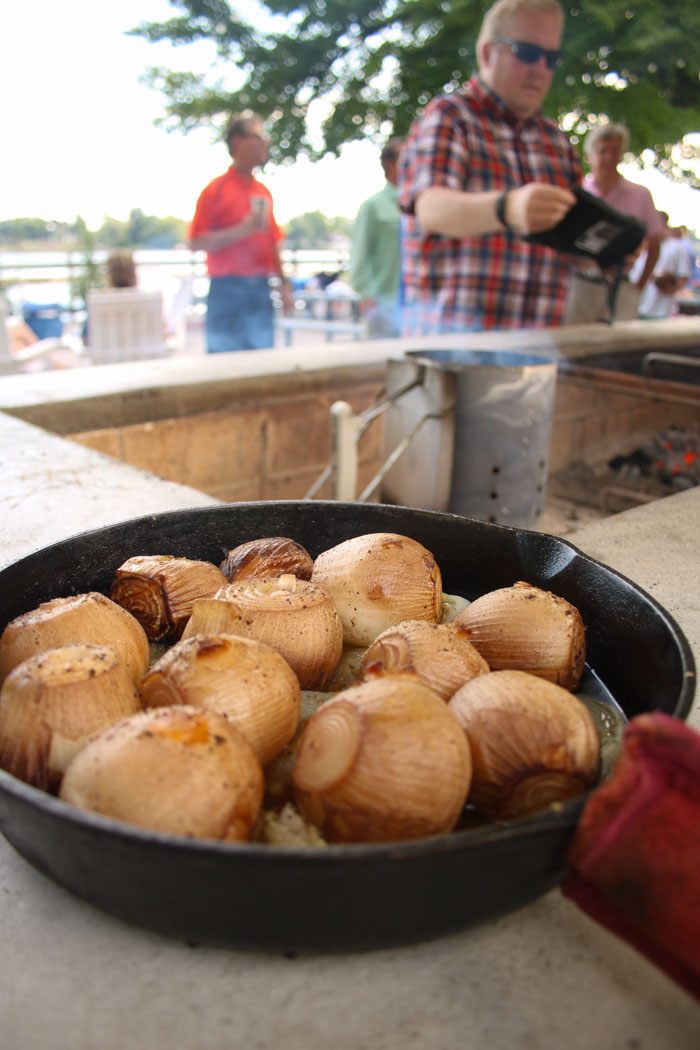
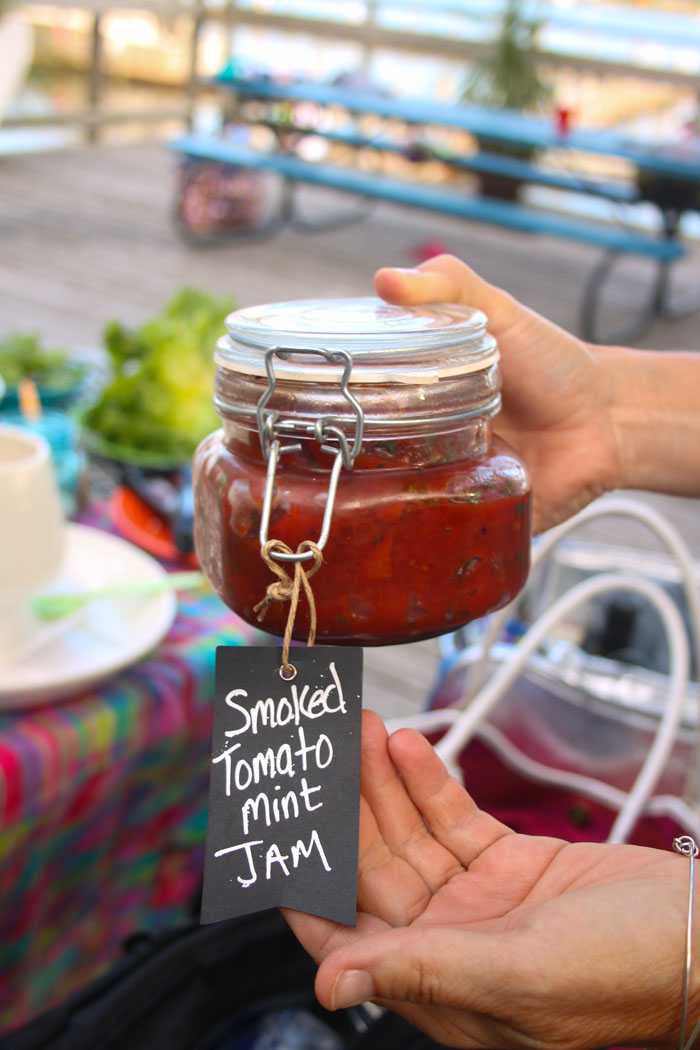
I provided the Designated Toppers with a range of ideas, but the contributions far exceeded that list. Cheeses, veggies, special sauce and more. In case it’s not yet clear – “more” means bacon. Or it means more bacon. The contributions ran from an irreverently-titled hot sauce to smoked onions stuffed with garlic, and on to smoked tomato mint jam (Noyce!!! A fabulous complement to the lamb burger). I felt a bit like the butterball hotline, holding court and making pairing recommendations. A cup or two of each topping is plenty if you shoot for the wide range that we recruited – no need to prepare vats-full.
Here are a few of the amazing items that painted the burger canvas:
Cheeses:
Goat
Bleu Cheese Crumbles
Pepper Jack
Jalapeno Pimento Cheese
Veg & more:
Mushrooms Bourguignon
Smoked Onions
Mango Salsa
Arugula
Pickled Peppers
Lemon Feta Pepperoncini
Julienne purple radish
Bacon
Special Sauce:
Salsa Verde
Chimichurri
Cumin Yogurt
Mint Pesto
Chipotle Aioli
Roasted Pineapple Habanero Sauce
Guacamole
Tzatziki
Smoked Tomato Mint Jam
Amazingly there were only about 3 of the 144 sliders left. Clearly no one went home hungry and everyone was very (wink, wink) “happy”. Sharing a grill and creating your own masterpiece is a great way to get the group mingling – everyone has something to say about their personal favorite combo.
Talking Turkey
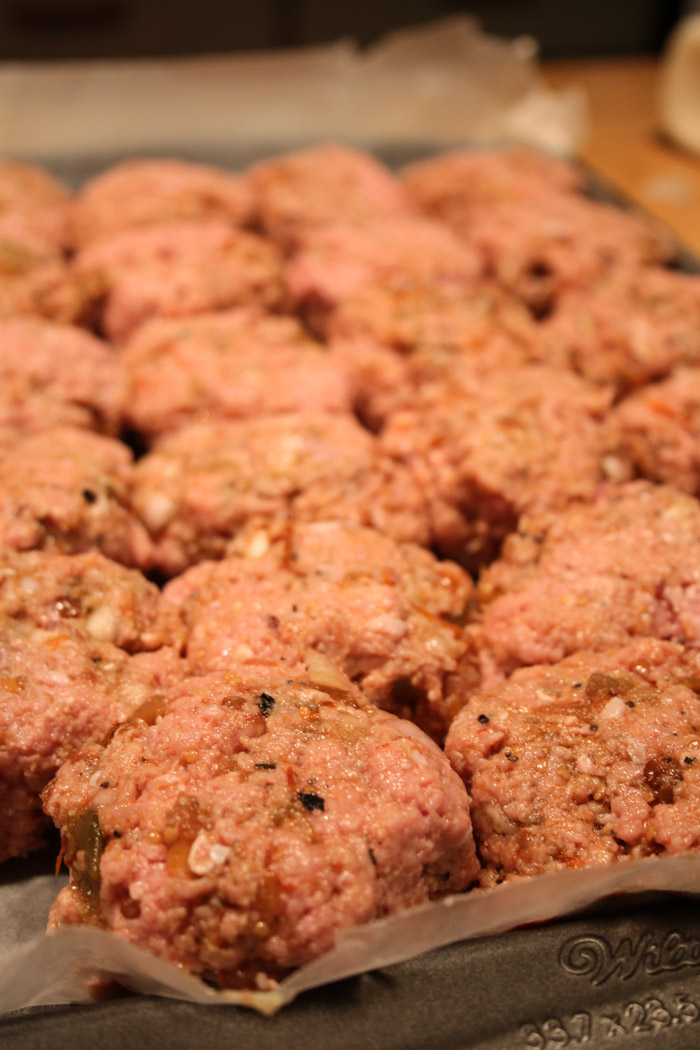
If you have ever visited me in Michigan, you have probably had a turkey burger. Because I add drained salsa to the very lean (read: potentially dry) meat, I tend to do a jar or two’s draining at once. Then I patty the burgers out and wrap individually in saran and freeze on a sheet pan to keep their shape, zipping them up when frozen. It’s great to have as a staple when company comes unannounced (unless they come three times in one day – you know who you are!) This is the kind of dish I always make well ahead of guests and if I’m not freezing the patties, each wrapped in saran, I put them on a tray with wax paper below and on top of the burgers, and refrigerate for up to two days. If I’m holding for more than a few hours, I’m sure to wrap the whole tray in saran. This resting time really helps firm up a somewhat wet patty.
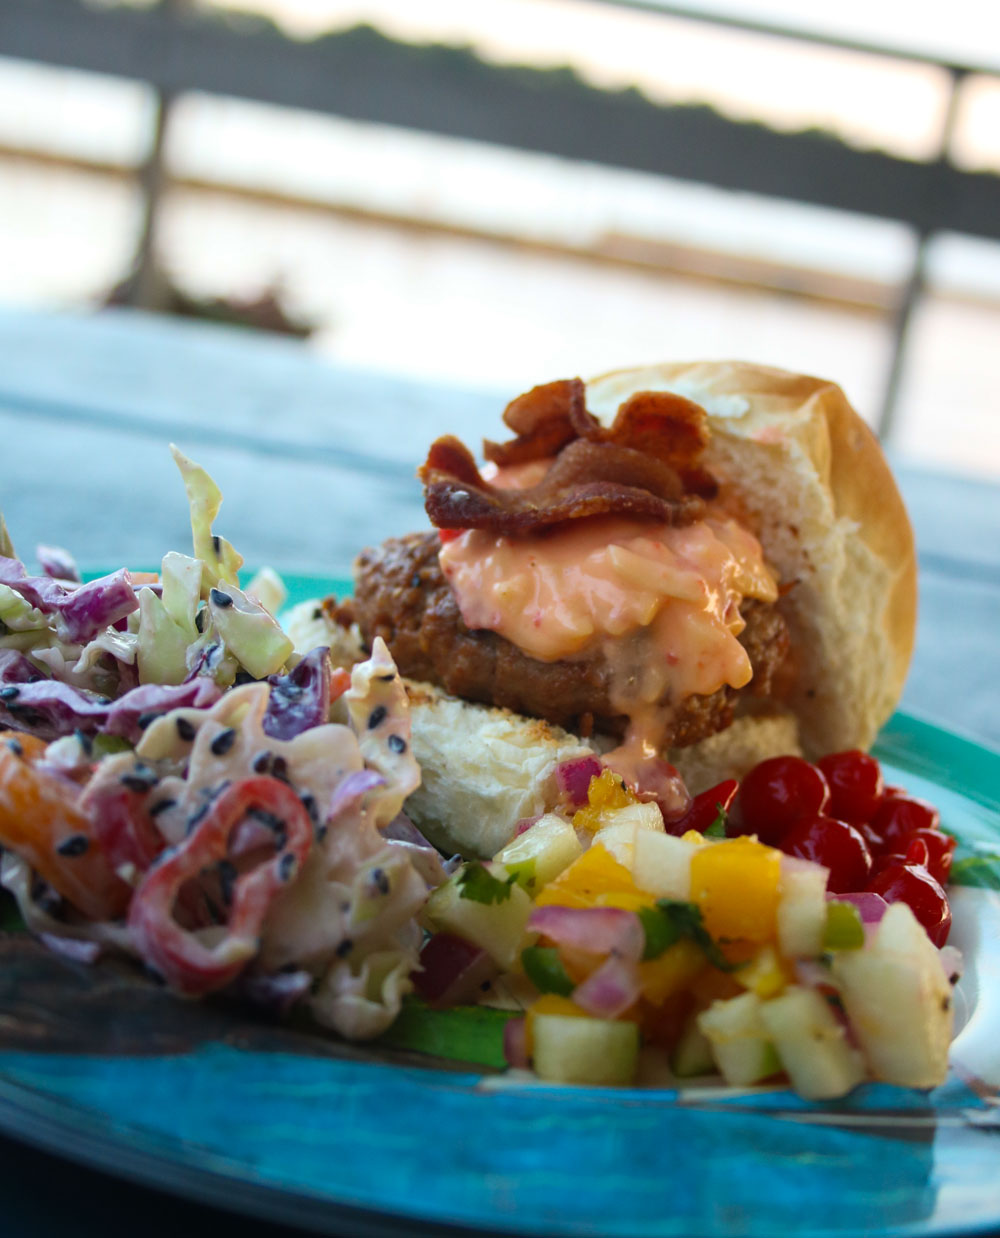
At the very beginning of my career, I assisted my cooking school teacher Rick Rodgers in classes and at book signings. He wrote both the Turkey Cookbook and Thanksgiving 101. He has written well over 30 books now and there is not a dud among them. Every recipe is always impeccably tested. I have links to a couple of the books in my shop but truthfully they are all fantastic. I have a vague memory that we made turkey burger sliders for some book signings and served them on little potato rolls. I think that is where the idea of drained salsa first came to my attention. Since then turkey burgers were a staple on the menu at my restaurant New World Grill, where we made Pico de Gallo in-house and added cumin, shallots, and a splash of white wine. However you do it, these stir-ins add a lot of flavor and keep the lean meat from being dry. I really love these with pepper jack and grilled onions on an onion roll. Go big or go home.
Turkey Burger
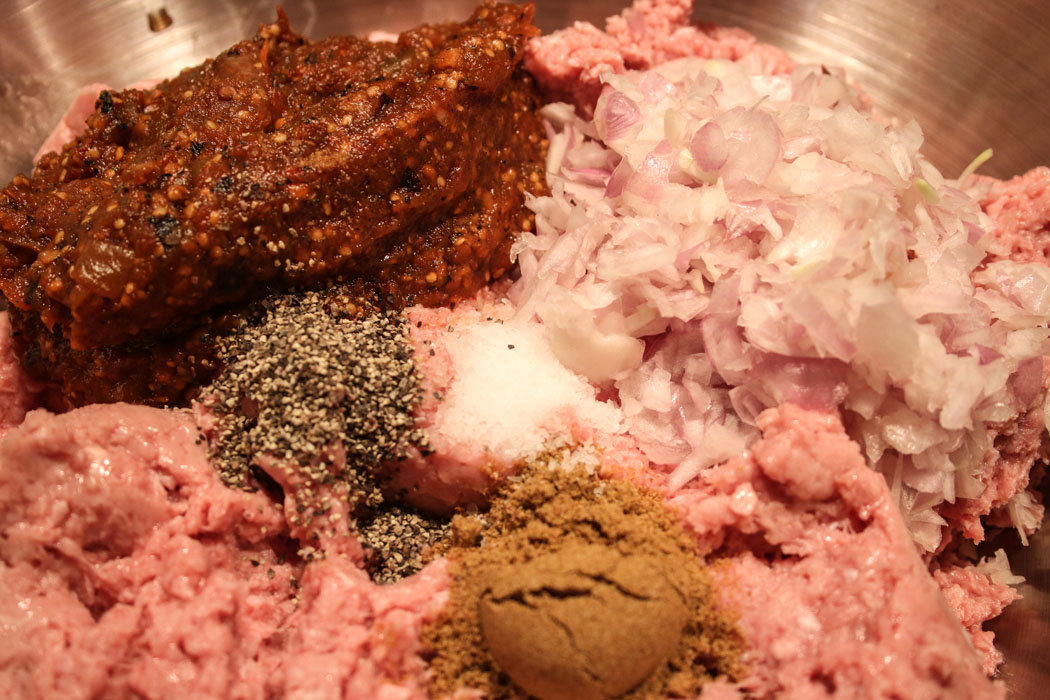
For the burger pot lucky, I used one of my very favorite salsas: Frontera Chipotle Salsa. Because ground turkey is a blank canvas, you almost can’t over-season it. In other words, more heat, more spice. Please.
16 ounce jar of favorite salsa, drained and liquid discarded (or save and use to season a sauce, etc.)
3 pounds ground turkey
3 shallots, chopped
2 teaspoons ground cumin
1 teaspoon salt
½ teaspoon ground black pepper
Pour the salsa into a fine mesh strainer, set over a bowl. Set aside for 20 minutes or more until the liquid has been released. Discard the liquid or save/freeze for something else.
Mix the turkey, drained salsa, shallots, cumin, salt and pepper by hand until incorporated and shape into patties. See note above about stocking your freezer or letting them rest for an hour (up to two days) in your fridge before grilling.
Grill over a medium-hot fire until cooked through (timing depends on burger size). Poultry should always be thoroughly cooked. If you find it hard to flip, show a little patience. A hot grill will always release the stuck food when it’s ready.
Serve with firecracker cole slaw – recipe is coming soon!!
Makes 24 sliders or 8 full size burgers.
This post contains affiliate links. For more of my must-have faves, check out my shop.
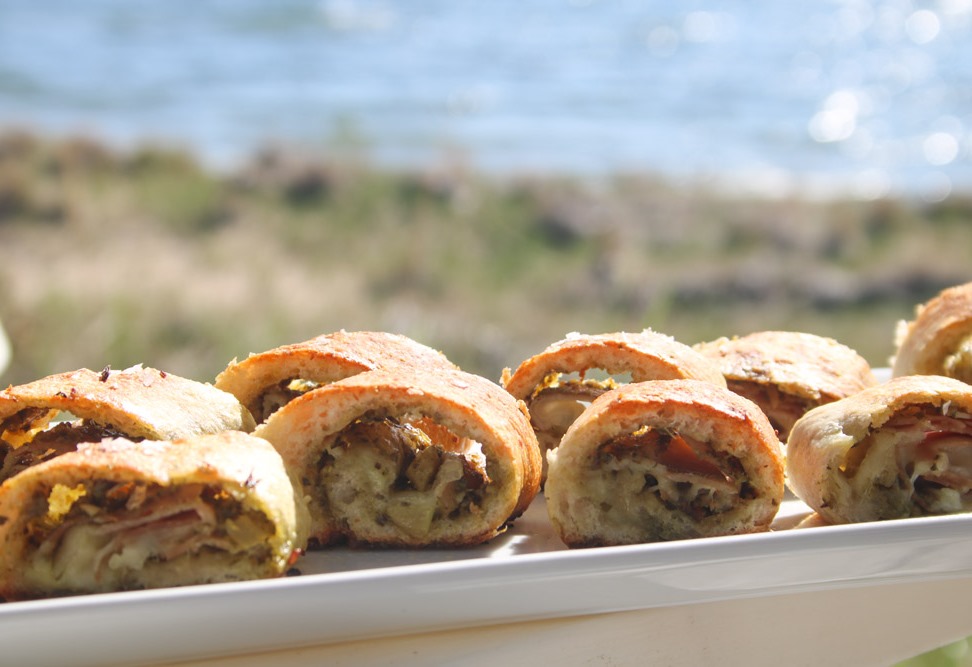
Prosciutto Pesto Puffs!! Prosciutto Pesto Poppers?? Puffs or Poppers? Mmmmmm, I can kind of go either way. In support of Puffs, these tasty little morsels are light and puffy. But, don’t discount Poppers; the journey from cutting board to platter is anything but guaranteed – see Open Wide above. I say you get 3 dozen pieces, but do you??? What if you don’t? Who will know? Most importantly, this quick and easy app includes the four food groups (remember those?) – cheese and dough, pesto and pig. Riiiiiiiiight?? I know I had you at cheese and dough.
Ingredients you have on hand!
Who among you doesn’t have some version of those four things in-house at all times? Don’t make me come over there! I know by now I have cultivated at least some level of pantry-responsibility in you. Personally I am still working through pizza dough from last month’s Pizzapalooza/Bring Your Own Pizza Toppings pot lucky. I was so uber prepped that I ended up with another half dozen crusts in the freezer. But this dish disappears so quickly you can short cut my Trader Joe’s dough hack and just grab the poppin’ fresh variety at the grocery. It would be a crime against your calendar to make dough for this from scratch.
Pesto
And pesto…I’m just about at the end of the stash of Pistachio Lemon Pesto I put away last fall. But for this I used an arugula pepita pesto –Y.U.M. – that was a contribution to the pizza party. Any combo of greens and nuts or seeds will work. Just follow the basic proportions in this recipe. The sassier the better. And, of course, you will get more depth of flavor if you toast the nuts or seeds first. But if you are short-changed on time, supermarket pesto ain’t half bad. We’re on the clock, people! We got PopperPuffs to make.
Pig
Then there’s the pig – let’s just go straight for prosciutto and stop there. But of course you could use salami, ham, anything that is cooked or cured. Raw bacon would be a mess. Smoked turkey would be a delish sub, or roasted peppers and thoroughly drained spinach if you are vegetarian.
Cheese
Vegans however need not apply. This PopperPuff screams for cheese*. I met and love-@first-sight’d this dish about 8 years ago when my then 14-year old neighbor Allison whipped up a larger version, stromboli-like, and appeared for a boat ride with a hamper-full. All the adults were stunned. What? Is? This? Cheesy? Goodness? It’s possible I broke a bicep shoveling in the gooey slices. Ever since, we have called this (or any interpretation of) the Ali Roll. *If you have a vegan cheese that melts well, give it a try and keep me posted!
Making it Bite-Sized
It recently occurred to me that if you use the full width of pizza dough and make it more stromboli-like, it is a tad bit – don’t judge me on what I am about to say – too gooey. I know. I know. But more because the center stays a bit dough-y than that there is too much cheese. Heaven forbid! So for a Memorial Day app exchange – which had nothing to do with technology – I decided to whittle this down to bite-size, and the results were a crowd-pleaser. The pieces were also less daunting than a slice 4+ inches wide which is considered bite-size in fewer and fewer circles these days.
Versatile and Make Ahead for Prep Win
Feel free to swap out all the fillings. This dish is pretty indestructible. I haven’t tried it but am fairly certain you could make the logs and freeze them, then bake frozen. Or you could bake it off, slice and freeze in an airtight container. These are good warm-from-the-oven or at room temperature.
While not gourmet per se, this is squarely in the category my friend Cindy calls “People Love It”.
Prosciutto Pesto Puffs!! Who among you doesn’t have some version of these four things in-house at all times: pizza dough, pesto or other slather, cured meat and melty cheese. For this, we choose pesto, mozzarella and prosciutto. But, the possibilities are endless.
Ingredients
Scale
13.8 ounce can of classic pizza dough (or equivalent fresh dough)
2/3 cup pesto
1/2 pound prosciutto, thinly sliced, (includes a bit extra for snacking)
1 1/2 cups grated mozzarella*
Good olive oil, salt flakes and crushed red pepper flakes
Instructions
Preheat oven to 425o.
Roll or stretch dough into a 12” by 14” rectangle.
Cut in thirds lengthwise, creating three 4 x 14 strips.
Divide the pesto between the three strips and spread evenly. Leave a ¾” edge pesto-free along the far (long side) of each strip.
Cover the pesto area on each strip with prosciutto – about 4 slices per strip. It’s okay to overlap a bit.
Divide the grated mozzarella between the three strips and sprinkle on top of the prosciutto.
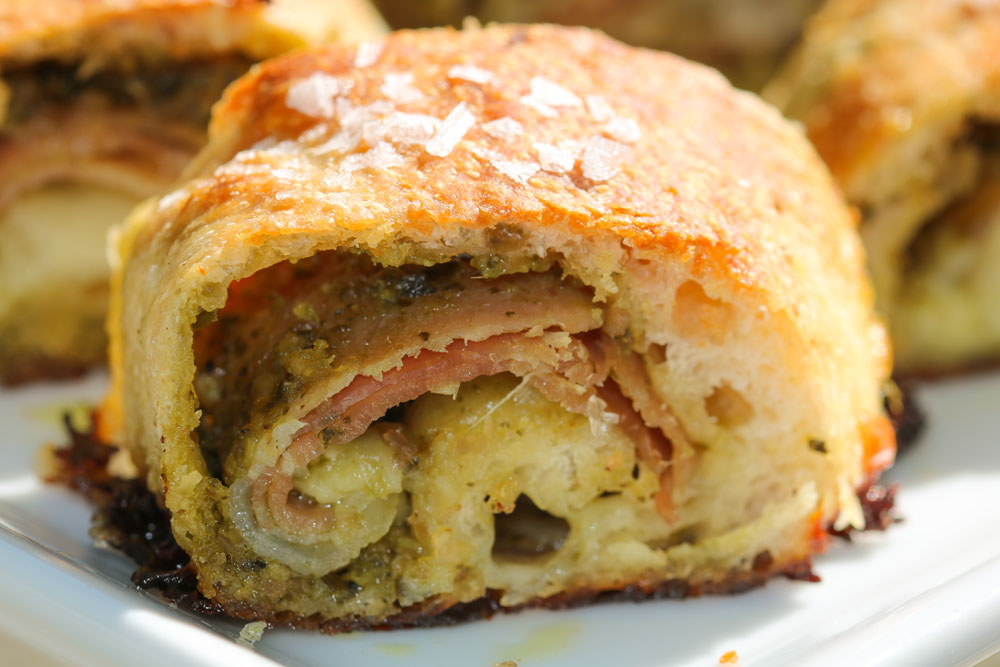
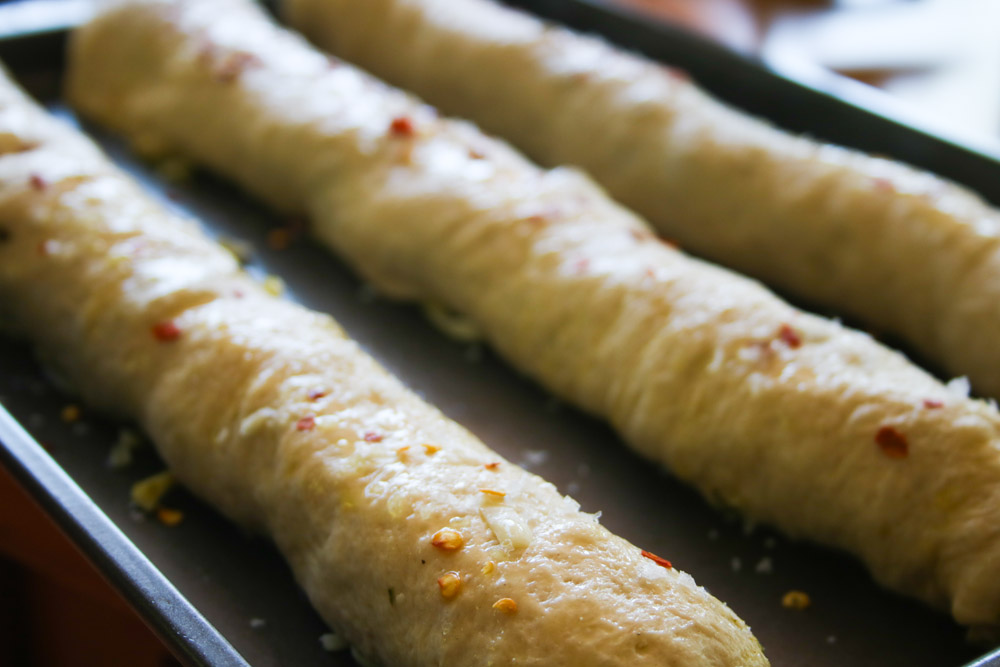
Working with one strip at a time, tightly roll toward the pesto-free zone, creating a 14” long log. Tuck the ends under and place, seam side down, on an oiled or lined baking sheet. Repeat with the other two strips.
Brush the logs with olive oil and sprinkle with salt (I like Maldon Sea Salt Flakes ) and sprinkle with crushed red pepper flakes.
Bake in preheated oven for 10-12 minutes until golden brown, rotating the pan about half way through.
Remove from oven and cool on a wire rack. When cool enough to handle, transfer the logs off the baking sheet onto the wire rack. Let rest 10 minutes all together.
Slice into 12 slices per log. Stand back and relish the high praise.
Notes
*When asked on that maiden Ali-Roll voyage, the Ali-Roll Mistress herself instructed me to use “grocery store mozzarella for best melting.” Sure, you could fancy it up with fresh mozz, but you still won’t have leftovers.
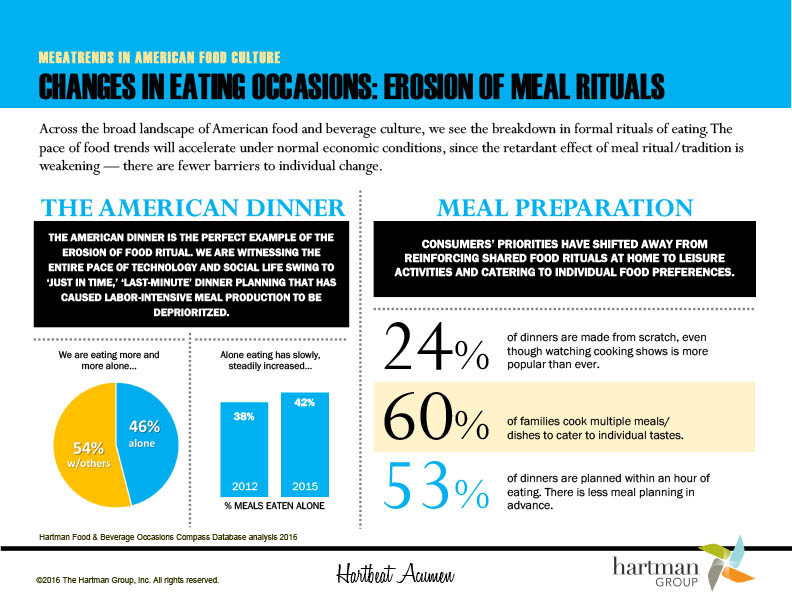
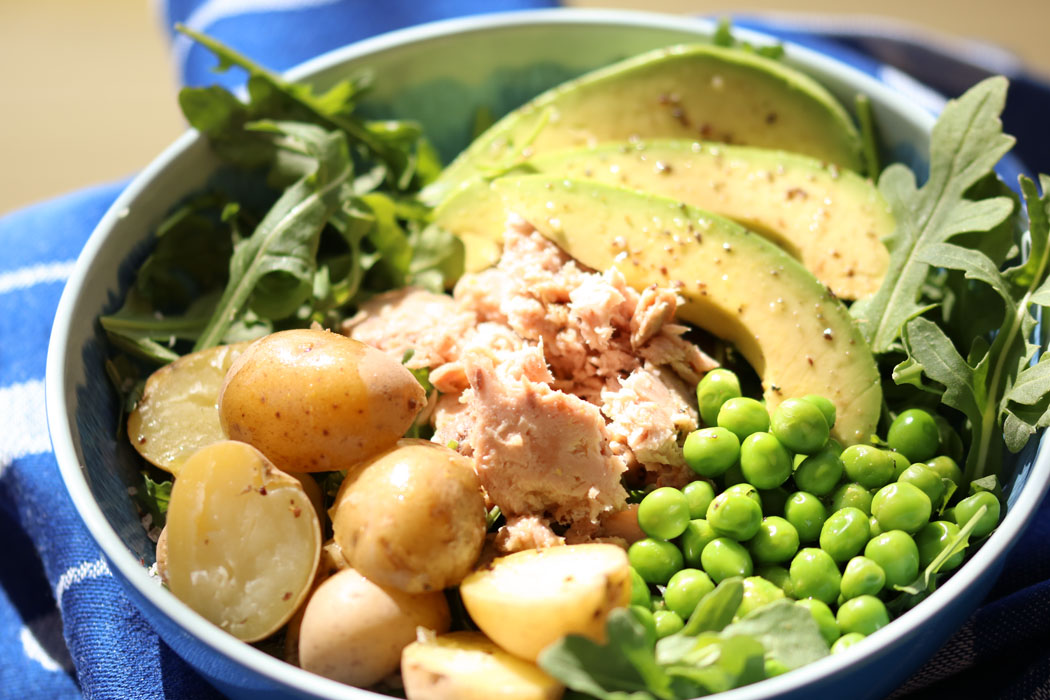
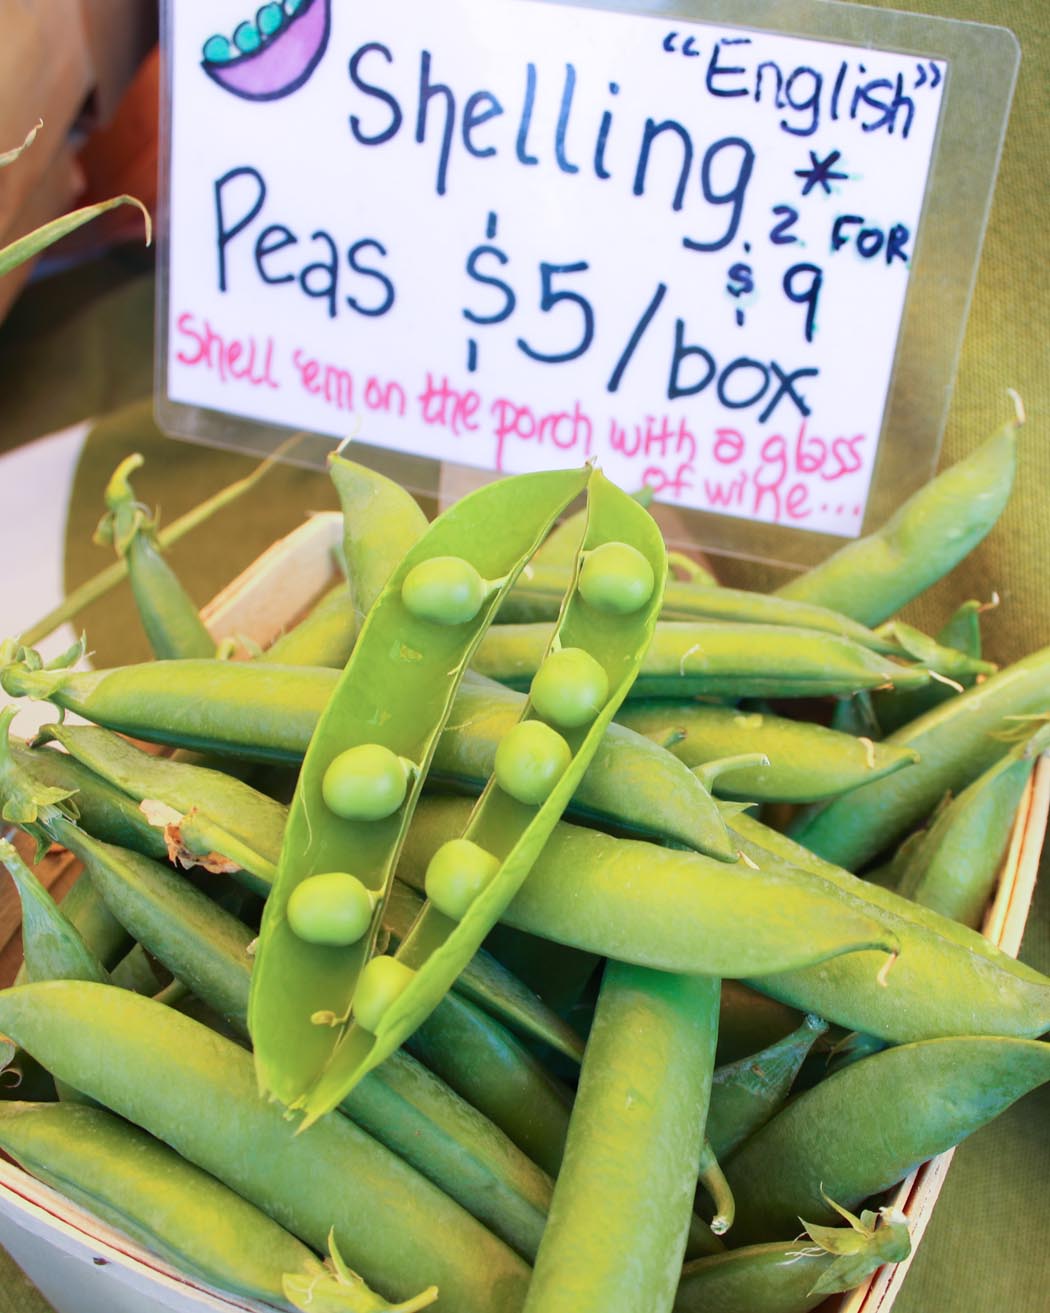
Say it ain’t so!! This sad infographic appeared this week from a consulting company that focuses on food and beverage trends. For me, the really sad part is the title – Erosion of Meal Rituals. According to the Hartman Group, more people are eating meals alone and most meals are planned in less than an hour. The last part sounds really good to me. With a well-stocked pantry, and the fact that spring has sprung and sweet peas are starting to appear, this soul-satisfying dish can be whipped up in no time. But it’s just as easy to make this for two – or three – or four or more – so please don’t eat alone. Breaking bread with friends and family is one of life’s great treats and truth be told is the real soul-satisfying part of any meal.
This spicy horseradish lemon dressing is a fantastic vinaigrette to make in a big batch and have on hand. I always have four or more vinaigrettes available at any time and the flavor profile of each can take a dish in a whole new direction. Lemon/EVOO is a staple, doctored here with a dose of spicy mustard and horseradish. I love a creamy miso dressing, an Asian ginger/soy/sesame oil one and of course something balsamic-based – maple, raspberry, white balsamic, etc. The possibilities are endless.
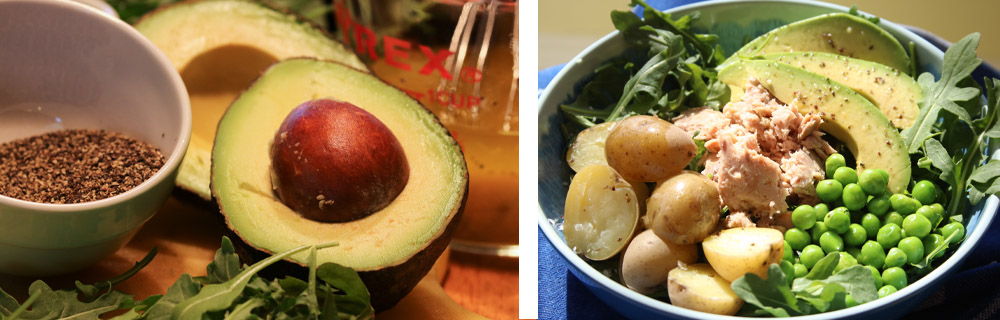
Using classic French technique, salt and pepper are added first with the acid so that they can dissolve before drizzling in the oil in a thin stream for a perfect emulsion. Seemingly every kitchen in France had a different benchmark as to what was the right amount of seasonings. And no matter how I did it, I was American and it was wrong. Oh wait, I was an American Woman, and it was really wrong. I will dedicate a whole post to the classic technique, but for today we will just dump and whisk. As an American, I reserve the right to change the technique and I find that using a grainy salt and pepper in just a measured dose at the end – here I use it strategically on the avocado where its texture and flavor make it a standout – allows for more control over sodium intake which isn’t a bad thing. Certainly not as bad as eating alone. These are my favorite salts today – Maldon Sea Salt Flakes and Maine Coast Sea Seasonings.
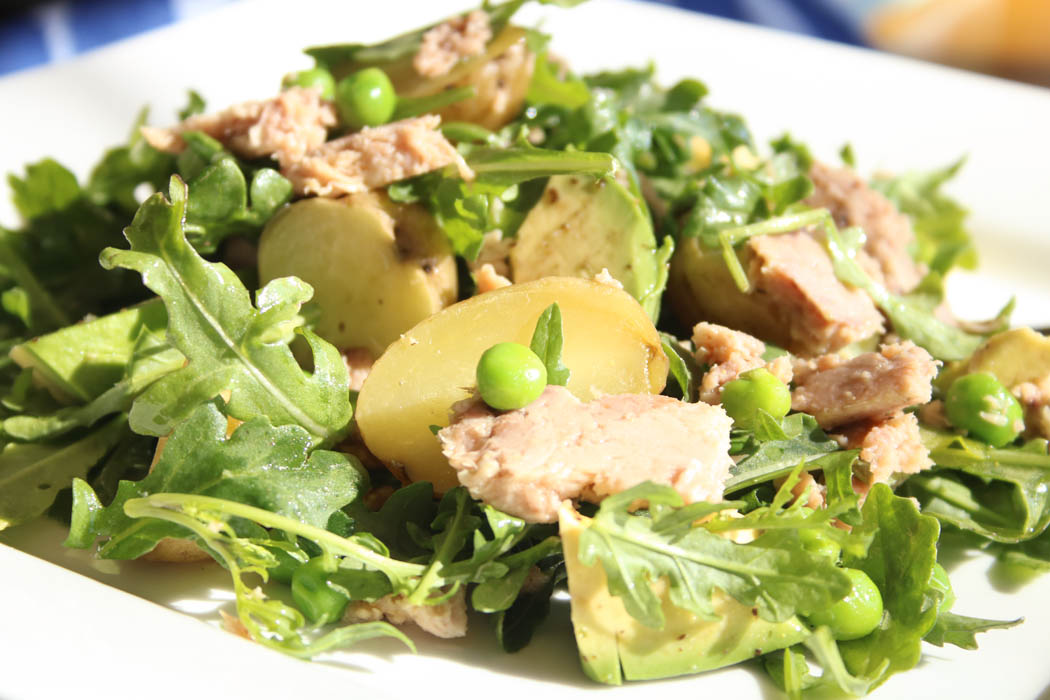
Sweet Peas, Tuna and New Potato Salad
1 pound small new potatoes
½ pound fresh (or frozen) shelled sweet peas
10 ounces tuna (I prefer chunk light tuna in water – especially love the pouches that need no draining)
5 ounces arugula
1 avocado, sliced or chopped
Salt and Pepper to taste
Spicy Horseradish Lemon Vinaigrette
1/3 cup lemon juice
1/3 cup extra virgin olive oil
1 Tablespoon prepared horseradish
1 Tablespoon spicy Dijon mustard
Bring a pot of salted water to a boil. Add potatoes and cook until tender, about 8 minutes. Drain liquid and let potatoes cool to room temperature.
While the potatoes are cooling, place an inch of water in the pot and bring to a boil. Transfer the peas to a steamer basket and add the basket to the pot and cover. (Frozen peas can just be thawed – no need to cook). When tender (about 2 minutes), remove the basket and run under cool water to stop the cooking.
Prepare the Spicy Horseradish Lemon Vinaigrette: Combine all ingredients in a shaker with a tight-fitting lid and shake to combine well, or place in a small bowl and whisk to combine.
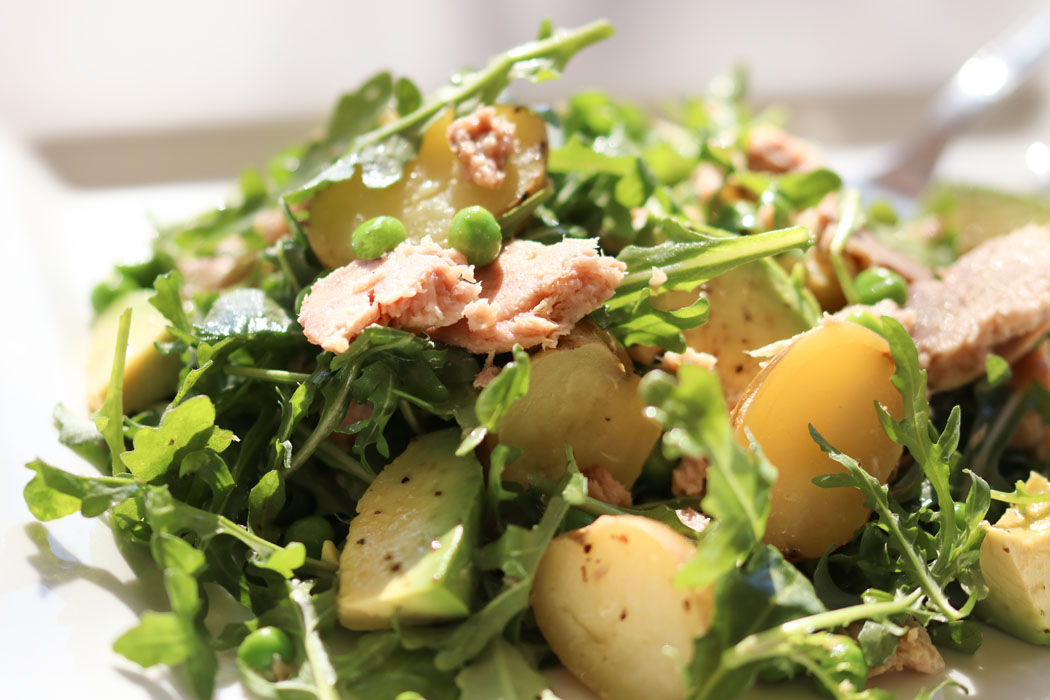
Arrange greens in four bowls and divide and arrange potatoes, peas, tuna and avocado. Drizzle with spicy horseradish lemon vinaigrette. Or combine all ingredients in a large serving bowl and drizzle with the dressing and toss to combine. Season with salt and pepper to taste.
Either way – composed (aka deconstructed) or tossed – it’s as fresh as the spring air.
To provide the best experiences, we use technologies like cookies to store and/or access device information. Consenting to these technologies will allow us to process data such as browsing behavior or unique IDs on this site. Not consenting or withdrawing consent, may adversely affect certain features and functions.
Functional
Always active
The technical storage or access is strictly necessary for the legitimate purpose of enabling the use of a specific service explicitly requested by the subscriber or user, or for the sole purpose of carrying out the transmission of a communication over an electronic communications network.
Preferences
The technical storage or access is necessary for the legitimate purpose of storing preferences that are not requested by the subscriber or user.
Statistics
The technical storage or access that is used exclusively for statistical purposes.The technical storage or access that is used exclusively for anonymous statistical purposes. Without a subpoena, voluntary compliance on the part of your Internet Service Provider, or additional records from a third party, information stored or retrieved for this purpose alone cannot usually be used to identify you.
Marketing
The technical storage or access is required to create user profiles to send advertising, or to track the user on a website or across several websites for similar marketing purposes.


) and sprinkle with crushed red pepper flakes.