Nov 20, 2016 | Dinners & Mains, Dressings & Sauces, Holidays, Passionate Producers, Pot Lucky, Recipes, Savvy Kitchen Tips
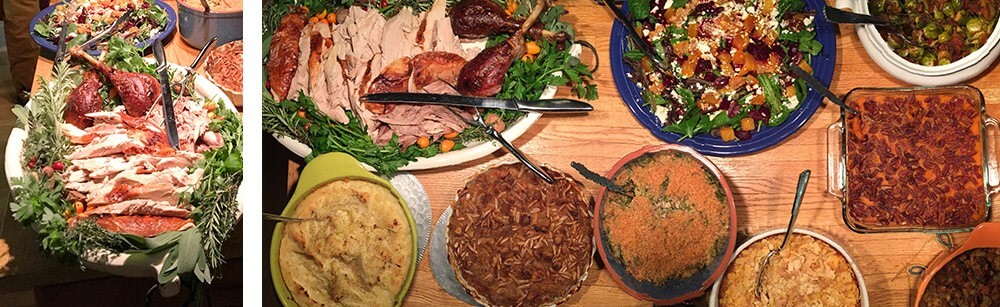
Nary has a Thanksgiving rolled by that I am not peppered with queries from dawn to dusk. I heed the call, alternating with “Gobble Gobble” and “Butterball Hotline.” This year, I say bring it on. I’ve got nothing but time. Yup! I have already cooked my Thanksgiving feast – the roast turkey and the gravy – and served it up with a “Family Favorites Pot-lucky.” Food served. Wine drunk. Dishes done. Trash at the curb. Sorry. Not sorry.

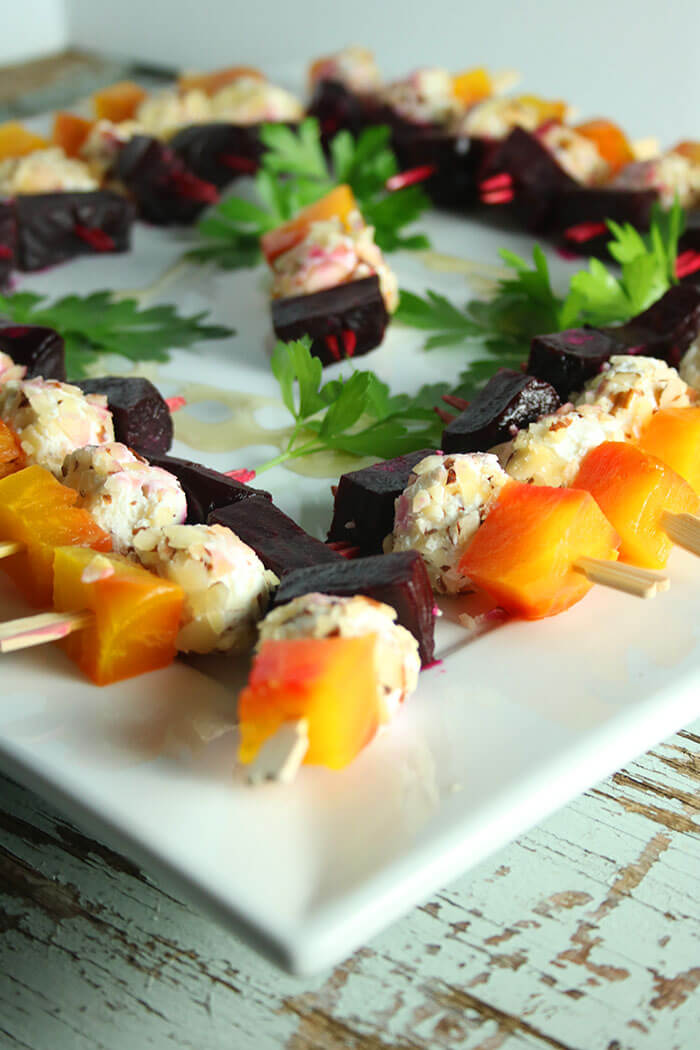
We gathered earlier this month and the pot-lucky theme was Family Treasures – the iconic culinary treats that are essential for fall family feasts. I brought Gaga’s Delmonico apples and a cranberry kumquat chutney, that’s a newer tradition. One couple brought a wonderful red and yellow beet with nutty goat cheese appetizer. The other dishes were both familiar and uniquely twisted – a modern green bean casserole & sweet potatoes with pecans, scalloped corn & sprouts with bacon, and mash taters & an amazing sausage stuffing. It was a tasty trip seeing how others celebrate the season.
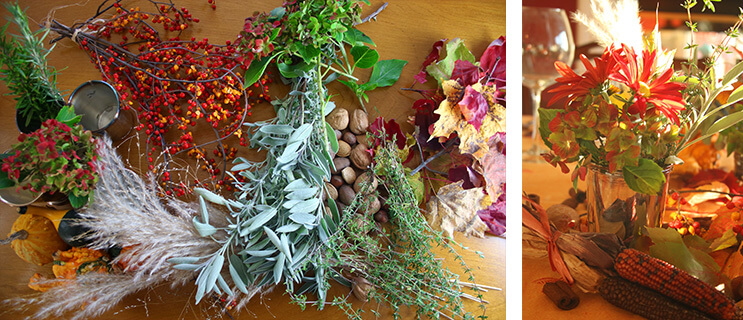
And because it has been so warm, I was able to get most of the décor from the herb bed, grasses and colorful leaves. After one too many table settings that hogged the site line and got moved off the table about 5 minutes after we were seated, I decided to keep it low and used a collection of mismatched short silver cups, more commonly used at Derby time – julep cups! That plus a few candles and some nuts and gourds was all I needed.

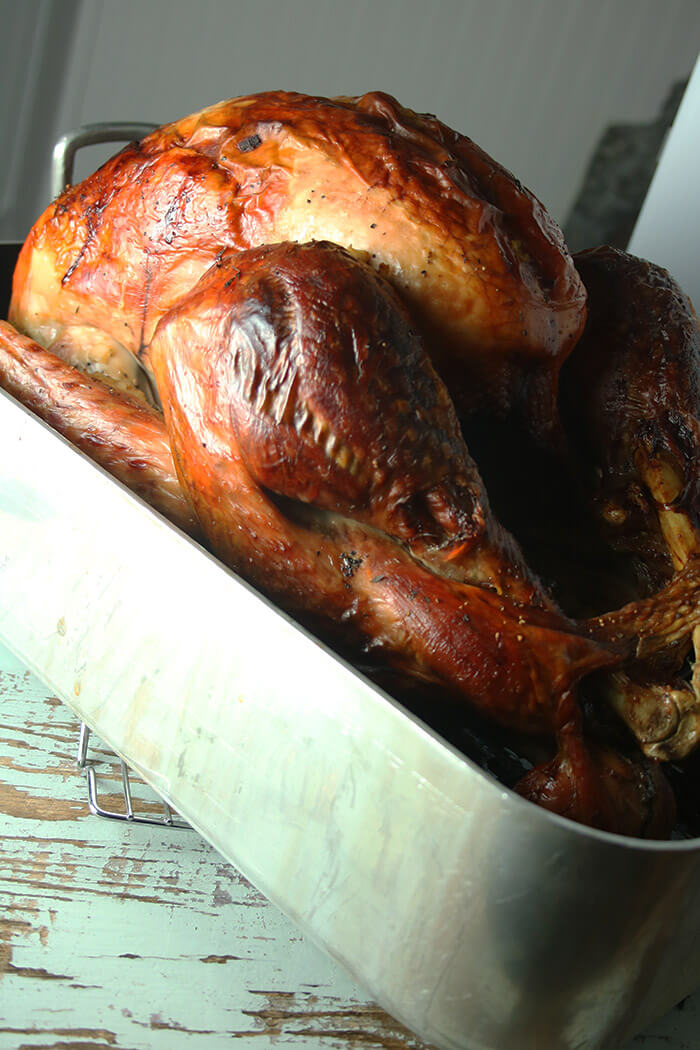
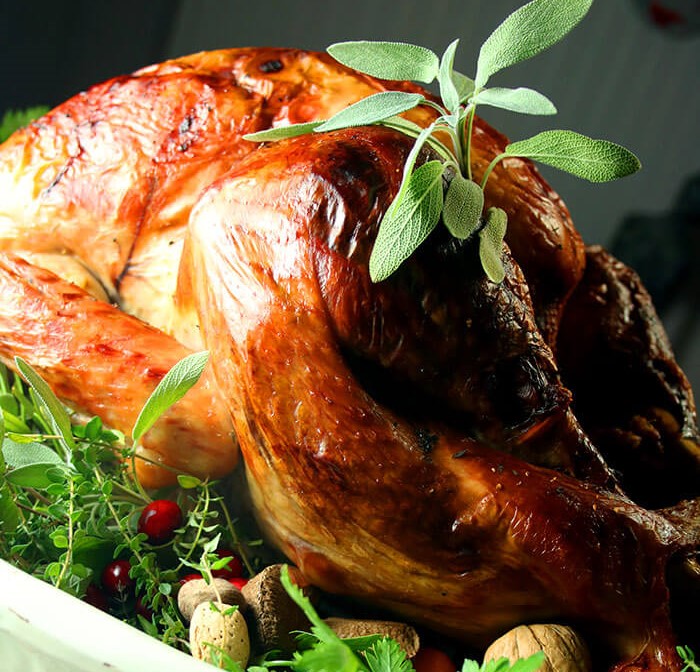
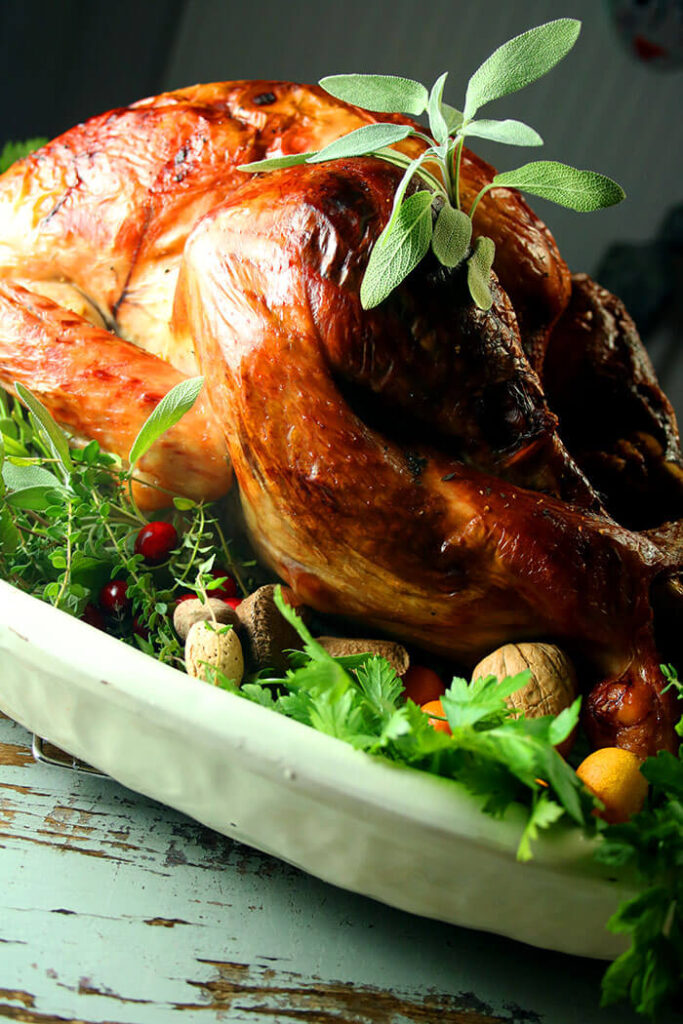
I was also in charge of the turkey and over the years I’ve had my share of turkey prep. Some years I have gone from perfect turkey on the Today Show Thursday to turkey leftovers on Good Morning America Friday. By noon on Thursday when others were thinking about the big dance, I had moved on to leftovers prep. One year my balcony was lined by so many wall to wall coolers filled with turkey parts that you’d have thought I was running a soup kitchen. Suffice it to say I have done every show with every possible technique and turkey part. Whole turkeys, turduckens, spatchcocked and deconstructed. Done. It. All.
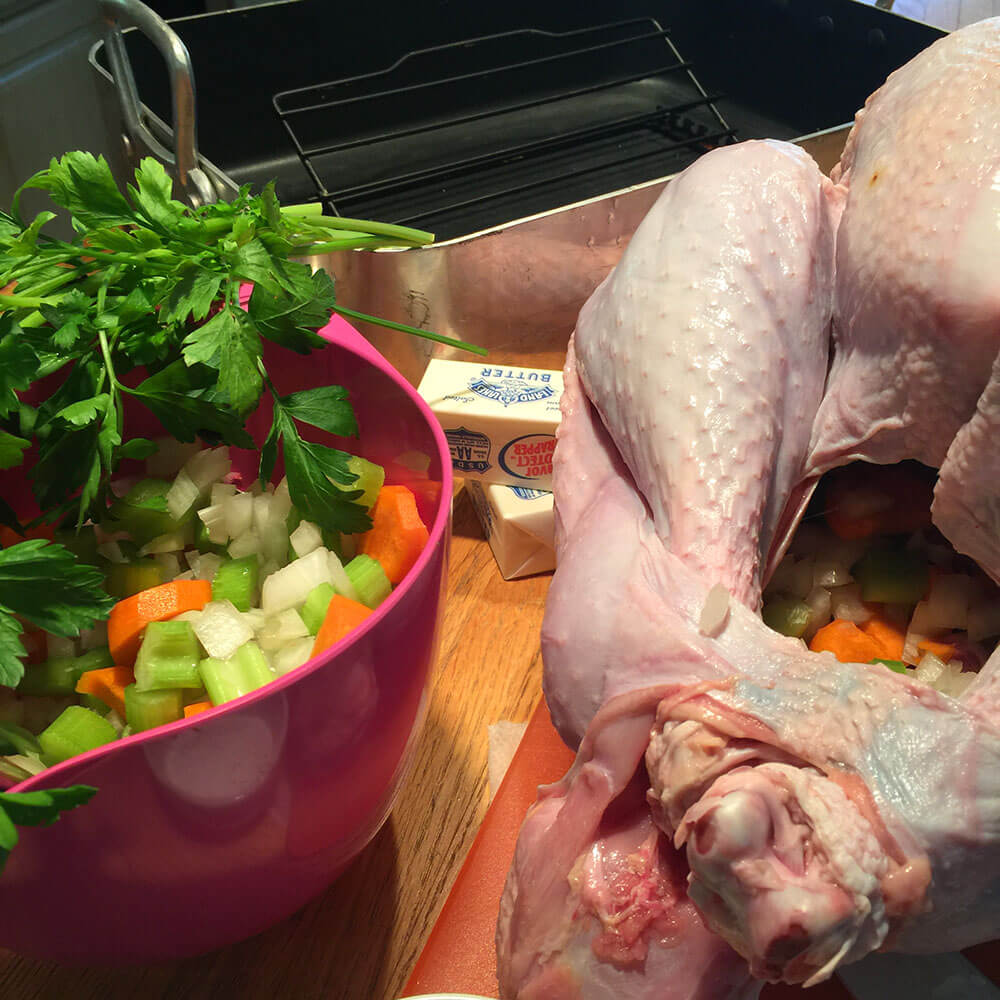
The real secret to Turkey Perfection comes from good preparation, organization, great ingredients and having the right equipment. My turkey this year came from Wise Family Farm and was about 16 pounds. I hope you are so lucky as to have a fresh, locally pastured bird, but if you are only able to source a frozen turkey, you need to get busy now. The safest way to thaw a frozen turkey is in the refrigerator over several days. And don’t forget that it takes 24 hours to thaw every 4 pounds of frozen bird.
If you head to my shop, you will find the tools I find most invaluable – a good Roasting Pan , about 2-3” deep (I prefer “stick” over non-stick – that results in a nice dark brown gravy), a Roasting Rack that raises the turkey for essential airflow, an Instant Read Thermometer
 to validate estimated cooking time, a Fat Separator
 to skim off fat and pour the rich stock from the bottom of the vessel, and anything written by Rick Rodgers, including The Turkey Cookbook
 , Thanksgiving 101
 , and The Big Book of Sides
 . I can safely say everything I know about turkey and gravy I learned from Rick. He IS Mr. Turkey.
I find the recipe below to be quite foolproof. It is a classic technique for an average-sized 18-pound turkey, but the instructions can be adjusted depending on the size of your bird. There are many tweaks and twists that can bedazzle the bird, but it always helps to know the basics before you start embellishing. Learned that one from Julia herself! And one of the things I learned from Rick is to have a stock pot going all day so that you can baste before your bird gets juicy and you have everything needed to make gravy, regardless of the amount of juices your bird yields. I have included details on how to do that so you can relax and know you will be gravy-prepared.
Roast Turkey Perfection with Gimme-More Gravy
Turkey Perfection
- One (18-pound) fresh turkey
- Freshly ground black pepper
- Kosher salt
- 2 carrots, coarsely chopped
- 2 stalks celery, coarsely chopped
- 1 small onion, coarsely chopped
- 3 quarts turkey or chicken stock (I prefer low sodium since this will reduce for hours – you can always add seasoning later)
- 1 Tablespoon olive oil
- 4 sprigs Italian parsley
- 2 sprigs fresh thyme
- 6 peppercorns
- 1 bay leaf
- 1/2 cup* plus 2 Tablespoons unsalted butter, at room temperature
- 1/2 cup all-purpose flour
*You may not need this if the turkey releases enough fat to yield a half-cup. Commercially produced birds tend to be fattier, but the pasture-raised bird I cooked was very lean and I needed to supplement with the butter when making the roux for the gravy.
Position oven rack in the lower part of oven and preheat to 325° F.
Remove any pieces/parts inside the turkey – the neck and giblets (which includes the gizzard, heart, and liver) – and set aside.
Rinse the turkey inside and out with cold water. Pat dry with paper towels and wipe out the cavity. Rub cavity with salt and pepper and stuff loosely with 1/3 of the carrots, celery, and onions.
Pin the turkey’s neck skin to the back with a bamboo skewer or trussing pin. Tuck the wings akimbo (“hands” behind the back, elbows turned outward) to keep the tips from burning.
Place the drumsticks in the hock lock. Some birds will be butchered with a skin flap as shown above. Others may have a plastic loop to lock the legs. If all else fails, tie them together with kitchen string.
Place the turkey, breast side up, on a rack in a roasting pan. Rub all over with 2 Tablespoons softened butter. Season with salt and pepper.
Tightly cover the breast area with aluminum foil. (Not tented, just pressed tightly onto the breast. You will remove this during the last hour of roasting).
Pour 2 cups of turkey or chicken stock into the bottom of the pan and place in the pre-heated oven.
Stock Pot
As soon as the bird is in the oven, start the stock pot. This will give you juices for basting during the early hours when the bird hasn’t given off much liquid. It will also provide backup turkey stock for a bird that is a low juice producer.
Hack the turkey neck into 4 or 5 pieces. Trim away the gizzard’s silver skin and membrane and coarsely chop. Some like to also chop up the liver and heart and add it here, but I think they are a bit bitter when boiled. I’m more likely to save them and sauté later with onions and then add them to stews, fried rice, or place atop avo toast.
In a large stock pot, heat the olive oil, add the turkey neck, any giblets, and sauté until brown, about 5-7 minutes. Add the remaining carrots, celery, and onions and sauté for 5 minutes. Add 1 quart of turkey stock, along with the parsley, thyme, peppercorns and bay leaf. Bring to a boil and reduce to a simmer. Continue to simmer, using this to baste the turkey as needed. Periodically skim any floaters. (I’m trying really hard not to say scum, but you know what I’m talking about.) Add additional turkey stock to the pot to maintain a 1-1 ½ quart level.
Basting
Roast the turkey, basting all over every hour with the juices in the bottom of the pan or from the stock pot. Lift up the foil to baste the breast area. I usually rotate the pan periodically to make sure there are no oven hot spots and the bird roasts evenly. Roast until an Instant Read Thermometer inserted in the meaty part of the thigh (but not touching the bone) reads 180° F and the breast is 165° F, about 4 hours. Whenever the drippings evaporate, baste from the stock pot and add a bit more stock to the roasting pan. Remove the foil from the breast during the last hour to let the skin brown.

It’s better to pad your estimated cooking time by 30 minutes, so nobody is standing around drinking too much while waiting for the bird. I say that like it’s a bad thing. I always defer to the thermometer, but use the times below as a guideline. Stuffing your turkey will add about 5 minutes per pound, so I cook the stuffing on the side (doesn’t that make it dressing??). Since you need to let the bird rest 30 minutes and carving takes time, you have most of an hour to finish or warm the rest of the sides when the oven is no longer needed for the turkey.
Estimated Roasting Times – Unstuffed Turkey – about 15 – 20 min a pound
(Oven Temperature 325° F)
12 to 14 pounds 3 to 3 3/4 hours
14 to 18 pounds 3 3/4 to 4 1/4 hours
18 to 20 pounds 4 1/4 to 4 1/2 hours
20 to 24 pounds 4 1/2 to 5 hours
Transfer the turkey to a large serving platter and let it stand for at least 30 minutes before carving. Pour any juices that have run off back into the roasting pan.
Gimme-More Gravy
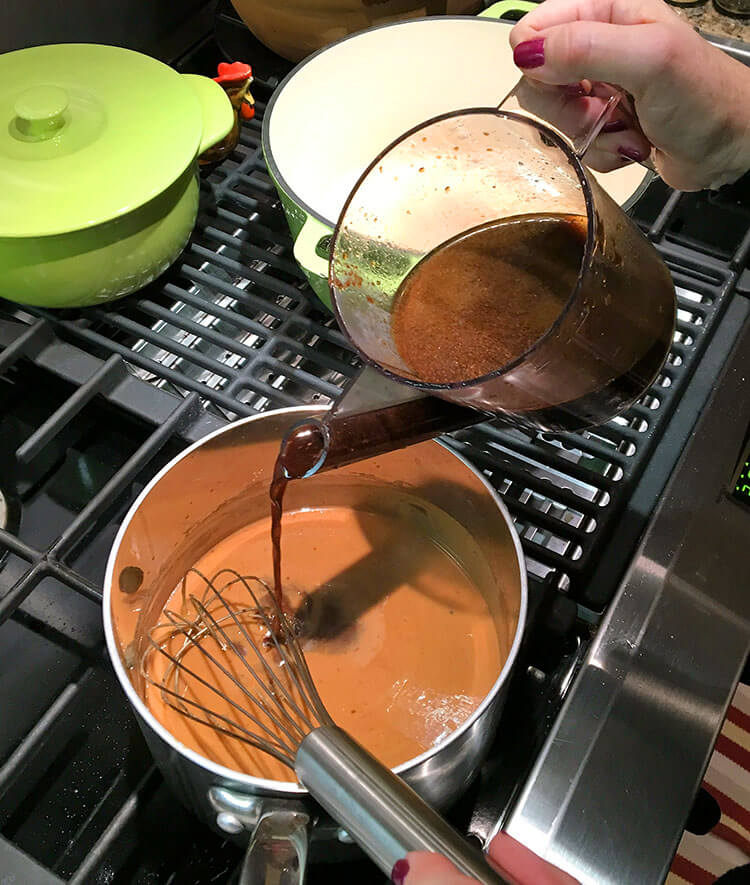
Once the turkey is out of the oven and resting, pour the drippings from the roasting pan into a Fat Separator or heatproof glass measuring cup. Let stand 5 minutes, then skim off and reserve the clear yellow fat that rises to the top. Measure 1/2 cup fat, adding butter, if needed, to make 1/2 cup.
Check the measurement on the broth remaining in the fat separator, once you have skimmed the fat. If you have less than one quart of liquid, add enough strained liquid from the stock pot to the skimmed drippings to make 4 cups.
Place the roasting pan on low across two stove burners (or scrape all the brown bits from the roasting pan into a saucepan) and add the turkey fat or fat/butter combo (1/2 cup total).
Whisk in the flour to make a roux, scraping up the browned bits on the bottom of the pan, and cook until the paste is lightly browned, about two minutes. Whisk in the turkey broth. Cook, whisking often, until the gravy has thickened and no trace of raw flour flavor remains, about ten minutes.
If desired, finely chop whatever giblets you have prepared and add to the gravy. Check the seasonings and add salt and pepper, as needed. Transfer the gravy to a warmed gravy boat.
Carving
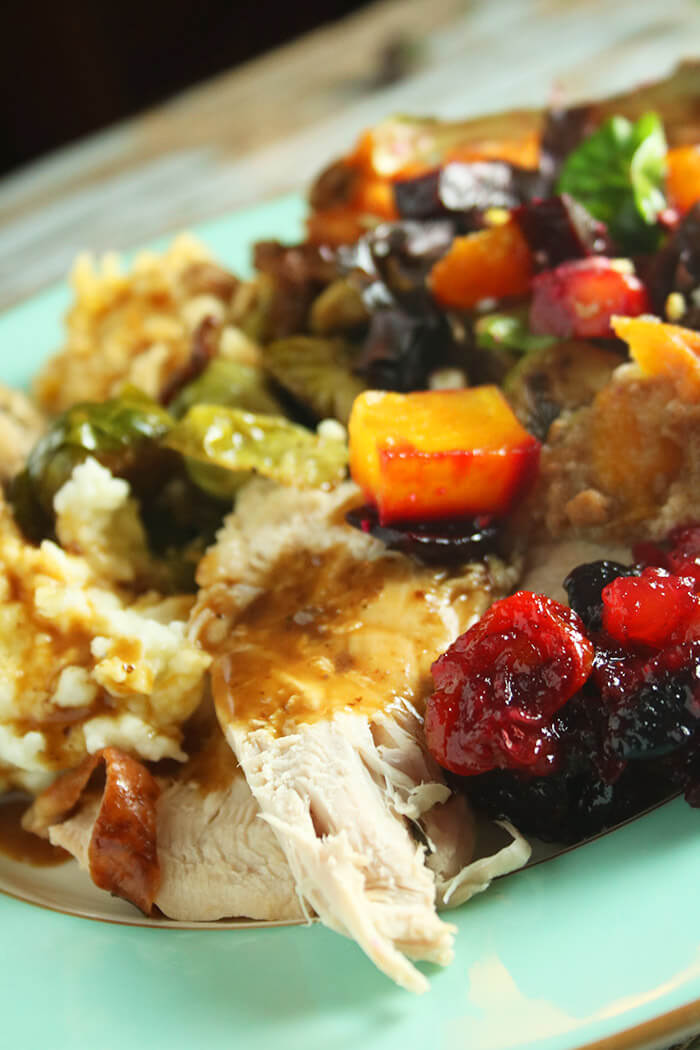
Remove the wing and leg on one side and slice the breast, carving parallel to the center/breast bone. Repeat on the other side. It’s become very popular to remove the breast and slice cross-wise like a loaf of bread. It’s not the way I was trained. But my Dad’s process which took an hour to carve…one slice for the platter, one for the man with the knife….and never ended up with enough food on the platter (What? You want more than one paper-thin slice???) has left some family members in therapy. I can’t be sure but I think some people that I may or may not be related to shred their turkey by hand just to avoid any brush with our torturous past. You are on your own – #NoJudgment – but know that there are plenty of videos on carving techniques!
However you carve it, enjoy and be sure to smother with amazing gravy and serve with gratitude! And be sure to share your family favorite sides in the comments below.
Serves 18 with about 4 cups of gravy

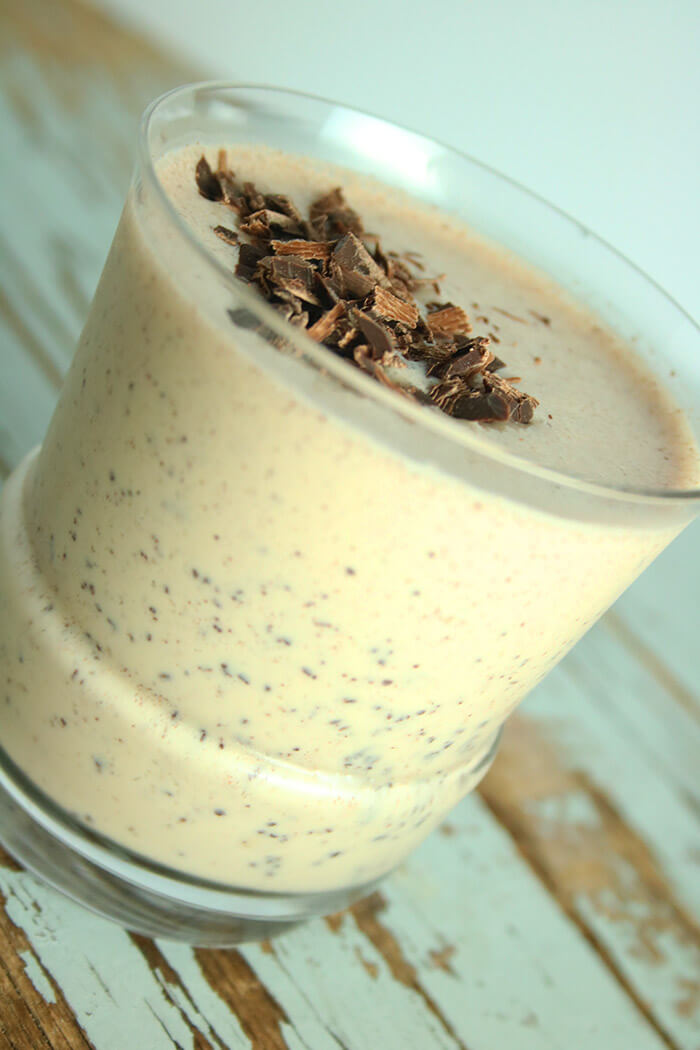
Take a page from this book and consider liquid dessert! Kind of a perfect way to end a meal – no further chewing needed.

Gobble! Gobble!
This post contains affiliate links. For more of my must-have faves, check out my shop.
© Copyright: KatyKeck.com 2016. All rights reserved.
Hey, we want to hear from you!
Don’t forget to Comment, Share & Subscribe to our blog.
Save

Aug 3, 2016 | Desserts & Sweets, Recipes, Savvy Kitchen Tips
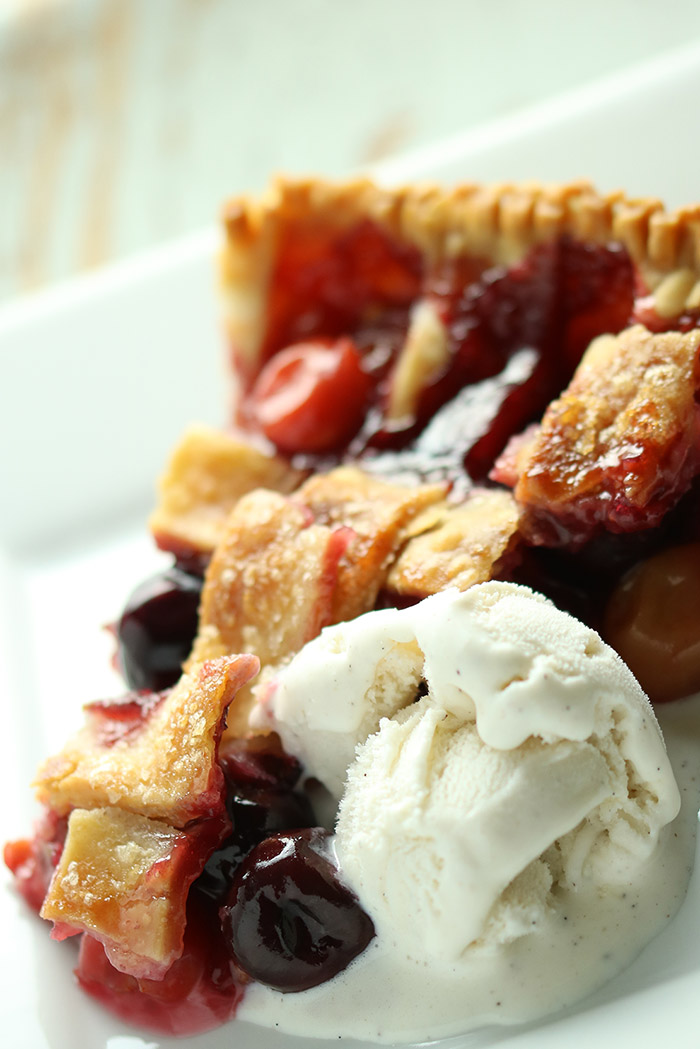
Nothing says summer like a fruit pie, especially cherry pie, warm with a generous scoop of vanilla ice cream. But for me there is one not so tiny problem. The 425oF oven. It’s impossible to get around that aspect of summer pies, biscuits and shortcakes. But what you can do is get in and out as quickly as possible and I have a couple secret weapons that let you trick out store bought dough, pass it off as your own, and get back to the beach. Who doesn’t love that? Face it – while home-made crust is a fabulous nod to bygone days and an awesome salute to Gramma, with our 2016 lifestyle and in the dog days of summer, it’s a crime against the calendar. I hereby give you my permission to do this fast fix.
While the crust hacks are my own, this pie recipe is inspired by one of the late Richard Sax’s Classic Home Desserts . This book is one of my very few must haves and has to be one of the best baking reference books ever written… at least for home-style desserts which are not only my personal favorites, but also the style at New World Grill where I did most of the baking. I am super excited to find out that it is no longer out of print! For years it was only available used, but it has been reprinted and is here for the taking! Not just pies, but cobblers, puddings, dumplings, cakes, tarts, custards, frozen treats and more. Run! Run! Run!
One of the tricky things about fruit pies is how much thickening – usually cornstarch or tapioca – is enough but not too much. There are no easy answers here. It depends on the water content of the fruit, the ripeness, pectin etc. This generally is not a problem with fall fruits like apples, quince, figs, or pears. Food52 had a recent post on “the fickle mistress” of the pie world – fresh fruit. Their suggestions are a lot more time consuming than what I suggest here, but they are also more predictable. I would NOT follow my recipe if you were trying to use super high water-content fruit like raspberries or blackberries. They are …..like 87% water, 12% seeds and 1% fruit. (Source: my vivid imagination). Not good contenders. But this would work super well with peaches and a sprinkling of blueberries. Or cherries as I suggest here. Keep it to fruit with sturdy flesh and you will be fine.

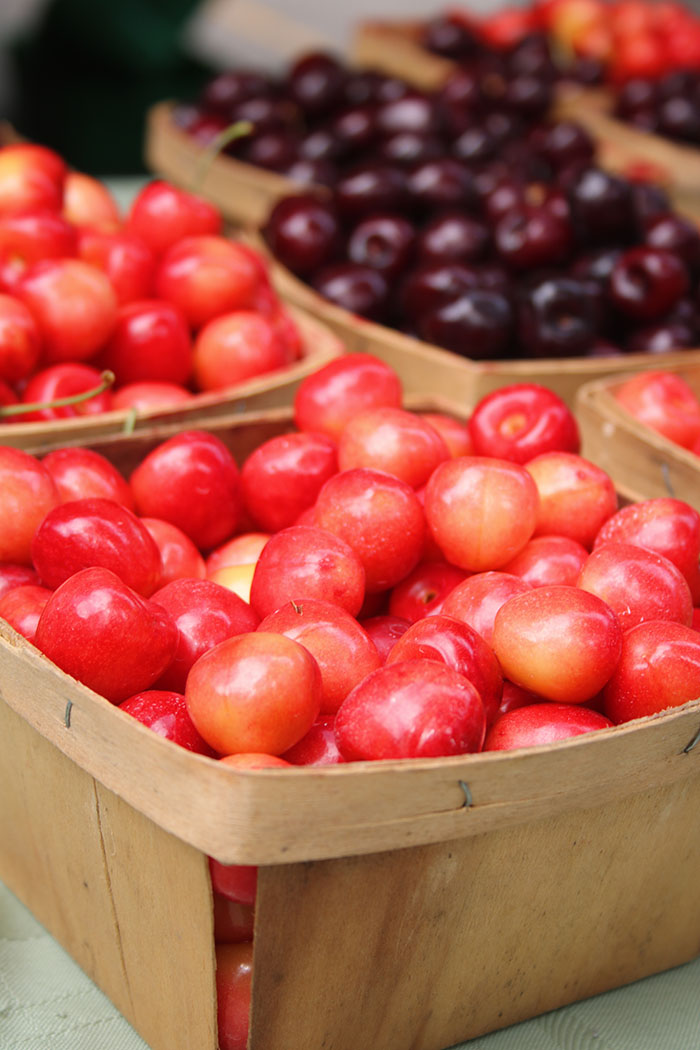
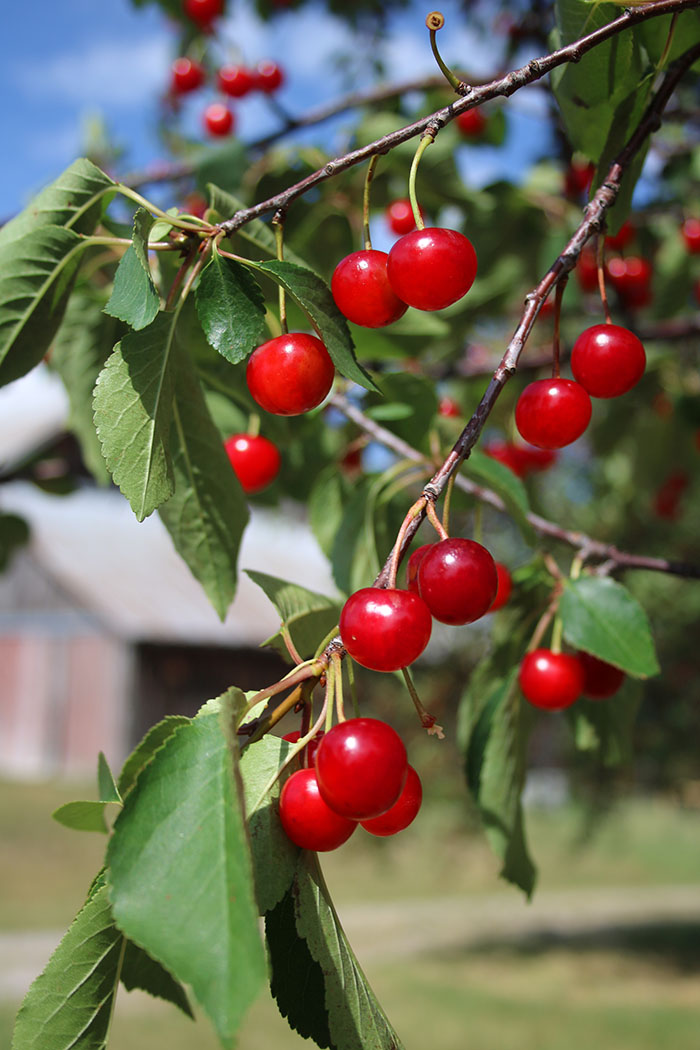
I can’t think of cherry pie without thinking of my Grandmother who was often perched on the piano bench belting out a round of Can She Make a Cherry Pie, Billy Boy Billy Boy. No?? Nobody?? We didn’t actually grow up on cherry pies as a summer staple, but my Dad loved him some bings and spending time in Michigan during the summers, they were and are plentiful. Traverse City has an annual festival dedicated to cherries with races through the orchards, pie eating and pit spitting. The airport is Cherry Capital Airport. Fly right over the Leelanau Peninsula mid-summer and you will be amazed by the vision in bright red. For this pie, I used a combo of those pretty bright red tarts, along with sweet dark cherries and whites. Whenever I get them, I pit them immediately and freeze by color in ziplocks.

Now on to the inside secrets on how to trick out a ready-made crust and pass it as your own. These tricks work best for the pre-made dough that comes rolled up and is found in the dairy case, possibly sporting a chubby white guy with a chef toque. Some of these tips will help you jazz it up and some will help rid you of a soggy bottom. Nobody likes that!
Secrets for success:
- Oven should be hot; pastry should be cold. Always 425oF for crusts.
- Heat a pizza stone while you preheat.
- Use a glass pie plate and butter it well.
- Brush egg white on the inside of the raw bottom crust once you’ve laid it in the pie plate. Back to the fridge til its time to use this.
- Brush the top crust with cream or half & half. Sprinkle with sugar
- Lay a sheet of foil loosely on the top for the first 15 minutes of baking to help the fruit temperature rise more quickly.
- Use a foil-lined (for the mess) sheet pan (to protect the glass on the pizza stone) under the pie.
- Get the best vanilla ice cream – no point in cutting corners here!

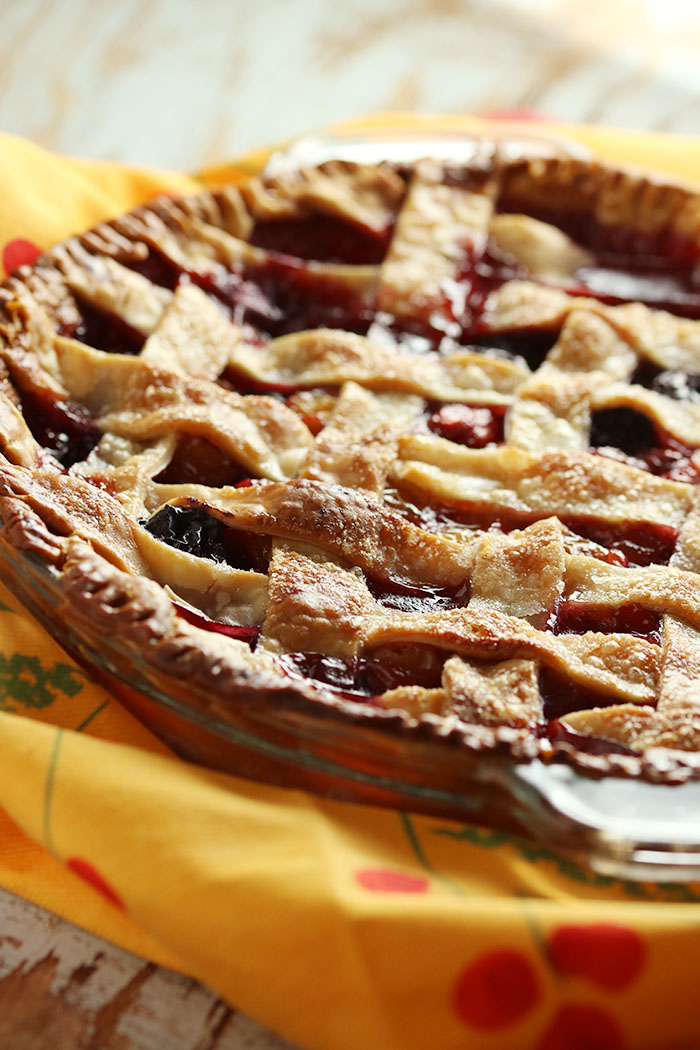
Double Crust Three Cherry Pie
- Dough for a double crust pie
- 6-7 cups of cherries, pitted (I like a combo of sweet and tart. If frozen, do not thaw)
- 1/2 cup sugar
- 3 Tablespoons cornstarch
- 1 Tablespoon lemon juice
- 1 teaspoon almond extract (wonderful flavor for both cherries and peaches)

Secret Weapons:
- Butter
- 1 egg white
- Splash of half & half or cream
- 1 Tablespoon sugar
- Glass pie plate, Pizza Stone
 & sheet pan
- Foil
Preheat the oven to 425oF with a pizza stone placed on a rack in the bottom third of the oven. Butter a 9 1/2” deep dish glass pie plate.
Rollout (or unfold) dough for the bottom crust. Fit into the pie plate, leaving any overhang. Brush the inside of the crust with enough egg white to coat. Roll out the top crust. Refrigerate both crusts until you are ready to use them.
Combine the cherries with the sugar, cornstarch, lemon juice and almond extract.
Remove the top crust from the refrigerator and cut into 3/4” wide strips.
Remove the bottom crust from the refrigerator and fill with the cherries. If any sugar mixture has settled in the bowl, sprinkle evenly on top of the cherries. Brush the outside edge of the crust with the remaining egg white and lay half the strips evenly across the top in one direction. Weave the remaining strips cross-wise ”pot-holder style”. Press the ends into the bottom crust around the outer edge and trim excess. Flute or crimp the edges.
Dot the top of the pie with butter, brush the lattice with cream and sprinkle with 1 Tablespoon sugar.
Lay a piece of foil on top of the pie (not tightly wrapped and not tented). This will help the fruit heat up faster and keep the crust from starting to brown too quickly. Place the pie on a foil-lined sheet pan and set on the pizza stone. After 15 minutes, remove the top foil. Continue baking until the crust is golden and the fruit is thickened and bubbly. Keep an eye on the crust color and cover outside edge with foil cut into a ring or entirely, as needed to slow down the crust color while the fruit thickens. This will take about an additional 45 -50 minutes.
Remove the pie from the oven and let it cool thoroughly on a wire rack to thicken up completely. Cut it too early and you have a juice bomb. If you want to serve it warm, reheat it at serving time.
Serves 8 – 10

This post contains affiliate links. For more of my must-have faves, check out my shop.
© Copyright: KatyKeck.com 2016. All rights reserved.
Hey, we want to hear from you!
Don’t forget to Comment below, Share & Subscribe to our blog.
Save
Save
Save
Save
Save
Save
Save
Save
Save
Save
Save
Save
Save
Save
Save
Save
Save
Save
Save
Save
Save
Save
Save
Save
Save
Save
Save
Save
Save
Save
Save
Save
Save
Save
Save
Save
Save
Save
Save
Save
Save
Save
Save
Save
Save
Save
Save
Save
Save
Save
Save
Save
Save
Save
Save
Save
Save
Save
Save
Save
Save
Save
Save
Save
Save
Save
Save
Save
Save
Save
Save
Save
Save
Save
Save
Save
Save
Save
Save
Save
Save
Save
Save
Save
Save
Save
Save
Save
Save
Save
Save
Save
Save
Save
Save
Save
Save
Save
Save
Save
Save
Save
Save
Save
Save
Save
Save
Save
Save
Save
Save
Mar 15, 2016 | Dinners & Mains, Pasta, Recipes, Savvy Kitchen Tips
After that fantastic morning cutting the cheese with the Cheese Lady (LadieS, original and 2.0), I wanted, no needed, to drill down on the “recipe cheeses” that Shelley was going on about. Yes, I do like to cook with cheese, but I also couldn’t be happier with a big spread, especially if there are raw milks in the mix. But after sharing my insights into the featured “recipe” cheeses in my last post, I turned around, drove back and bought even more, just for cooking. Mac & Cheese seemed like an easy and simple go to idea, but as you are probably noticing, I’m not one to let well enough alone. Okay, that’s not 100% true – I pendulum-swing from letting stellar ingredients shine (less is more) way across to an insane amount of add-ons (more is more). Have you already forgotten the Everything but the Farmer Farmer’s Market Salad? I rest my case. I’m sure there are good pharmaceuticals for this split personality, but I choose to go it alone and see what boils over each day’s pot.
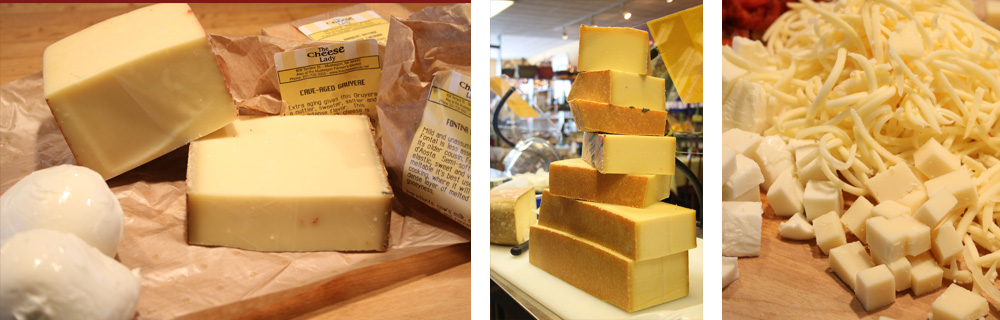
So this recipe is part Mac & Cheese 101 – including classic French béchamel technique – and part KMG – Katy Goes Mad …in this case, for Pimento Cheese. Two big drivers here: The Cheese Lady Muskegon sometimes has Zingerman’s Pimento Cheese. At the risk of telling you about it and creating a run on the stuff, it’s divine. The second is dear ole Dad. I think pimento cheese sandwiches were a staple his mother made – Grandmother Keck was quite the cook in the farm-girl-vegetable-soup-and-applesauce-by-the-vat-load-sort-of-way. Whatever his inspiration, he was super fond of the spread and, like me sourcing out the goods from Zingerman’s, he had his haunts. (I hate to admit that it was a Stuckey’s gas station on the highway south of Terre Haute….let’s just say this apple rolled a few acres after falling from that tree.) The notion of his love for “pimenna”, as he more or less Hoosier twanged it, lives on, and it wouldn’t be unheard of to find it served at an engagement party or stuffed on whole wheat and into your Christmas stocking – not because you’re dying for it but because it needs to be there. It’s the right thing to do. Some things you just don’t question.
There’s one more reason I’m keen to dose the mac & cheese in the southern way – a recent trip to Atlanta, trend-spotting for a client, had me in awe of the many uses of pimento cheese. From apps almost to dessert, I was hard pressed to find a joint without the ubiquitous spread in the 13 restaurants I visited in 36 hours. It was some kind of heaven and I’m sure my Pop was sitting nearby, somewhere on the right hand.
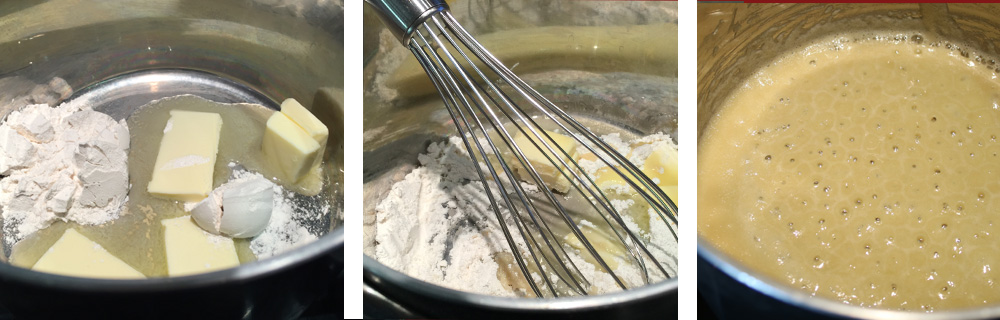
For the basics: The start to any classic flour-based sauce is a roux – equal parts flour and butter (or in the case of gravy, flour and meat or bird fat), generally used in equal portions. It’s always important to toast the flour, once the two are whisked together. That is what gives the sauce a cooked, somewhat nutty taste. For those that thicken pan drippings by whisking in flour at the end, there will always be a slightly raw flour taste. The longer you toast the roux, the deeper the color and flavor. Some gumbos will have it go all the way to a deep rich dark color. But Mac & Cheese is based on a white sauce, so for this the roux, we will only toast it until it just starts to bubble – about a minute or so.
No Shame in Measuring
I can eyeball proportions pretty well and often don’t measure but there is some chemistry at work here and there is no shame in measuring. A little precision will help ensure success. When making gravy at Thanksgiving, even I pour off all the pan drippings to see how much is fat and how much is broth – stay tuned for a Fall drill down on that. In a flat roasting pan, it’s damn hard to tell the ratio – pretty easy in a glass measuring cup when the fat floats.
The key proportions for a sauce of average thickness are:
- 1 Tablespoon Fat
- 1 Tablespoon Flour
- 1 cup liquid
Mac & Cheese is generally started with a white sauce or Béchamel. There you are speaking French again. You’re welcome! The addition of cheeses to this blond roux-thickened base turns Béchamel to Mornay. Add crayfish and you have Nantua Sauce. Sautéed Onions makes Soubise. And you can probably guess what makes Béchamel into Mustard Sauce. FYI, Bechamel is one of three of the five mother sauces that uses roux – so pay attention here! 1 T to 1 T to 1 Cup!
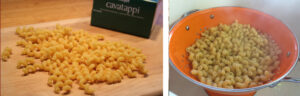
For a pound of pasta, you will need 3 to 4 cups of sauce. I make a mean turkey tetrazzini that uses spaghetti (not such a clingy noodle) and it seems to soak up about 3 cups of sauce. Since you are adding cheese to further thicken this sauce, I find Mac & Cheese with a curly, needy noodle like cavatappi will absorb closer to 4 cups. (Better safe than sorry – err on the “make-too-much” side). So who’s doing the math here? 4 Tablespoons (1/4 cup) butter, 4 T flour, 1 quart of milk.
After you finish the sauce, stir in grated cheese(s). I’m not bothered by the color here and chose white cheeses (high quality, of course: Fontina Fontal for its creaminess and ability to hold a sauce and Barber’s Cheddar for its edge). I realize that some of you can’t get over needing the bright yellow – but for the love of God, please use a quality yellow cheddar. Did you see that Kraft recently did the world’s biggest blind taste test? Assuming that fans would complain when they took out some dyes and non-natural additives, they secretly made the switch without changing the packaging (except ingredient list) and way ahead of schedule. Nobody noticed. I did feel pretty much affirmed on my comment last month that commercially produced turmeric “tasted – well, yellow” because Kraft used it in lieu of yellow dyes 5 and 6. I can promise you if the turmeric had tasted like ginger, as intended, someone would have noticed! But the unspoken fact still remains – even though these additives are so called natural, they are not natural to cheese. There is nothing wrong with a white sauce with white cheeses!

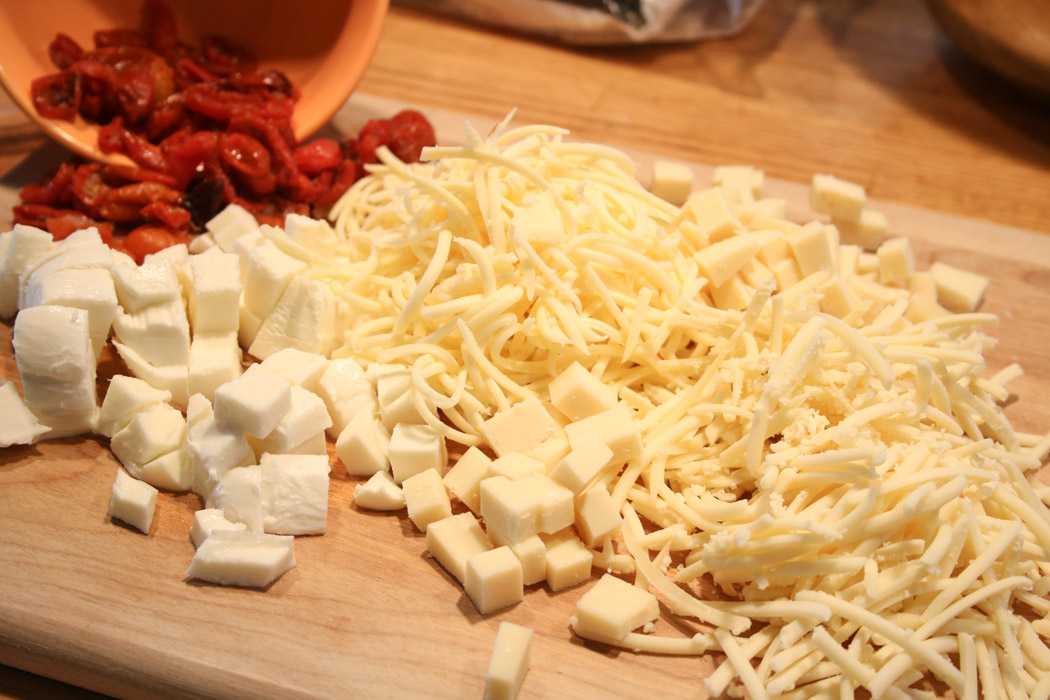
The other thing I like to do with the cheeses is grate some and cube the rest so you get pockets of cheesy goodness that melt and string as you pull. If you don’t like that (seriously, WHAT IS WRONG WITH YOU?), then either chop the cheeses more finely, or grate them all. With any of the grated cheeses, use a coarse grater. If you grate too finely (think green shakers of wood pulp/cellulose), the cheese “dust” won’t melt well and will cause the sauce to be a bit gritty. Nobody likes that! If you are using a variety of flavors like I am – or even more distinctive flavors, like a blue or pepper cheese….or blue with pepper (yes! Glacier Wildfire Blue!!!) – it’s really important to add the cheeses separately from the sauce so you get the distinct pops of flavor. If you only added them to the sauce, it would be a blended flavor and the strongest cheese wins. Not the goal! Layer! Layer! Layer!
I’m starting you out with the basics here and including the southern twist, but there are plenty of other ways to jack your mac, and I’ll ‘bring it’ in the future.
Ooey Gooey Mac & Cheese with Southern Twist (“pimenna cheese”)
Béchamel Sauce:
- 4 Tablespoons butter
- 4 Tablespoons flour
- 4 cups of milk
- 2 teaspoons salt
- ¼ teaspoon red pepper flakes, or more to taste
- 2 cups grated cheese (I used a combo of ¼ pound Fontina Fontal and ¼ pound Barber’s Cheddar)
Cheesy Goodness:
- 1 pound of cavatappi or curly noodle shape
- 2 fresh mozzarella balls, chopped ½” cubes
- ½ pound fontina fontal, grated
- ½ pound gruyere, ½ grated and ½ cubed
Jack your Mac Southern Style:
- ½ cup You’ll Thank Me in the Winter Oven-dried Tomatoes (or good quality sun-dried)
- ¼ cup chopped peppadew peppers
- 3 Tablespoons chopped chives, divided per below
- ½ cup panko bread crumbs
- ½ cup fried onion topping
- 1 Tablespoon of butter, for dotting
Make the Béchamel:
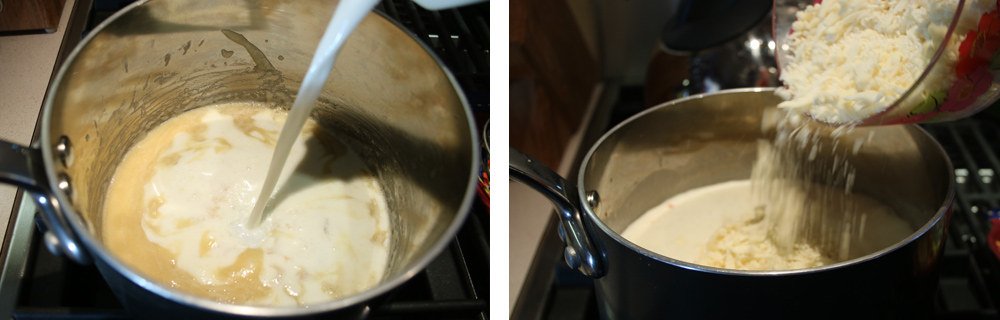
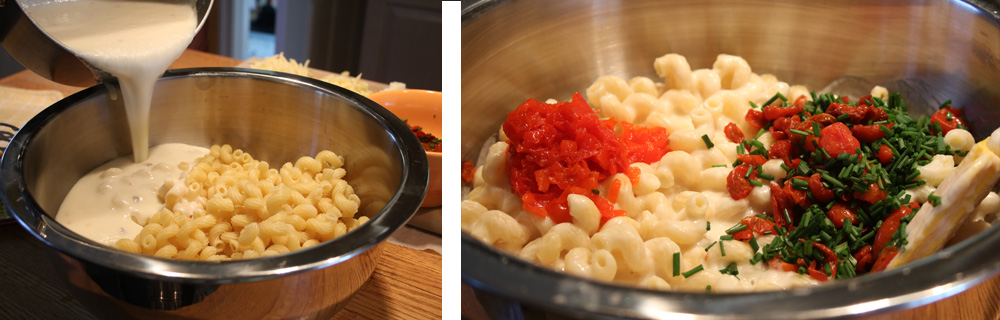
Melt the butter and whisk in the flour to make a roux, the texture of wet sand. Let it start to bubble and continue for one minute. Whisk in the milk and combine well. Add the salt and red pepper flakes. Simmer for 10 to 15 minutes until thickened, whisking from time to time to make sure the bottom does not stick. Add handfuls of the 2 cups of grated cheese and stir until melted.
Meanwhile cook the pasta according to package directions in salted boiling water, stopping about two minutes early. Drain and transfer to a mixing bowl.
Pour the cheese sauce over the warm pasta, using about ¾ quarters of the sauce to start. Stir until combined, adding additional sauce as desired. (You will likely want it all). Add the You’ll Thank Me in the Winter Oven Dried Tomatoes, peppadew and 2 Tablespoons of chives.
Preheat oven to 350oF.
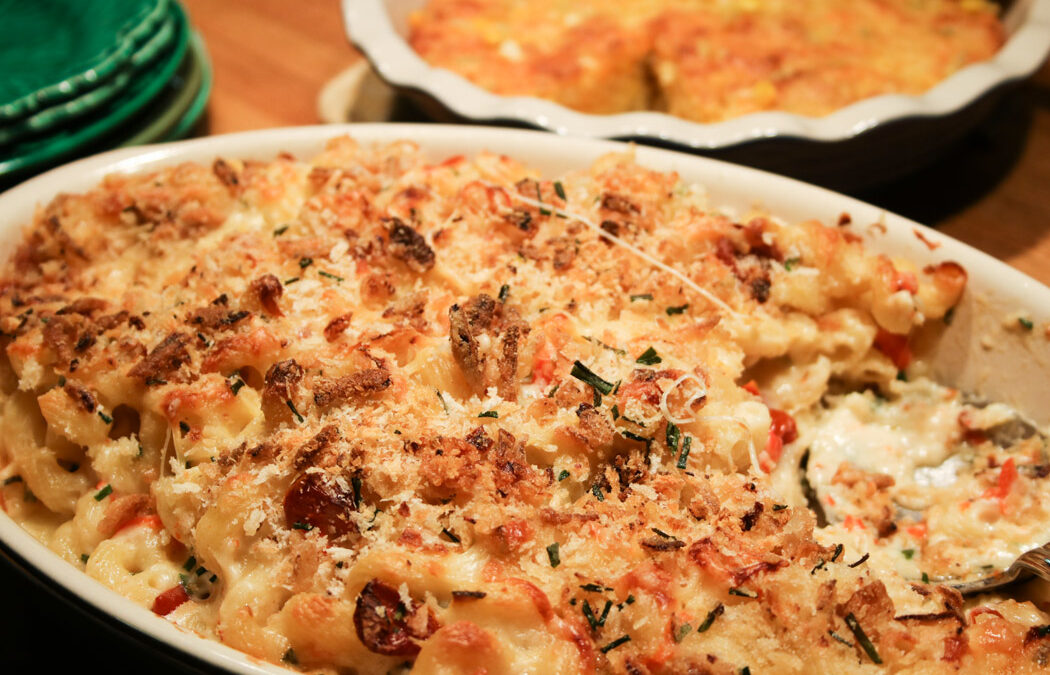
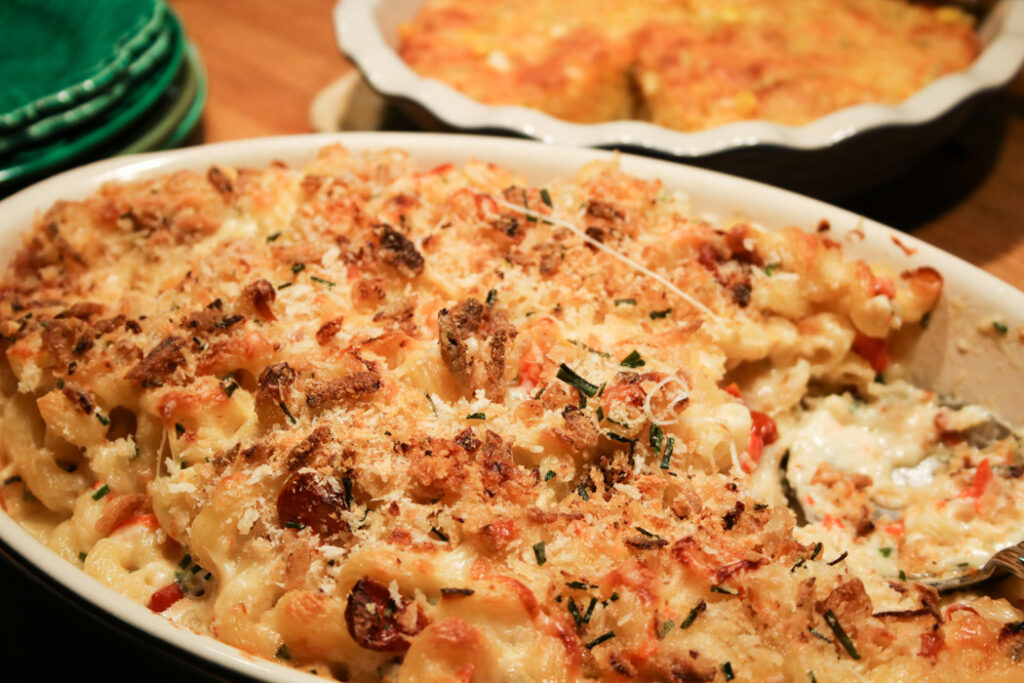
Transfer 3 cups of the sauced pasta to a buttered 3-quart casserole dish. Layer 1/3 of the remaining cheeses (the grated fontina, grated and chopped gruyere, and chopped mozzarella). Repeat with two more layers of pasta and cheese until all are used, ending with the cheeses.

Combine remaining Tablespoon of chopped chives, panko and fried onion topping in a small bowl. Sprinkle on top of the pasta and dot with butter.
Bake the assembled macaroni and cheese for 30-40 minutes until bubbly. Raise oven temperature to 450oF and bake an additional 7 to 10 minutes until top crisps up.
Serve hot and gooey!
Serves 6 as main, or 10 – 12 as side.
© Copyright: KatyKeck.com 2016. All rights reserved.
Hey, we want to hear from you!
Don’t forget to Comment below, Share & Subscribe to our blog.

Dec 7, 2015 | Dinners & Mains, Pot Lucky, Recipes, Savvy Kitchen Tips
Sawsuch sawsedge. That’s the way my Dad used to say it. Was he channeling his inner Brooklyn? Fuhgeddaboudit! He cracked himself up when he said it. But this tale isn’t really about sausage or sausage making, it’s about fun with friends. I must however make one quick sausage stop, a reverent moment to pay homage to the mother of all sausage experiences – the sausage bomb. I once had to work for the daughter of a famed crime boss. I would tell you who she was, but I’d have to kill you (read: they may kill me). You think I’m kidding, but when her brother died in a car/mini-bike accident, the car driver was “disappeared.” Have I said too much already? Anyway Princessa Mafiosa wrote a cookbook and Extra was filming a piece at her Lon G-Island mansion. I prepped what I could and took a car service to arrive a bit ahead of the appointed hour. They really hadn’t scheduled sufficient time for me to ready all the beauty food laid out in a magnificent “of course she did this herself” spread. When I knocked on the door of the palace, the circle drive strewn with obligatory black Escalades parked haphazardly Tony Soprano-style, my knock was greeted with a door slam and strict instructions to come back later. I had been doing this long enough to know how much work lay ahead and forceful enough to finesse my way inside, but I always wondered – at what cost?
The first recipe was a pasta dish that called for browning the sausage in 2 cups of olive oil, then adding 2 cups of cold water and a bouillon cube to the boiling oil. It was genius – take out the target without spilling any blood – sausage bomb ??? style. BOOM! I did have the good sense to retrieve my business card from the kitchen counter before leaving lest I find a horse head in my bed. Hopefully with a lovely Béarnaise sauce napping it just so.
But I digress – and still swear this really isn’t about sausage. It’s about hospitality. We’ve just survived the super bowl, the Oscars, and the New York marathon of all home entertaining events- Thanksgiving. It was no doubt stressful. Was the turkey too salty, too dry, too frozen? Did you really have to do it all by yourself? Time now to sit back and enlist the full team to make things happen, and have fun while doing it. I’m not just talking about a potluck people, I mean a real cooking party.
 I recently had the good fortune of spending the afternoon at a sausage party. This crowd takes their game meat seriously so we had a variety of flavors, including a beef heart sausage. (Stop it – your face is gonna freeze like that). But the one here is rabbit with dried cherries and toasted hazelnuts. The great thing about making your own sausage is that you have ultimate control over the seasonings and fat/meat ratio, eliminating all preservatives, while having great fun. Win. Win. Win.
One of my all-time favorite meat books is a seriously old cookbook by Jack Ubaldi. Jack owned the legendary Florence Prime Meat Market in New York’s Greenwich Village. He was a butcher’s butcher. A master of meat. When I came on the food scene, he had just sold it and was teaching. I took both butchering and knife skills from him. He changed my life when I learned that a bread knife is not to be used in a back and forth sawing motion, but rather cut on the forward movement, only dragging the knife back – without action – merely to re-position, so you can cut again on the next forward motion. Who knew? Jack.
Jack’s sausage technique became the base for our afternoon of sausage revelry. I arrived just as the sausage mix was being processed in a meat grinder. My Mom and Grandmothers had manual grinders that C-clamped to their counters. Today you can buy attachments for a variety of machines; I have the grinder attachment for my KitchenAid stand mixer.
 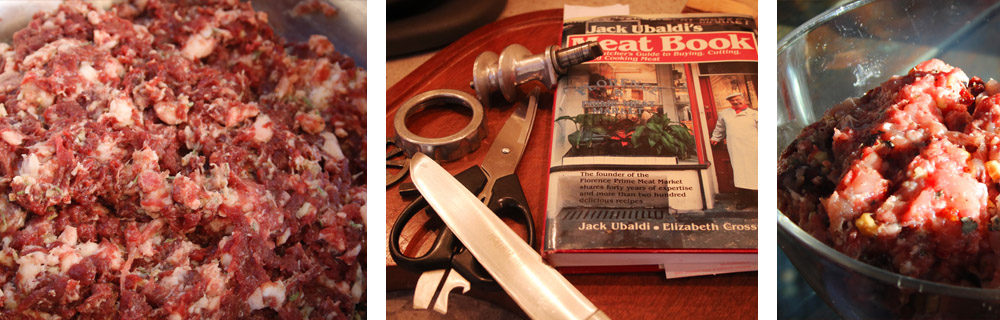 Here’s what we missed –
Fresh Rabbit Sausage with Dried Cherries and Toasted Hazelnuts:
- 2 pounds lamb, cut in chunks
- 2 pounds rabbit, cut in chunks
- 2 tablespoons kosher salt (if not kosher, at least coarse grain)
- 2 Tablespoons chopped garlic
- 1 teaspoon black pepper
- 1 teaspoon chopped marjoram
- 1 teaspoon chopped sage
- ¼ cup chopped dried cherries
- ¼ cup chopped toasted hazelnuts
- Casings, soaked – available from your butcher
Makes about 4 pounds of sausage, or approximately 12 links.
The general rule of thumb is 30% fat to 70% lean meat. If it’s too lean, it will be very dry; too fatty, the fat will render leaving a shriveled up sausage that is way too rich. This sausage was pretty lean, but lots of flavor. The meat went through the grinder with 3/8” plate, and the rest is stirred in by hand, first the seasonings, then the cherries and nuts. Knead by hand until the meat sticks together, about 5 minutes or so. The recipe and technique here are for a fresh sausage, meant to be cooked and enjoyed within a couple days. Drying sausage is a separate technique, which is no longer required for home cooks, now that we have fridges.
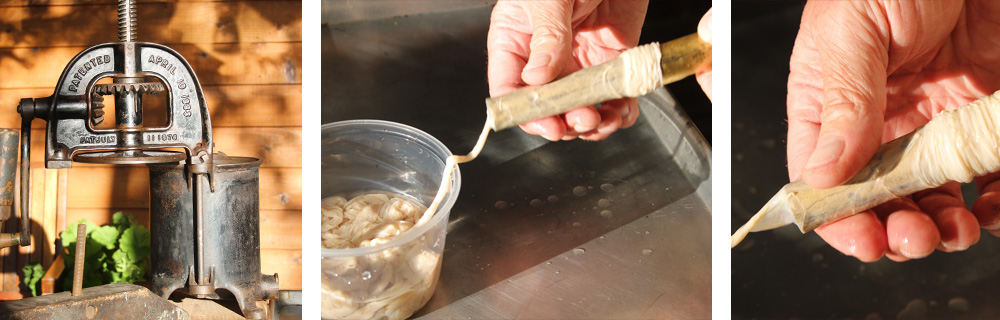 The casings you will find are generally hog. They are often sold packed in salt. If your butcher doesn’t carry them there are several online sources. About an hour before you start, you should soak the casings in warm water for about 30 minutes. After, run water through the casings, but do not squeeze. Then return them to a container, covered in tepid water. One pound of casings is about 50-60 feet long, and will pack 25 pounds of sausage, though it may be closer to 50 pounds. There is a fairly wide range in capacity because the diameter will vary. If you don’t use them all, wring out the excess water and pack again in salt and refrigerate in airtight container.
The real fun begins when the stuffing happens. My friends happen to own an antique stuffer, but in addition to the meat grinder attachment, my KitchenAid stand mixer has a Stuffing Attachment . You can always use a funnel for stuffing by hand. Thread the casings onto a wet funnel or stuffing tube until an inch of casing remains. Tie off the end.
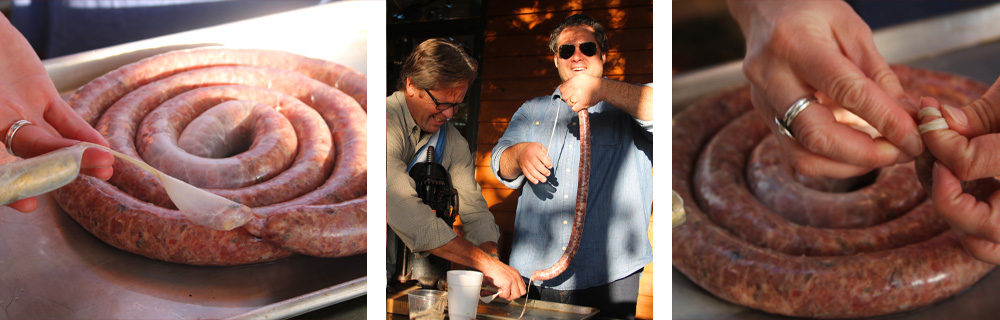 Add the meat to the hopper and push through. It helps here if you have octopus arms or a friend – one to man the sausage intake and one to manage the casing/stuffing output. Once you have filled a desired length, press gently to ease out any air, even the meat distribution, and make sure there is a little give – i.e. not too stuffed. Tie off this end. Continue filling additional lengths, until you have used all your meat mixture.
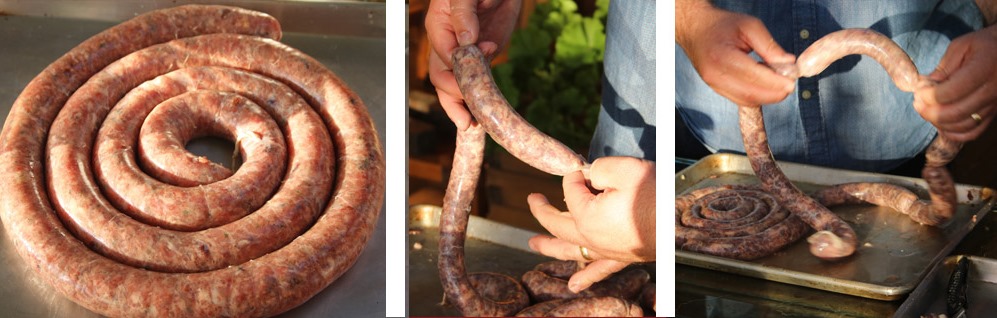 The next step is to make links: Pinch off a 4-5 inch section at each end and twirl like a jump rope to create an individual link. Generally all the links are kept attached to minimize the waste. At this point you can freeze, simmer, broil, or grill, but if you are like us, you will want them right away with a frosty beer. We threw them on the grill and cooked about 8-10 minutes per side.
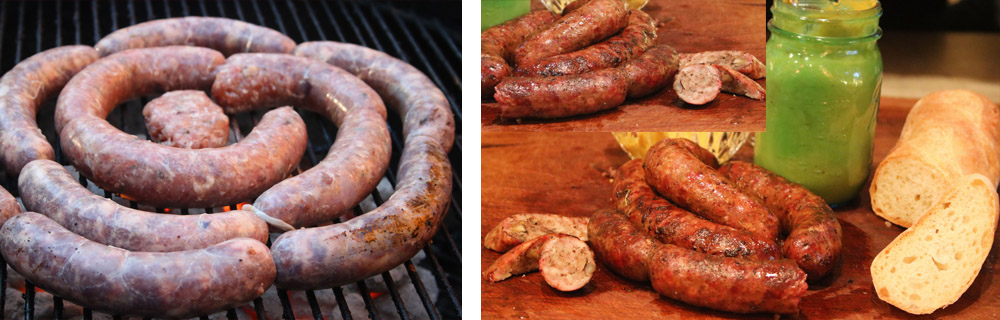 There are infinite ways you can customize this concept – fresh sausage, dry sausage, fruit, nuts, organs, animals, fish, veggie, etc. But this story is about camaraderie and spending the day with friends. We cracked a new jar of last season’s habanero mustard – sorry but this recipe is also a mob secret – and served it up with Amy and Todd’s butternut squash soup, topped with crispy bacon, shallots, and apples, then chased it with my gentleman jack pumpkin ginger cheesecake. Fat and happy!!!!
The next cooking party on the docket is a soup party. Stay tuned!
Where are they now? ChloElla J update
Okay you know where they are!!! It’s only been ten days. However, this update is worth reporting.
I do believe they have outdone themselves – December’s Cupcakes for a Cause were edible snow globes. Could they be a bit cuter????
 © Copyright: KatyKeck.com 2015. All rights reserved.
Hey, we want to hear from you!
Don’t forget to Comment below, Share & Subscribe to our blog.
Nov 21, 2015 | Holidays, Recipes, Savvy Kitchen Tips, Sides
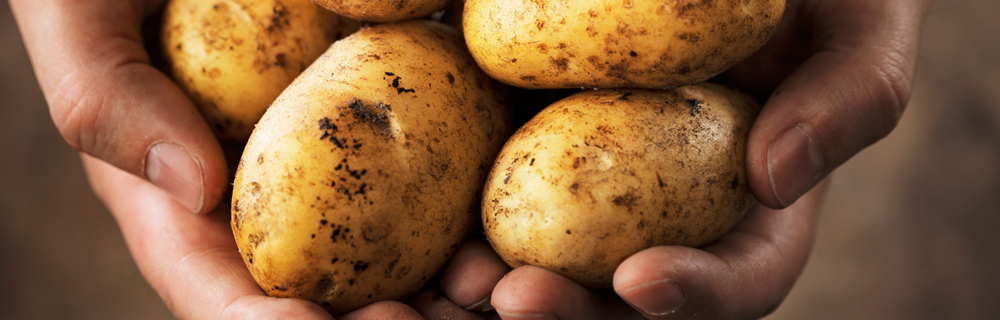
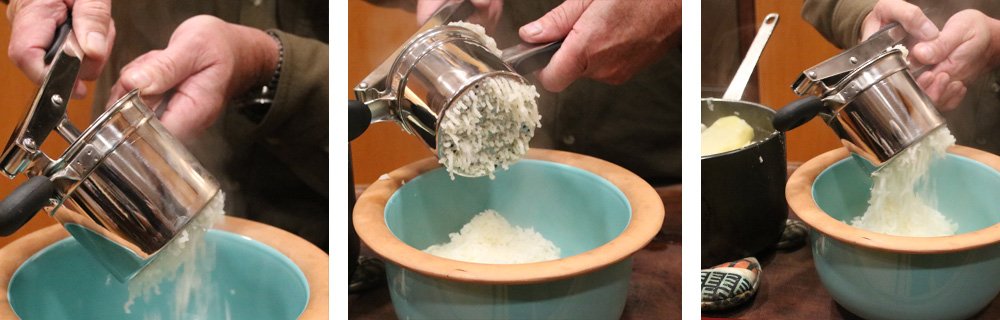
I’m not quite sure how I ever made it through to dessert all those years that I mashed potatoes with a – uh, masher. Oh sure, there was always a brother who made a mean mash with just the right amount of chunks left it. But in my family, the men (technically, THE MAN) were supposed to do the carving. That or keep the mimosas cold. The real magic, I think, behind having a potato ricer is that kids of all ages want to get involved. It’s like a giant garlic press and the potatoes come out all wormy and stuff. What’s not to love? And kids actually volunteering for food prep is win-win. Thank you, Ali Price!
I can’t tell you the exact date that I started my ricer love affair, but I remember the moment like it was yesterday. It was in the early years of New World Grill and I had a rare evening off and chose to dine at the James Beard house. I couldn’t tell you who was in the kitchen, but I remember clearly being seated with Nicole Routhier, author of beautiful books on Vietnamese food, and Florence Fabricant of the NY Times. There was breaking news and Florence arrived a bit late. As she settled in, Florence talked about an upcoming dinner that she and Frank Prial, NY Times’ wine writer, were hosting to benefit the NY Public Library. For a good number of years, the Times offered these magical dinners – which today would be auctioned online and raise a ton of money in minutes – for a flat ticket price, all proceeds to support NYPL. Florence and Frank always offered FOOD & WINE, Times style. There were other dinners, hosted by famous people, all over town at the exact same time. I was most intrigued by Calvin Trillin’s. He invited the guests into his home and served take-out – or to be more precise, the best Chinese take-out NY had to offer. He had stationed minions all over Chinatown, striking with military precision to bring each dish, the most iconic offering from each restaurant, one by one, on a carefully calculated timetable (“…..like the Entebbe raid”………according to the Times) to be served at the precise moment of each dish’s peak.
I asked who was cooking for Florence and Frank’s party and she said she was – of course. I offered to do the event-time cooking to finish off her prep, so she could be with the guests. To say she was skeptical would be an understatement. She did know who I was and had already written about New World Grill, but I was a newbie. Nicole insisted she take me up on the offer. I left knowing the date and time but little else. I doubt I even thought to panic until the week before. Then, total anxiety set in. Especially when I found out she was making Terence Brennan’s short ribs and mashed potatoes for the main, or more accurately she was making Terence Brennan’s short ribs and I was making mashed potatoes. Sure sure sure – it seems simple, but the simplest food is always an acid test of one’s cooking ability. Did you see The 100-Foot Journey? Helen Mirren had her acid test dish to confirm Chef’s talent – and it was seemingly simple. Same deal for Florence’s potatoes – under-season the water, turn the mash to glue, too wet, too dry, too bland – the stakes were incredibly high. To make matters worse – or as it turns out better – she had forgotten her ricer, “whatever that was”, I thought. She called her husband to bring it over and then handed it off to me. Luckily it didn’t come with –nor need – an owner’s manual. I had this. Salted water to cook, white pepper and a lot of butter to finish. Thankfully my performance was worthy of an invitation to greet the guests and a hug from Florence, neither of which were expected. Johnny Carson himself might as well have invited me to the couch. Thank you, ricer.
Incidentally, Florence also introduced me that night to Indiana’s goat cheese producer – Judy Schad of Capriole Farms. After the short rib course, there was a salad with fuyu persimmon and Wabash Cannonball cheese from Capriole Farms. Seriously – I need to get out more.
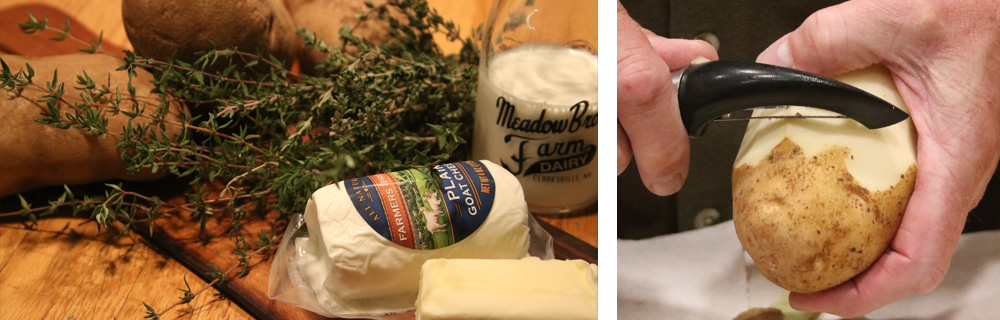
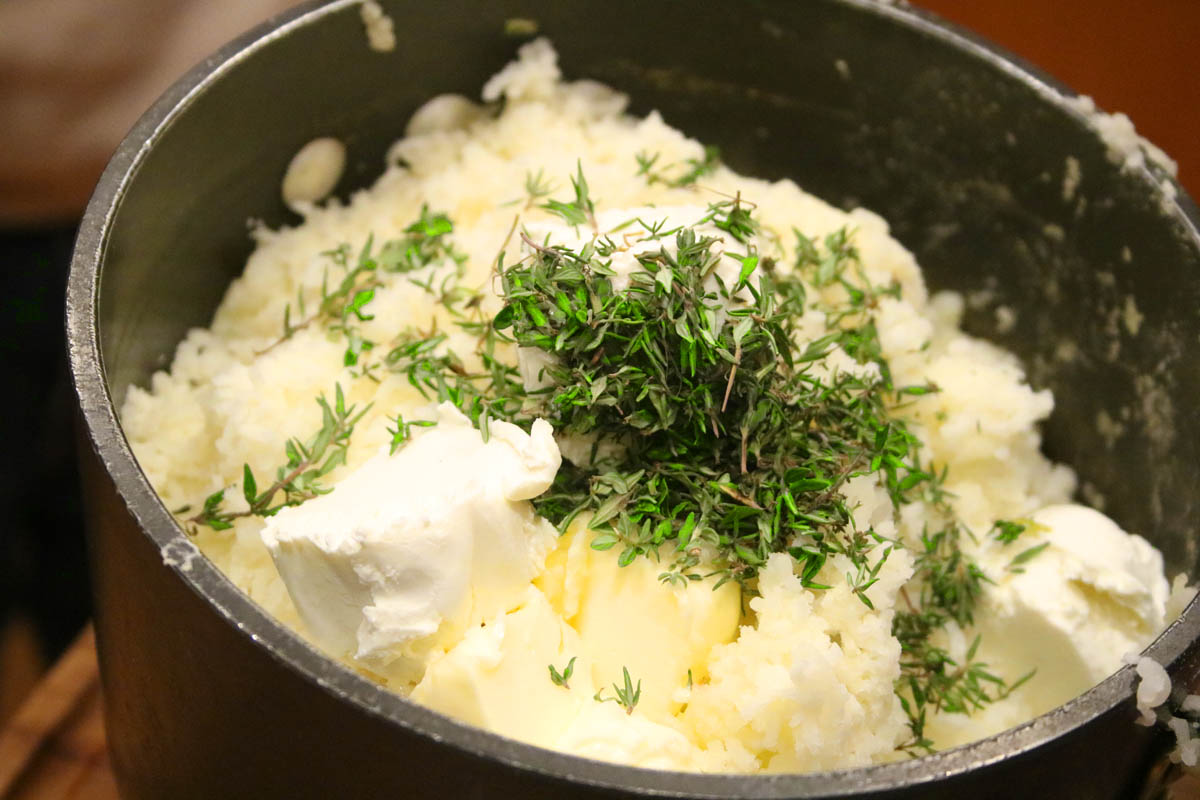
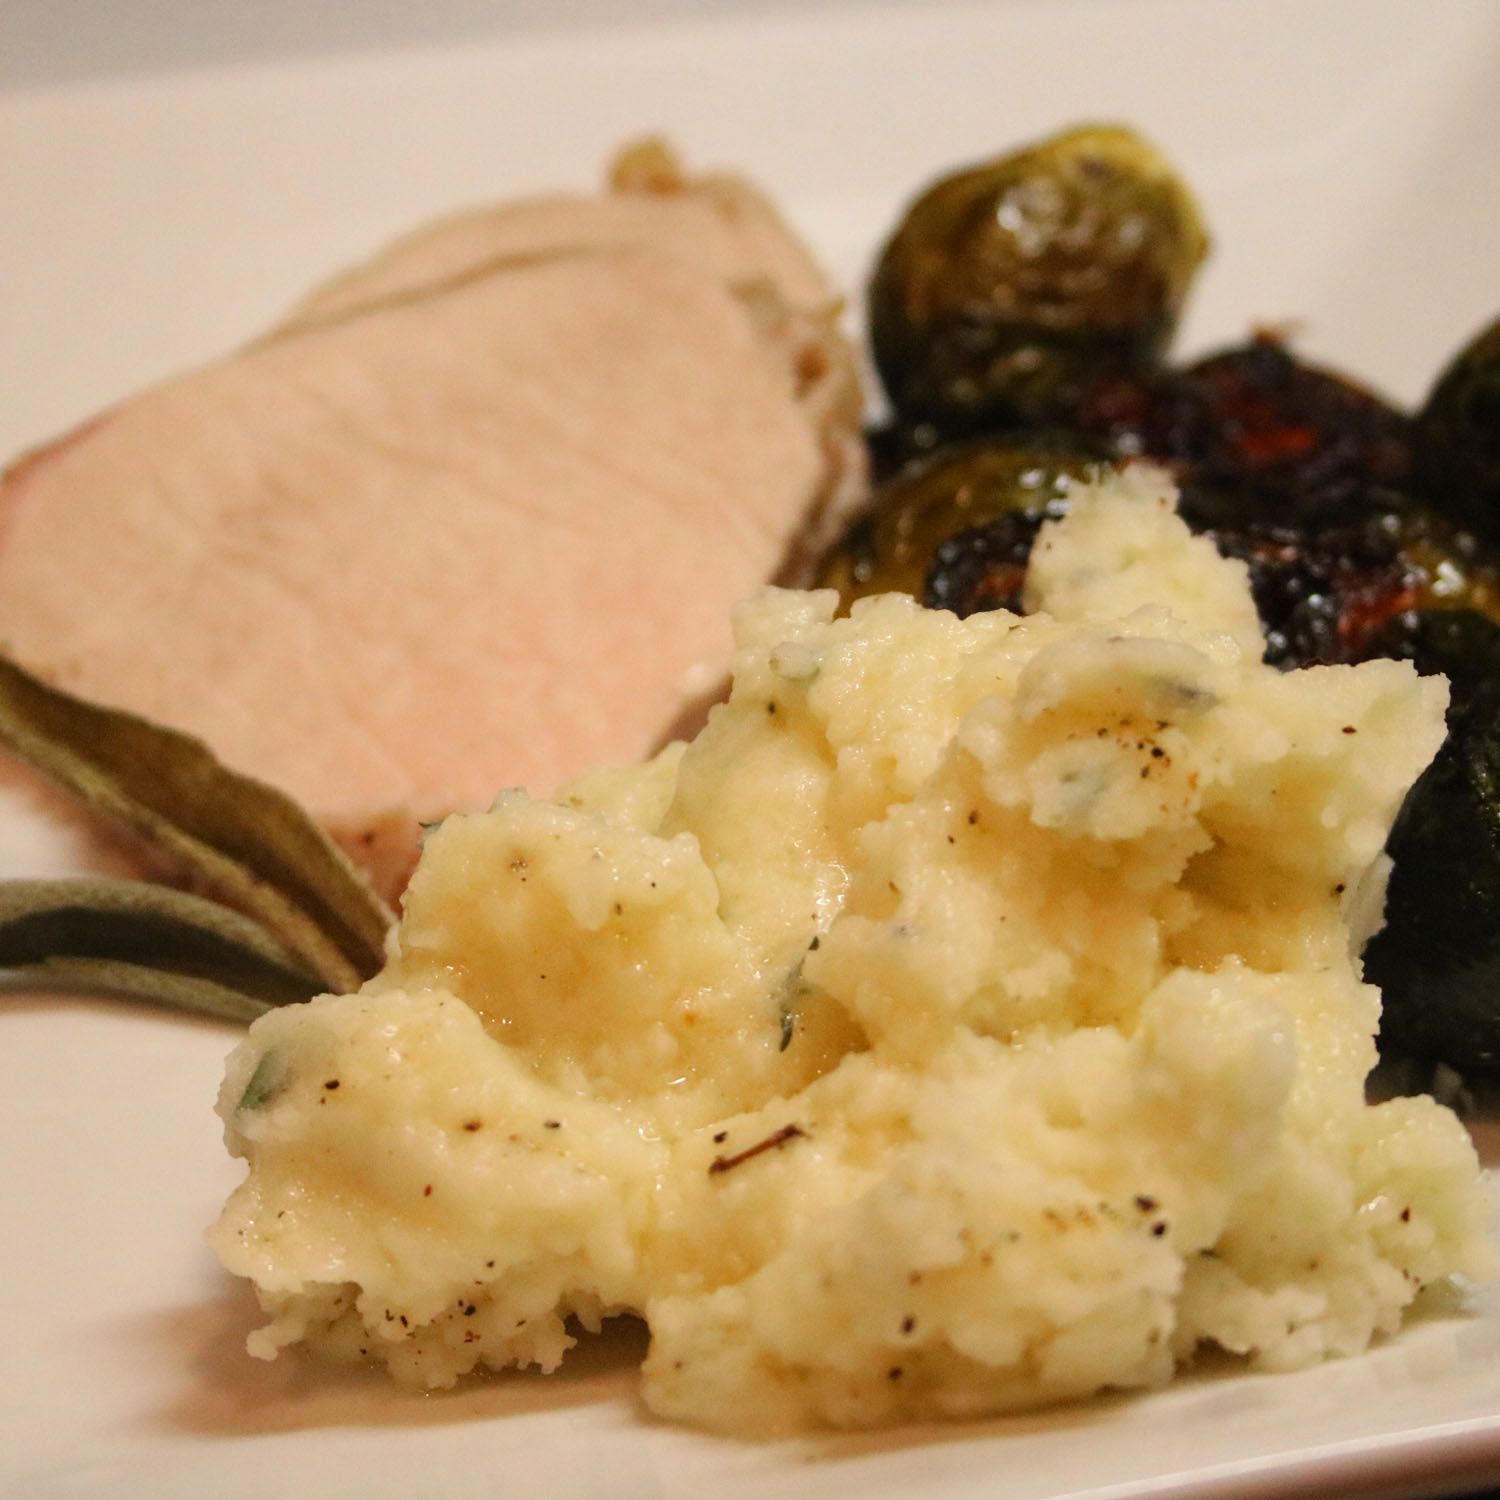
Perfect Mashed Potatoes
Mashed potatoes are an excellent blank slate for seasoning as you like. A few posts ago, I used the pistachio pesto recipe to flavor the riced potatoes. Today I am adding fresh goat cheese and thyme. But while using a ricer is simple and flawless, potatoes cooked like this are best mashed to order, so dedicating the burner and the last minute attention may be more than you can swing at a stove-intensive holiday like Thanksgiving.
Fear not – there is a great make-ahead mashed potato recipe in Rick Rodger’s Big Book of Sides (I get credit for the recipe, but truth is I stole it from my sister-in-law.) Rick’s books (including The Turkey Cookbook: 138 New Ways to Cook America’s Favorite Bird
 and Thanksgiving 101
 ) are right up there with ricers in the Thanksgiving must-haves.
Ingredients:
- 4 Russet potatoes, about 3 pounds, peeled, quartered, and covered in water
- ½ cup milk, half and half or cream, warmed (microwave is fine)
- 4 ounces fresh goat cheese, cut in chunks
- 3 Tablespoons butter, cut in chunks
- 3 Tablespoons fresh thyme leaves
- sea salt and freshly ground pepper
Put the potatoes in a large pot, season with 2 Tablespoons salt and cover with cold water. Bring to a boil and cook until the potatoes release easily when pricked with a fork, about 15-20 minutes. Drain well.
Press the potatoes through a Potato Ricer into a bowl.
Add about half the milk, as well as the goat cheese and butter. Stir until mixed, adding more milk, as needed to desired texture.
Add the fresh thyme and season with salt and pepper.
Garnish with pats of butter and sprigs of thyme.
Serves 4-6 – depending on how serious (About Mashed Potatoes!!) you are.
© Copyright: KatyKeck.com 2015. All rights reserved.
Hey, we want to hear from you!
Don’t forget to Comment below, Share & Subscribe to our blog.